Let's talk about how to use the Amap API in vue3
When we used Amap, the official recommended many cases to us, demo, but these cases all used native methods to access and did not provide vue or Many people have written about react’s demo and vue2’s access to the Internet. Let’s take a look at this article vue3 How to use the commonly used Gaode mapapi, I hope it will be helpful to everyone!

Pre-work
We need to understand before development
vue3Medium access to high Several steps for German map
- First install the package and introduce
npm i @amap/amap-jsapi-loader --save
import AMapLoader from '@amap/amap-jsapi-loader'
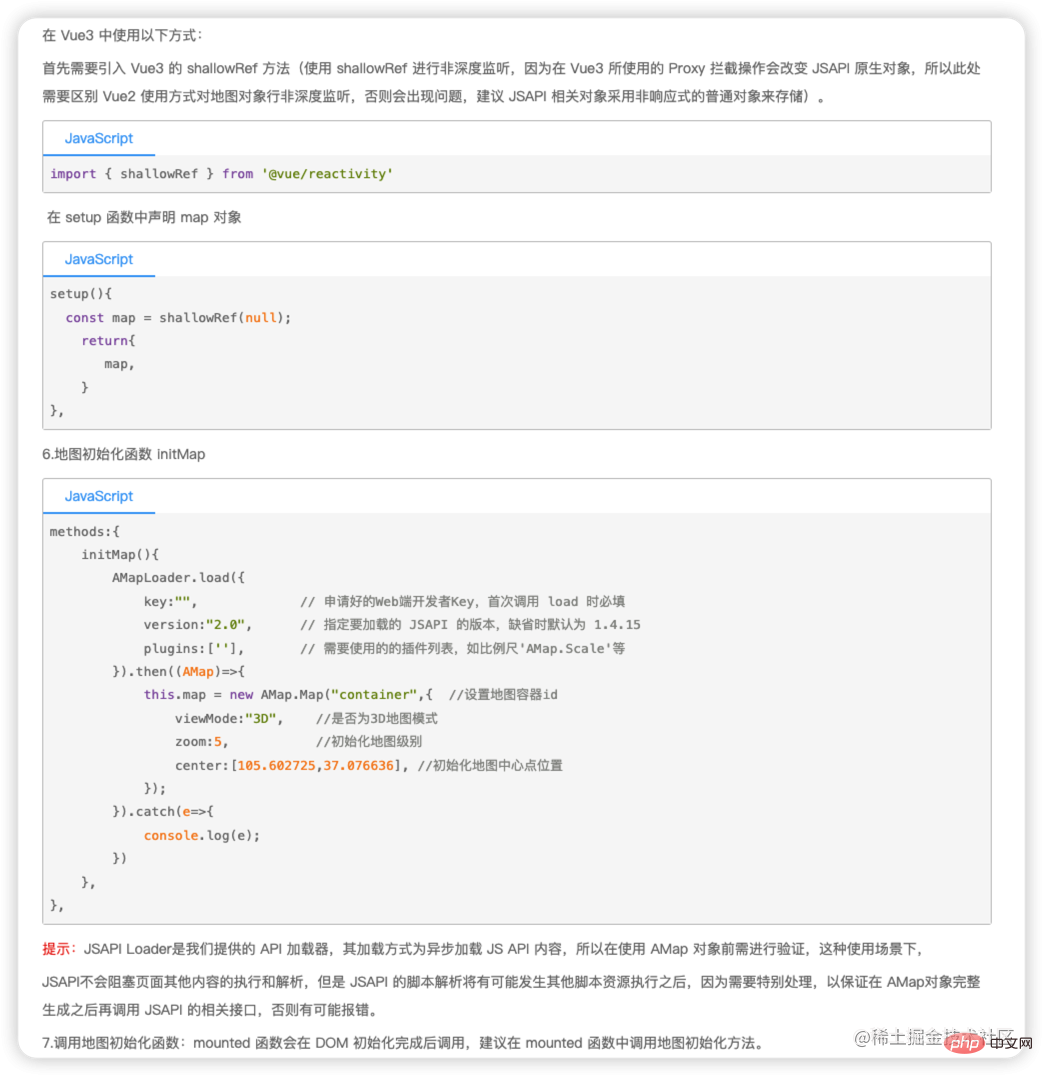
Use the official introduction method There is a difference between adding

vue2 and vue3, here we use vue3, But the method of vue3 here is still optional, not combined. When I wrote it myself, I used combined type and integrated ts. I will publish the complete later. When creating the .vue file, the ts on the label will be removed, because the type is not yet complete, and the changes will be posted after it is completed later. Why use shallowRef The official also gave an explanation. [Related recommendations: vuejs video tutorial, web front-end development]
Sample module
Here I will directly I took the business logic of the map business requirements that I wrote earlier and introduced it directly into an html file without using a framework. You can click on the link below to view:
Use of Amap jsApi
Point and line configuration of Gaode map jsApi
Right-click setting of Gaode map jsApi
New point position of Gaode map jsApi Add
Amap jsApi legend
When usingvue3, the instantiation method,thisproblem, and insertion When using string templates, the way of event response needs to be changed, which is still very troublesome
模块的引入
- 首先导入的方式,和官网一样,后面我会贴完整代码, 这里我们使用
plugins加载插件, 其他配置如Loca, 直接进行配置, 这里需要注意版本问题, 写成 ‘2.0’ 是不行的,初始化函数在onmounted生命周期中执行。 - AMap存储 这里我做了很多存储,大家知道
.value的语法是vue3获取ref的语法,我下面使用到的 都是ref,后面完整代码可以查看, 这里挂载的时候直接存一下,因为很多工具方法都会只用到他,这里后期业务逻辑我会抽离到pinia中去,所以不需要在初始化函数中写全部的业务逻辑。 - 模版样式不生效问题, 我们在使用的时候, 就像我之前写的文章,点位新增的时候,我们会插入
content字符串模版,替换点样式,这里有两种方案修改样式,一种是 插入DOM,不使用字符串,然后在DOM上通过style直接修改样式,另一种就是使用模版的时候直接给class类名,但是这种样式如果我们给vue的style加了scoped就不会生效,这里大家可以自己灵活选择用哪种,我这里暂时先使用模版的方式,去掉了scoped。 - 图例, 图例这里除了导入的时候,需要配置一下,使用上来说变化不大,样式的修改还是复用了我之前的逻辑。
import AMapLoader from '@amap/amap-jsapi-loader'

const initMap = () => {
  AMapLoader.load({
    key: 'b59c490f61a694b9d7576dd864f74d6e', // 申请好的Web端开发者Key,首次调用 load 时必填
    version: '2.0', // 指定要加载的 JSAPI 的版本,缺省时默认为 1.4.15
    plugins: ['AMap.Scale', 'AMap.ToolBar', 'AMap.MouseTool'], // 需要使用的的插件列表,如比例尺'AMap.Scale'等
    Loca:{
      version:'2.0.0'
    }
  })
    .then((res) => {
      AMap.value = res
      // 上来就显示的中心点  北京 116.397, 39.918
      var lnglat = new res.LngLat(105, 38)
      map.value = new res.Map('container', {
        //设置地图容器id
        viewMode: '3D', //是否为3D地图模式
        zoom: 5, //初始化地图级别
        center: lnglat, //初始化地图中心点位置
      })
      map.value.clearMap() // 清除地图覆盖物
      // 地图是否可拖拽和缩放
      map.value.setStatus({
        dragEnable: true, // 是否可拖拽
        zoomEnable: true, // 是否可缩放
      })

      initWindow()
      // 添加一些分布不均的点到地图上,地图上添加三个点标记,作为参照
      coordData.forEach(function (marker) {
        setMarker(marker)
      })

      let renderLine = setLine(coordData)
      // 设置线
      let polyline = renderLine.reduce((prev, item, index) => {
        let weight = item.type === 1 ? 5 : 3
        let color = item.type === 1 ? headColors[0] : headColors[1]
        prev.push(setLines(item.current, color, weight))
        return prev
      }, [])
      map.value.add([...polyline]) // 绘制线
      //创建右键菜单
      menuInstance.value = new ContextMenu(map.value)
      let loca = new Loca.Container({
          map:map.value,
      });
      window._loca = loca;

      // 图例, 图例可以实例化多个,使用定位来设置位置
      let lengend = new Loca.Legend({
          loca: loca,
          title: {
              label: '管道类型',
              fontColor: 'rgba(255,255,255,1)',
              fontSize: '16px'
          },
          style: {
              backgroundColor: 'rgba(255,255,255,0.2)',
              left: '20px',
              bottom: '40px',
              fontSize: '12px'
          },
          dataMap: [
              { label: '省级管道', color: headColors[1] },
              { label: '县级管道', color: headColors[0] },
          ],
      });

      //修改图例排列方式
      document.getElementsByClassName("amap-loca loca-controls")[0].setAttribute('id', 'testid')
        var lis = document.querySelectorAll("#testid li");
        for (var i = 0; i < lis.length; i++) {
          console.log(lis[i]);
          lis[i].setAttribute("class", 'test'
          );
      }
    })
    .catch((e) => {
      console.log('error', e)
    })
}
onMounted(() => {
  initMap()
})
右键菜单
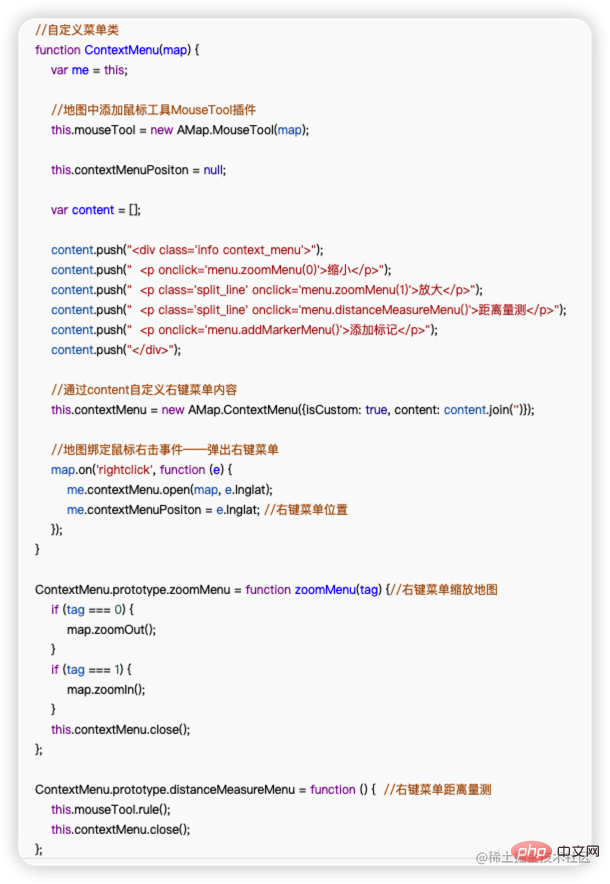
右键菜单, 右键菜单这里官方给我们的示例是使用一个 函数 进行实例化,里面使用了
this, 所以这个我单独拿出来,首先我们看一下官方的 demo

- 这里使用了一个函数,但这个函数还不是类,但是他却在里面使用了
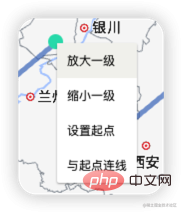
this,实话来讲,这种写法确实不是很优秀,可扩展性很差,不够健壮,但没办法,谁让我们用了人家的东西呢是吧, 在vue3中这么用就不可以了,首先vue3里面使用this就不是官方建议的, 另外这里面还修改了函数原型上的方法,其实我得代码里面一共有两种右键菜单,如下:


一种是在指定点位上打开,另一种是在非点位的空白处打开,指定点位处打开的其实叫信息窗体,只不过是通过右键的方式触发,那个没有上面这个右键菜单麻烦。
- 首先来说
this问题, 这里的this实际上就是把我们的实例化对象挂载到上面而已,vue3中没办法像vue2那样使用this, 但也提供给我们了api来获取当前组件的实例化对象, 然后我没用使用函数, 使用了一个类,类构造这个方法, 模版也不适用字符串模版,因为这里字符串模版的事件绑定写死了,我们使用DOM来动态绑定事件,代码如下:
const { ctx } = getCurrentInstance()
const _this = ctx
//自定义菜单类
class ContextMenu {
  constructor(map) {
    var me = _this
    //地图中添加鼠标工具MouseTool插件
    _this.mouseTool = new AMap.value.MouseTool(map)
    _this.contextMenuPositon = null
    const fragment = document.createElement('div') // 使用 DOM 方式, 方便添加事件
    fragment.className = 'info context_menu'
    const p = document.createElement('p')
    p.addEventListener('click', this.delMarkerMenu)
    p.textContent = '移除上次选中信息'
    fragment.appendChild(p)
    //通过content自定义右键菜单内容
    _this.contextMenu = new AMap.value.ContextMenu({
      isCustom: true,
      content: fragment,
    })
    //地图绑定鼠标右击事件——弹出右键菜单
    map.on('rightclick', function (e) {
      me.contextMenu.open(map, e.lnglat)
      me.contextMenuPositon = e.lnglat //右键菜单位置
    })
  }
  delMarkerMenu() {
    // 右键菜单上次选中点的信息
    clearPoint()
    _this.mouseTool.close()
    _this.contextMenu.close()
  }
}
完整代码
添加选点请输入坐标
- 这里的业务逻辑还不完善, 输入部分的交互逻辑没有完成, 这个文件直接引入自己的项目,安装一下上面说过的依赖, 就可以使用,不过这里数据源需要自己根据自己的数据来构造就可以了,我引入的事
data中的一组假数据,在这里给大家两组看一下
export const coordData = [
  {
    name: '黑龙江',
    position: [127, 47],
    pointData: {
      out: 100,
      provide: 10,
    },
    line: [
      {
        current: [
          [127, 47],
          [126, 43],
        ],
        type: 1,
      },
    ],
  },
  {
    name: '吉林',
    position: [126, 43],
    pointData: {
      out: 120,
      provide: 11,
    },
    line: [
      {
        current: [
          [126, 43],
          [113, 41],
        ],
        type: 1,
      },
    ],
  },
]- 后面我会把业务逻辑抽离到
pinia中, 并且完善ts类型, 大家对哪一部分有疑问或者更好的解决方案可以留言一起学习~
The above is the detailed content of Let's talk about how to use the Amap API in vue3. For more information, please follow other related articles on the PHP Chinese website!

Hot AI Tools

Undress AI Tool
Undress images for free

Undresser.AI Undress
AI-powered app for creating realistic nude photos

AI Clothes Remover
Online AI tool for removing clothes from photos.

Clothoff.io
AI clothes remover

Video Face Swap
Swap faces in any video effortlessly with our completely free AI face swap tool!

Hot Article

Hot Tools

Notepad++7.3.1
Easy-to-use and free code editor

SublimeText3 Chinese version
Chinese version, very easy to use

Zend Studio 13.0.1
Powerful PHP integrated development environment

Dreamweaver CS6
Visual web development tools

SublimeText3 Mac version
God-level code editing software (SublimeText3)
 PHP and Vue: a perfect pairing of front-end development tools
Mar 16, 2024 pm 12:09 PM
PHP and Vue: a perfect pairing of front-end development tools. In today's era of rapid development of the Internet, front-end development has become increasingly important. As users have higher and higher requirements for the experience of websites and applications, front-end developers need to use more efficient and flexible tools to create responsive and interactive interfaces. As two important technologies in the field of front-end development, PHP and Vue.js can be regarded as perfect tools when paired together. This article will explore the combination of PHP and Vue, as well as detailed code examples to help readers better understand and apply these two
 Graphviz Tutorial: Create Intuitive Data Visualizations
Apr 07, 2024 pm 10:00 PM
Graphviz is an open source toolkit that can be used to draw charts and graphs. It uses the DOT language to specify the chart structure. After installing Graphviz, you can use the DOT language to create charts, such as drawing knowledge graphs. After you generate your graph, you can use Graphviz's powerful features to visualize your data and improve its understandability.
 Exploring Go language front-end technology: a new vision for front-end development
Mar 28, 2024 pm 01:06 PM
As a fast and efficient programming language, Go language is widely popular in the field of back-end development. However, few people associate Go language with front-end development. In fact, using Go language for front-end development can not only improve efficiency, but also bring new horizons to developers. This article will explore the possibility of using the Go language for front-end development and provide specific code examples to help readers better understand this area. In traditional front-end development, JavaScript, HTML, and CSS are often used to build user interfaces
 Vue.js vs. React: Project-Specific Considerations
Apr 09, 2025 am 12:01 AM
Vue.js is suitable for small and medium-sized projects and fast iterations, while React is suitable for large and complex applications. 1) Vue.js is easy to use and is suitable for situations where the team is insufficient or the project scale is small. 2) React has a richer ecosystem and is suitable for projects with high performance and complex functional needs.
 Visualization technology of PHP data structure
May 07, 2024 pm 06:06 PM
There are three main technologies for visualizing data structures in PHP: Graphviz: an open source tool that can create graphical representations such as charts, directed acyclic graphs, and decision trees. D3.js: JavaScript library for creating interactive, data-driven visualizations, generating HTML and data from PHP, and then visualizing it on the client side using D3.js. ASCIIFlow: A library for creating textual representation of data flow diagrams, suitable for visualization of processes and algorithms.
 Questions frequently asked by front-end interviewers
Mar 19, 2024 pm 02:24 PM
In front-end development interviews, common questions cover a wide range of topics, including HTML/CSS basics, JavaScript basics, frameworks and libraries, project experience, algorithms and data structures, performance optimization, cross-domain requests, front-end engineering, design patterns, and new technologies and trends. . Interviewer questions are designed to assess the candidate's technical skills, project experience, and understanding of industry trends. Therefore, candidates should be fully prepared in these areas to demonstrate their abilities and expertise.
 Combination of Golang and front-end technology: explore how Golang plays a role in the front-end field
Mar 19, 2024 pm 06:15 PM
Combination of Golang and front-end technology: To explore how Golang plays a role in the front-end field, specific code examples are needed. With the rapid development of the Internet and mobile applications, front-end technology has become increasingly important. In this field, Golang, as a powerful back-end programming language, can also play an important role. This article will explore how Golang is combined with front-end technology and demonstrate its potential in the front-end field through specific code examples. The role of Golang in the front-end field is as an efficient, concise and easy-to-learn
 Is vue.js hard to learn?
Apr 04, 2025 am 12:02 AM
Vue.js is not difficult to learn, especially for developers with a JavaScript foundation. 1) Its progressive design and responsive system simplify the development process. 2) Component-based development makes code management more efficient. 3) The usage examples show basic and advanced usage. 4) Common errors can be debugged through VueDevtools. 5) Performance optimization and best practices, such as using v-if/v-show and key attributes, can improve application efficiency.


