
CommonJs. If you haven’t read it yet, you can find the column where this article is located to learn.CommonJshas many excellent features, let’s briefly review them below:Module code only runs after loading;
The module can only be loaded once;
The module can request to load other modules;
Supported Circular dependencies;
Modules can define public interfaces, and other modules can observe and interact based on this public interface;
Es Moduleis unique in that it can be loaded natively through the browser or with third-party loaders and build tools.Es modulemodules can load the entire dependency graph from the top-level module, and it is done asynchronously. The browser will parse the entry module, determine the dependencies, and send a request for the dependent module. After these files are returned over the network, the browser will resolve their dependencies, and if these secondary dependencies have not been loaded, more requests will be sent.Es Modulenot only borrows many excellent features ofCommonJsandAMD, but also adds some new behaviors:Es Moduleis executed in strict mode by default;
Es Moduledoes not share the global namespace;
Es ModuleThe value of the top-levelthisisundefined(regular script iswindow);
Thevardeclaration in the module will not be added to thewindowobject;
##Es Moduleis loaded and executed asynchronously;
andimport. Thecommand is used to specify the external interface of the module, and theimportcommand is used to import the functions provided by other modules.export const nickname = "moment"; export const address = "广州"; export const age = 18;
const nickname = "moment"; const address = "广州"; const age = 18; export { nickname, address, age };
export function foo(x, y) { return x + y; } export const obj = { nickname: "moment", address: "广州", age: 18, }; // 也可以写成这样的方式 function foo(x, y) { return x + y; } const obj = { nickname: "moment", address: "广州", age: 18, }; export { foo, obj };
is the original name, but can be renamed using theaskeyword.const address = "广州"; const age = 18; export { nickname as name, address as where, age as old };
export default "foo"; export default { name: 'moment' } export default function foo(x,y) { return x+y } export { bar, foo as default };
if(true){ export {...}; }
Must provide an external interface:// 1只是一个值,不是一个接口export 1// moment只是一个值为1的变量const moment = 1export moment// function和class的输出,也必须遵守这样的写法function foo(x, y) { return x+y }export foo复制代码
command to define the external interface of the module, other js files can be loaded through theimportcommand The entire moduleimport {foo,age,nickname} from '模块标识符'
The command accepts a curly bracket, which specifies the variable name to be imported from other modules, and the variable name must be the same as the name of the external interface of the imported module.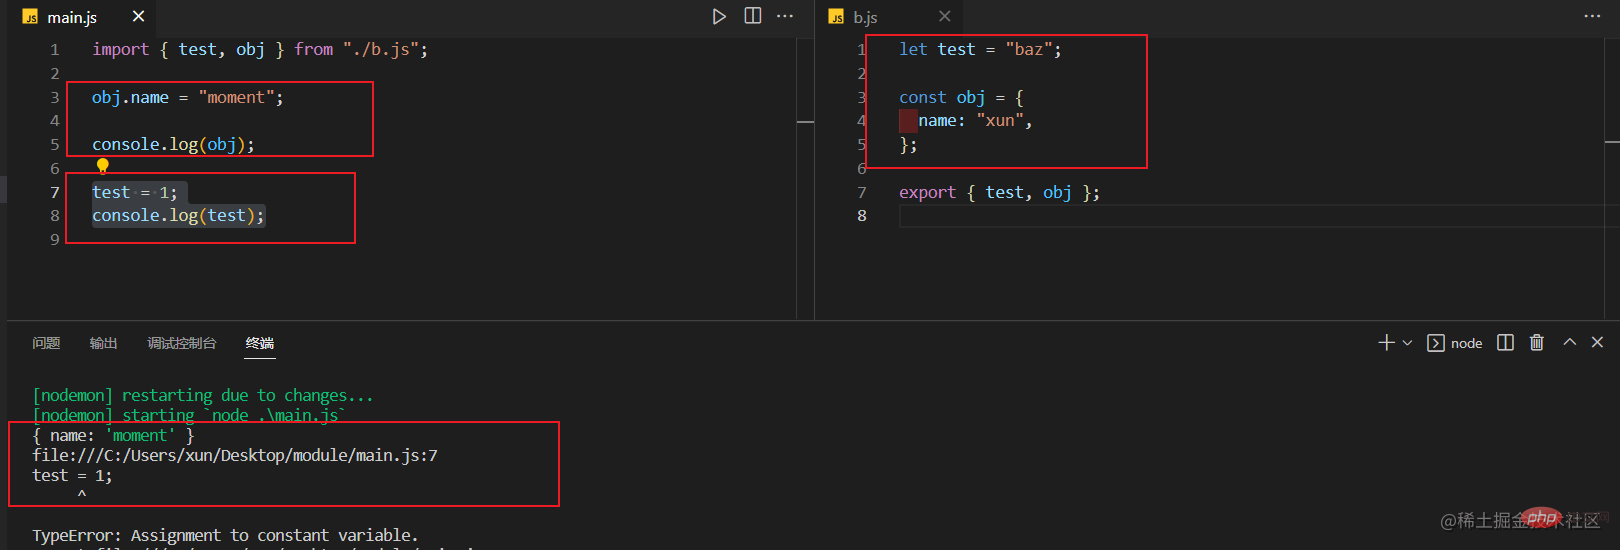
Assignment to constant variable的类型错误。import语句中同时取得它们。可以依次列出特定的标识符来取得,也可以使用*来取得:// foo.js export default function foo(x, y) { return x + y; } export const bar = 777; export const baz = "moment"; // main.js import { default as foo, bar, baz } from "./foo.js"; import foo, { bar, baz } from "./foo.js"; import foo, * as FOO from "./foo.js";
import导入的模块是静态的,会使所有被导入的模块,在加载时就被编译(无法做到按需编译,降低首页加载速度)。有些场景中,你可能希望根据条件导入模块或者按需导入模块,这时你可以使用动态导入代替静态导入。import可以像调用函数一样来动态的导入模块。以这种方式调用,将返回一个promise。import("./foo.js").then((module) => { const { default: foo, bar, baz } = module; console.log(foo); // [Function: foo] console.log(bar); // 777 console.log(baz); // moment});复制代码
await必须在带有async的异步函数中使用,否则会报错:import("./foo.js").then((module) => { const { default: foo, bar, baz } = module; console.log(foo); // [Function: foo] console.log(bar); // 777 console.log(baz); // moment });
Top-level await:const p = new Promise((resolve, reject) => { resolve(777); });const result = await p;console.log(result); // 777正常输出
import是静态执行,所以不能使用表达式和变量,这些只有在运行时才能得到结果的语法结构。// 错误 import { 'b' + 'ar' } from './foo.js'; // 错误 let module = './foo.js'; import { bar } from module; // 错误 if (x === 1) { import { bar } from './foo.js'; } else { import { foo } from './foo.js'; }
type属性设置为module用来告知浏览器将script标签视为模块。defer的方式延迟你的nomodule脚本:
nomodule脚本会被执行多次,而模块只会被执行一次:
nomodule脚本会阻塞HTML解析。你可以通过添加defer属性来解决此问题,该属性是等到HTML解析完成之后才执行。
deferandasyncare optional attributes, they can only choose one of them, under thenomodulescript,deferThe current script will not be parsed untilHTMLis parsed, andasyncwill be parsed in parallel withHTMLand will not block the parsing ofHTML, the module script can specify theasyncattribute, but it is invalid fordefer, because the module is delayed by default.asyncattribute is present, the module script and all its dependencies will be parsed and fetched in parallel, and the module script will be executed as soon as it is available.Es Modulemodule, you must first understand theEs ModuleandCommonjsare completely different, they have three completely different types:CommonJSThe module outputs a copy of the value,Es ModuleThe output is a reference to the value;CommonJSmodule is loaded at runtime, andEs Moduleis the compile-time output interface.CommonJSTherequire()of the module is to load the module synchronously, and theimportcommand of the ES6 module is to load asynchronously and has an independent module dependency analysis stage.CommonJSloads an object (that is, themodule.exportsproperty), which is only available when the script is running It will be generated after completion. AndEs Moduleis not an object. Its external interface is just a static definition, which will be generated during the static analysis phase of the code.CommonjsWhat is output is a copy of the value. That is to say, once a value is output, changes within the module will not affect the value. For details, please see the previous article. The operating mechanism ofEs Moduleis different fromCommonJS.JS EngineWhen statically analyzing a script, a read-only reference will be generated when the module loading commandimportis encountered. When the script is actually executed, the value will be retrieved from the loaded module based on this read-only reference. In other words,importis a connection pipe. If the original value changes, the value loaded byimportwill also change accordingly. Therefore,Es Moduleis a dynamic reference and does not cache values. The variables in the module are bound to the module in which they are located.Module Record) encapsulates structural information about the import and export of a single module (the current module). This information is used to link the import and export of the connected module set. A module record consists of four fields, which are only used when executing the module. The four fields are:Realm: Create the scope of the current module;Environment: Module The top-level binding environment record of Runtime property-based access. Module namespace objects have no constructor;HostDefined: field is reserved for use byModule Environment RecordConstruction), find thejsfile according to the address, download it through the network, and parse the module file toModule Record;Instantiation), instantiate the module, allocate memory space, parse the import and export statements of the module, and point the module to the corresponding memory address;Evaluation), run the code, calculate the value, and fill the value into the memory address;loaderis responsible for addressing and downloading modules. First we modify an entry file, which inHTMLis usually a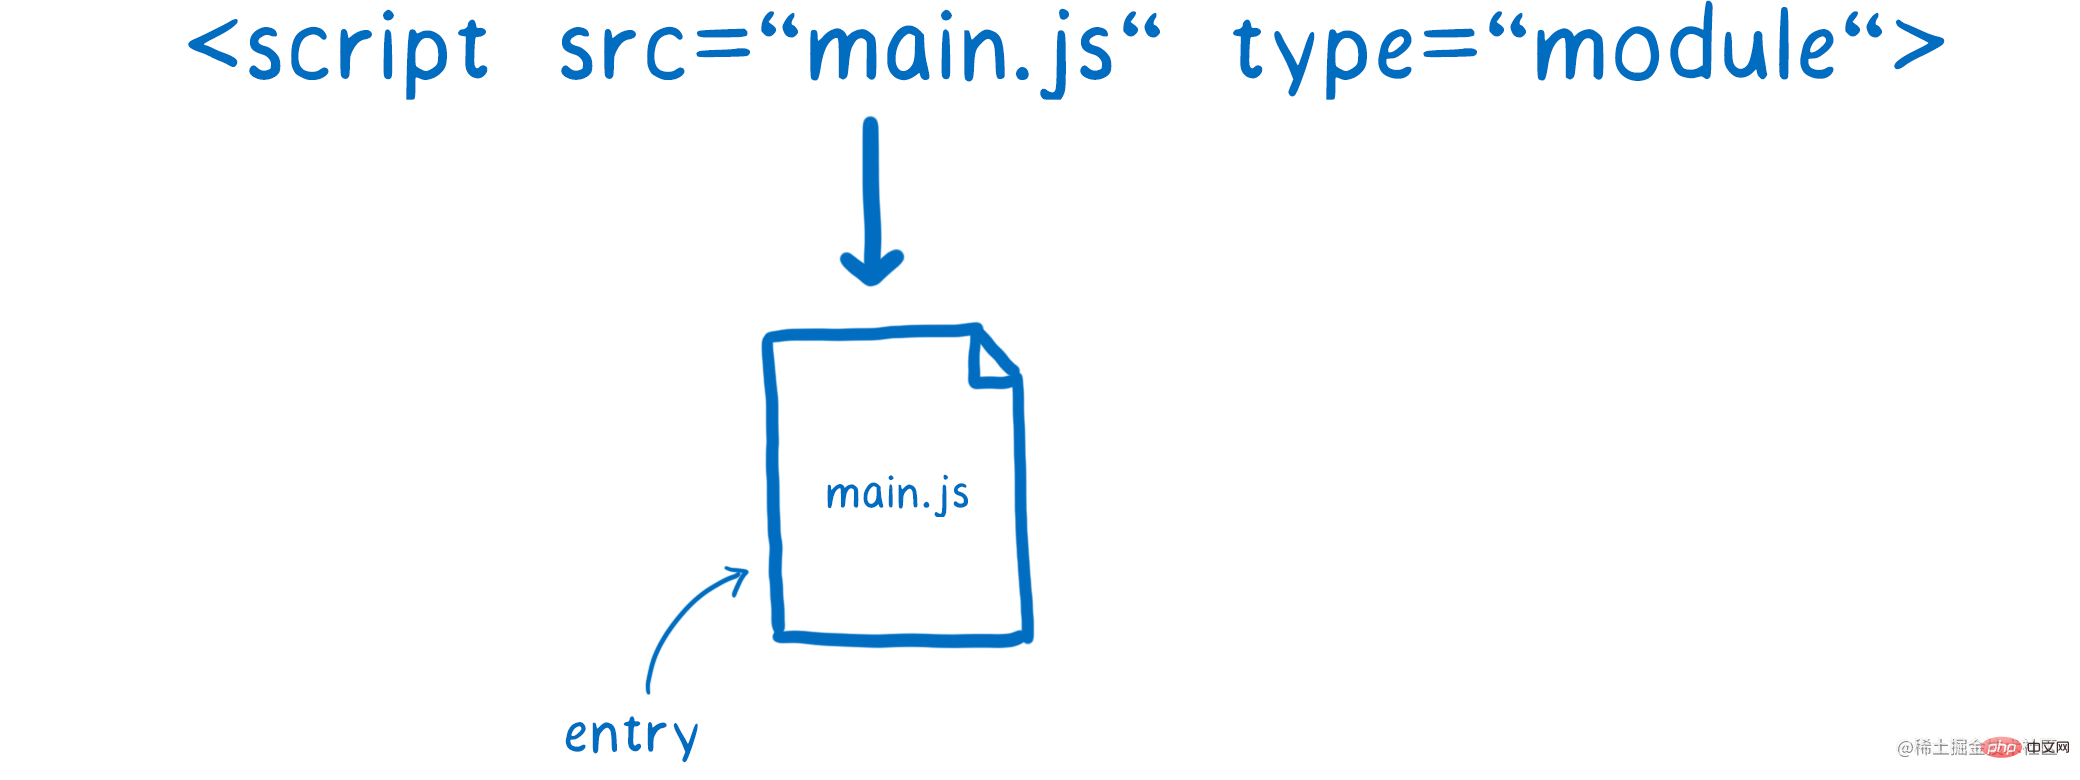
importstatement. There is a module declaration identifier in theimportdeclaration statement. Character (ModuleSpecifier), which tellsloaderhow to find the address of the next module.
module record (Module Record), and eachmodule recordContainsJavaScript code,execution context,ImportEntries,LocalExportEntries,IndirectExportEntries,StarExportEntries. TheImportEntriesvalue is aImportEntry Recordstype, andLocalExportEntries,IndirectExportEntries,StarExportEntriesis aExportEntry Recordstype.ImportEntry Recordscontains three fieldsModuleRequest,ImportName,LocalName;ModuleSpecifier);ModuleRequestThe name of the required binding for the module export of the module identifier. The valuenamespace-objectindicates that the import request is for the namespace object of the target module;
ImportEntry Recordsfields imported usingimportExample:ExportEntry Recordscontains four fieldsExportName,ModuleRequest,ImportName,LocalName, andImportEntry Recordsare different in that there is an additionalExportName.The following table records examples ofExportEntry Recordsfields exported usingexport:
| Import Statement From | Module identifier(ModuleRequest) | Import name(ImportName) | LocalName |
|---|---|---|---|
| "react" | "default" | "React" | |
| "react" | namespace -obj | "Moment" | |
| "react" | "useEffect" | "useEffect" | |
| "react" | "useEffect" | "effect" |
Back to topic
Only after parsing the currentModule Recordcan we know which submodules the current module depends on , then you need toresolvethe submodule, obtain the submodule, then parse the submodule, and continuously cycle this process resolving -> fetching -> parsing. The result is as shown in the figure below:
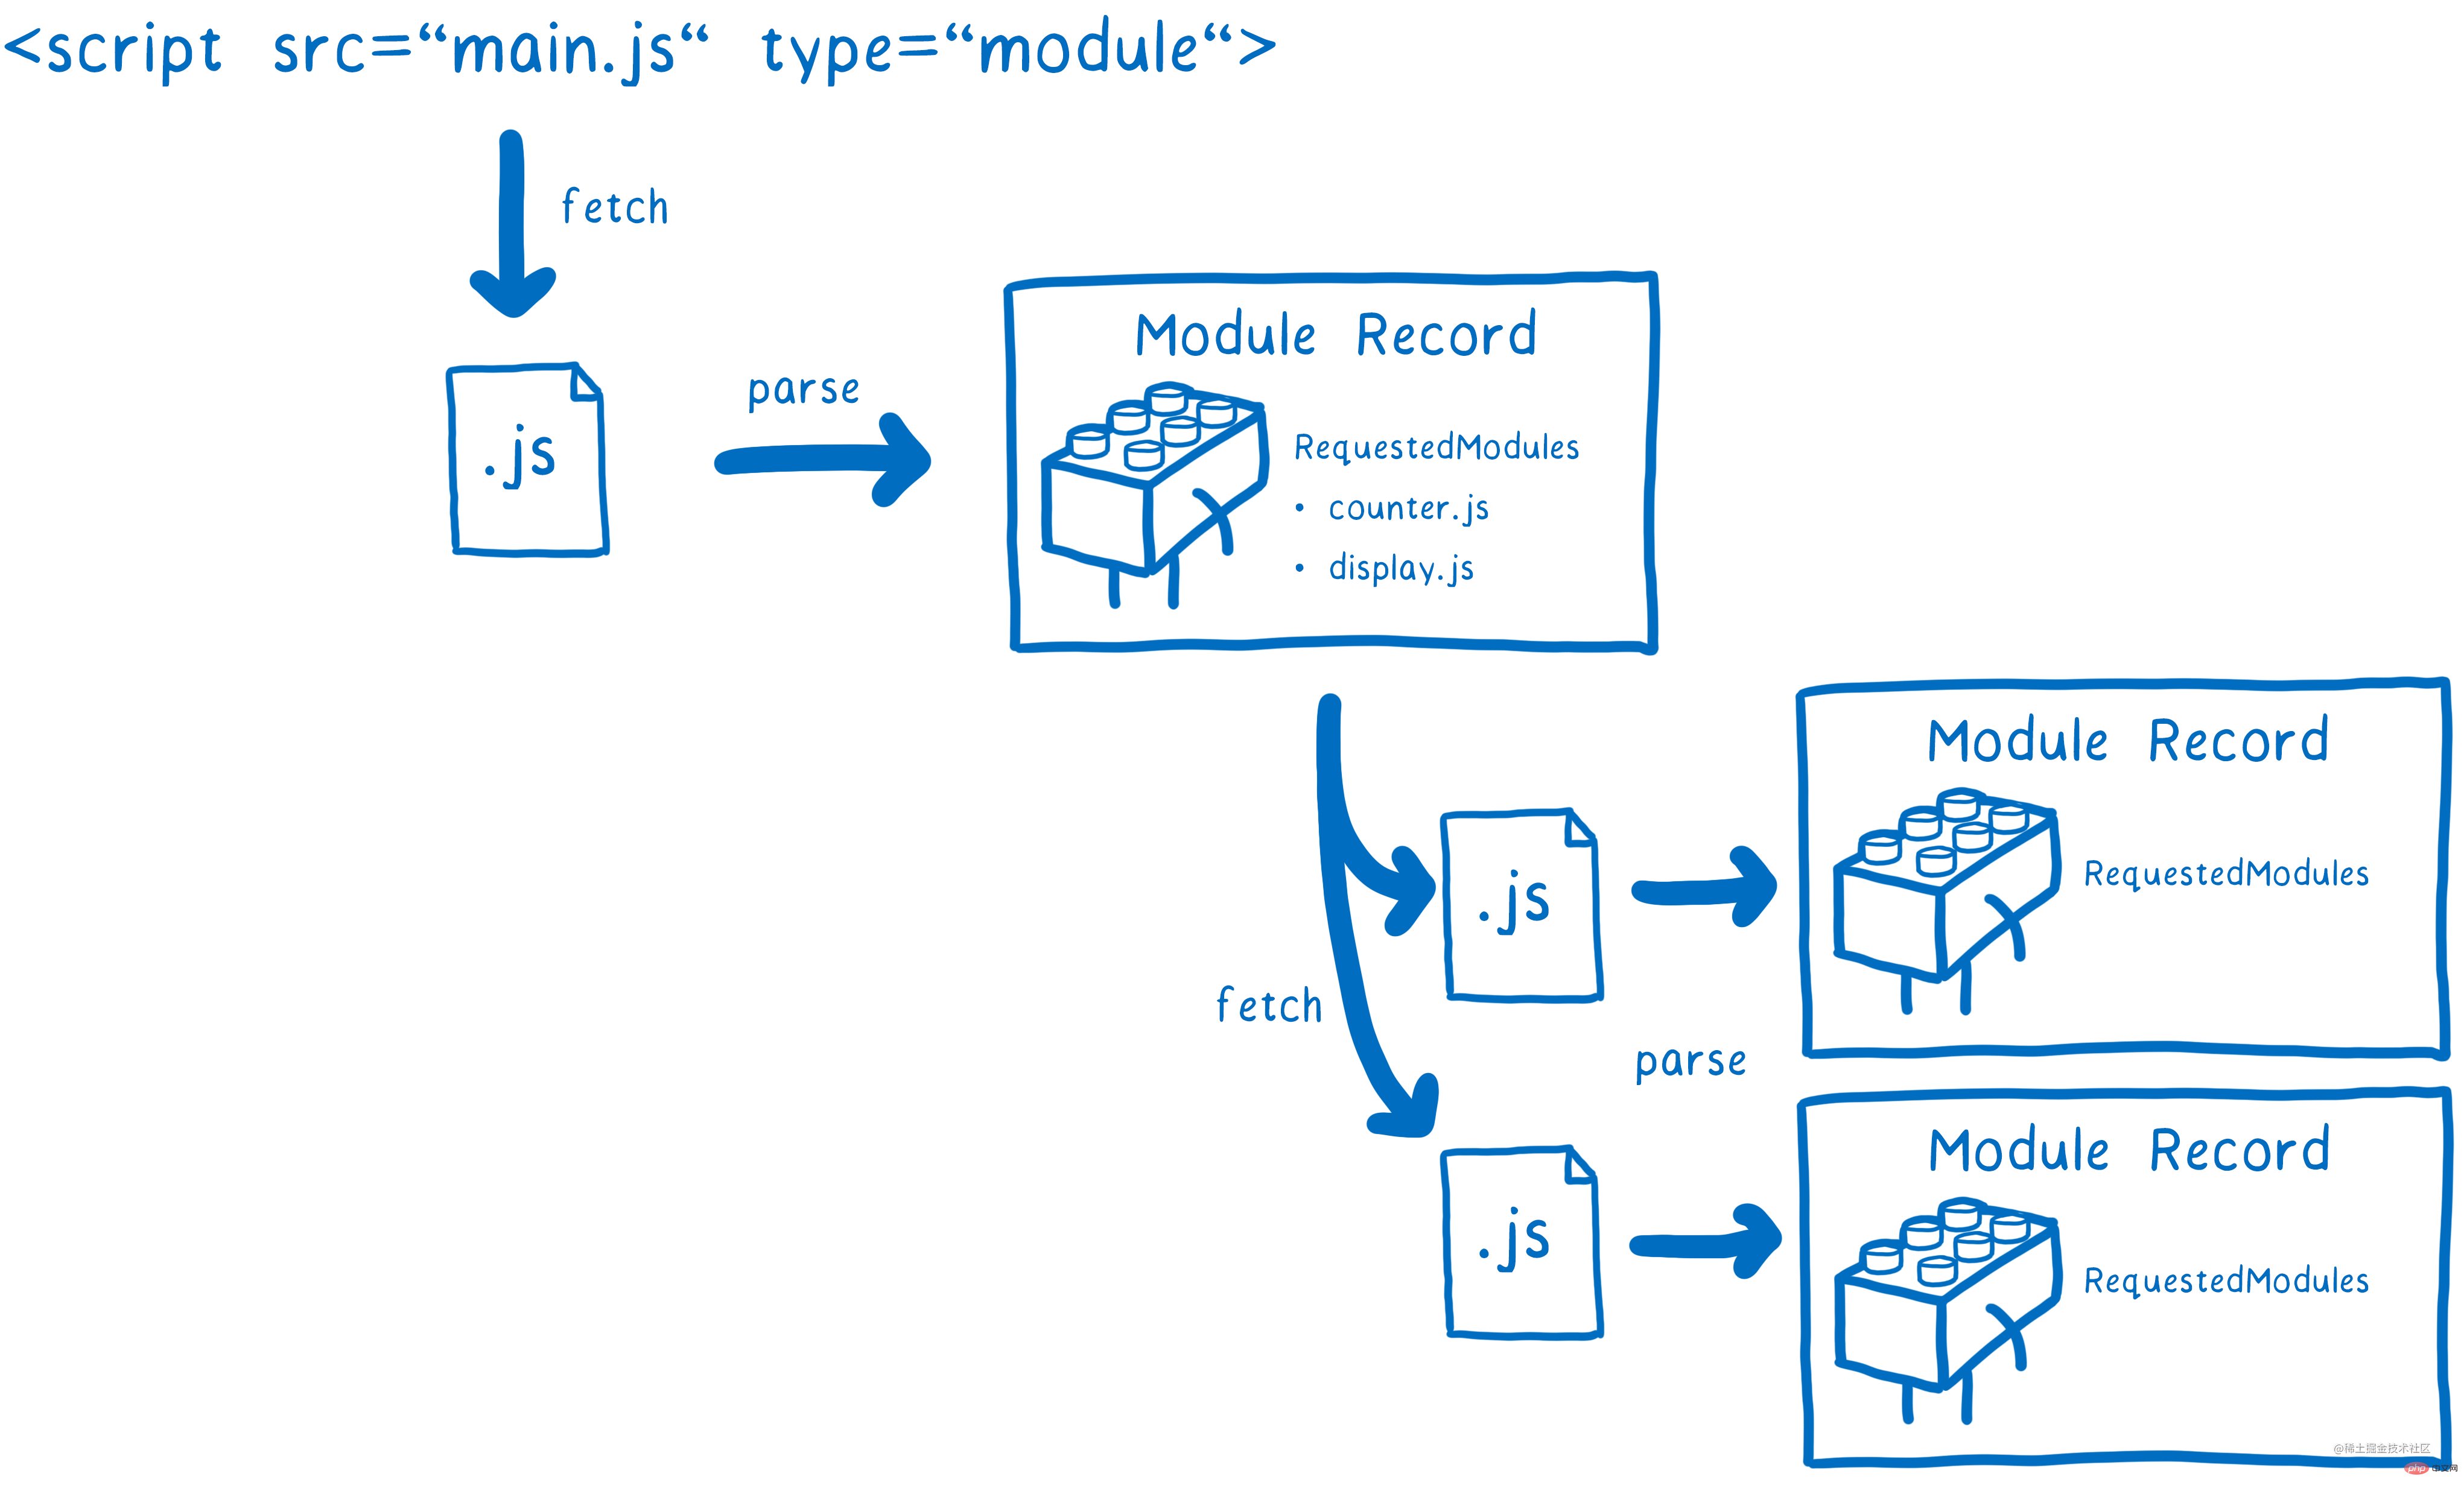
static analysis. It will not run JavaScript code and will only identifyexportandimportkeyword, soimportcannot be used in non-global scope, except for dynamic import.loaderUseModule Mapto track and cache the globalMOdule Recordto ensure that the module is onlyfetchOnce, there will be an independent Module Map in each global scope.MOdule Map is a key/value mapping object composed of a URL record and a string. The URL record is the request URL to get the module, a string indicating the type of module (e.g. "javascript"). The value of the module map is either the module script, null (used to indicate a failed fetch), or the placeholder value "fetching".

Module Recordare parsed, the next JS engine needs Link all modules. The JS engine takes theModule Recordof the entry file as the starting point, recursively links the modules in depth-first order, and creates aModule Environment Recordfor eachModule Record. Used to manage variables inModule Record.
has aBinding, which is used to storeModule The variables exported by Record, as shown in the figure above, export a variable ofcountat the modulemain.js, inModule Environment RecordTheBindingwill have acount. At this time, it is equivalent to the compilation phase ofV8, creating a module instance object, adding the corresponding attributes and Method, the value at this time isundefinedornull, allocate memory space for it.keyword is used in the submodulecount.jsto importmain.js, andcount. Theimportof jsand theexportvariable ofmain.jspoint to the same memory location, thus linking the relationship between the parent and child modules. Woke up. As shown below: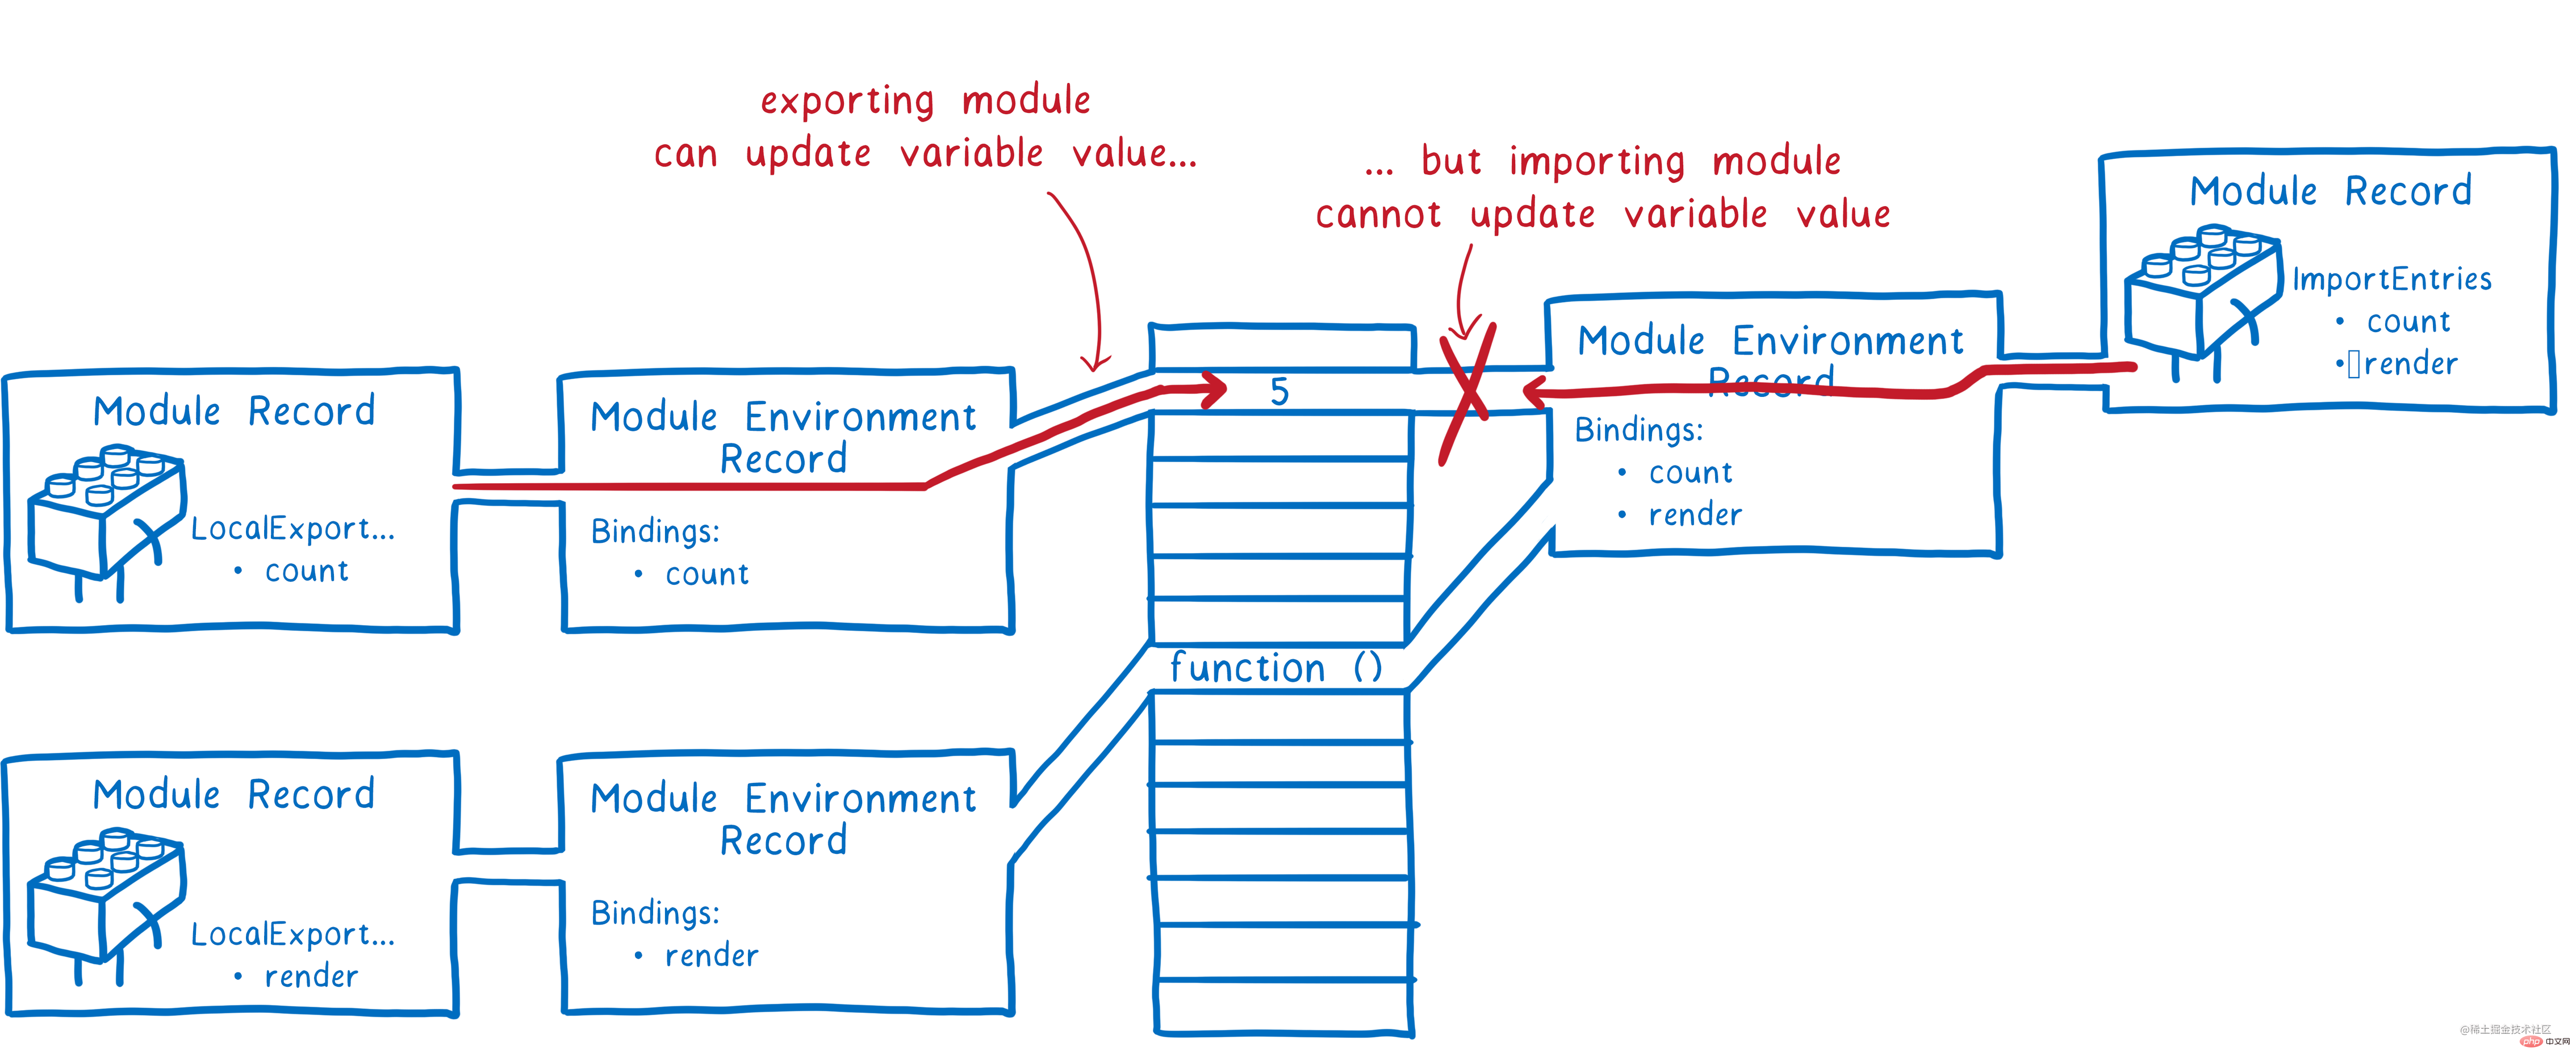
export导出的为父模块,import引入的为子模块,父模块可以对变量进行修改,具有读写权限,而子模块只有读权限。Es Module中有5种状态,分别为unlinked、linking、linked、evaluating和evaluated,用循环模块记录(Cyclic Module Records)的Status字段来表示,正是通过这个字段来判断模块是否被执行过,每个模块只执行一次。这也是为什么会使用Module Map来进行全局缓存Module Record的原因了,如果一个模块的状态为evaluated,那么下次执行则会自动跳过,从而包装一个模块只会执行一次。Es Module采用深度优先的方法对模块图进行遍历,每个模块只执行一次,这也就避免了死循环的情况了。深度优先搜索算法(英语:Depth-First-Search,DFS)是一种用于遍历或搜索树或图的算法。这个算法会尽可能深地搜索树的分支。当节点v的所在边都己被探寻过,搜索将回溯到发现节点v的那条边的起始节点。这一过程一直进行到已发现从源节点可达的所有节点为止。如果还存在未被发现的节点,则选择其中一个作为源节点并重复以上过程,整个进程反复进行直到所有节点都被访问为止。
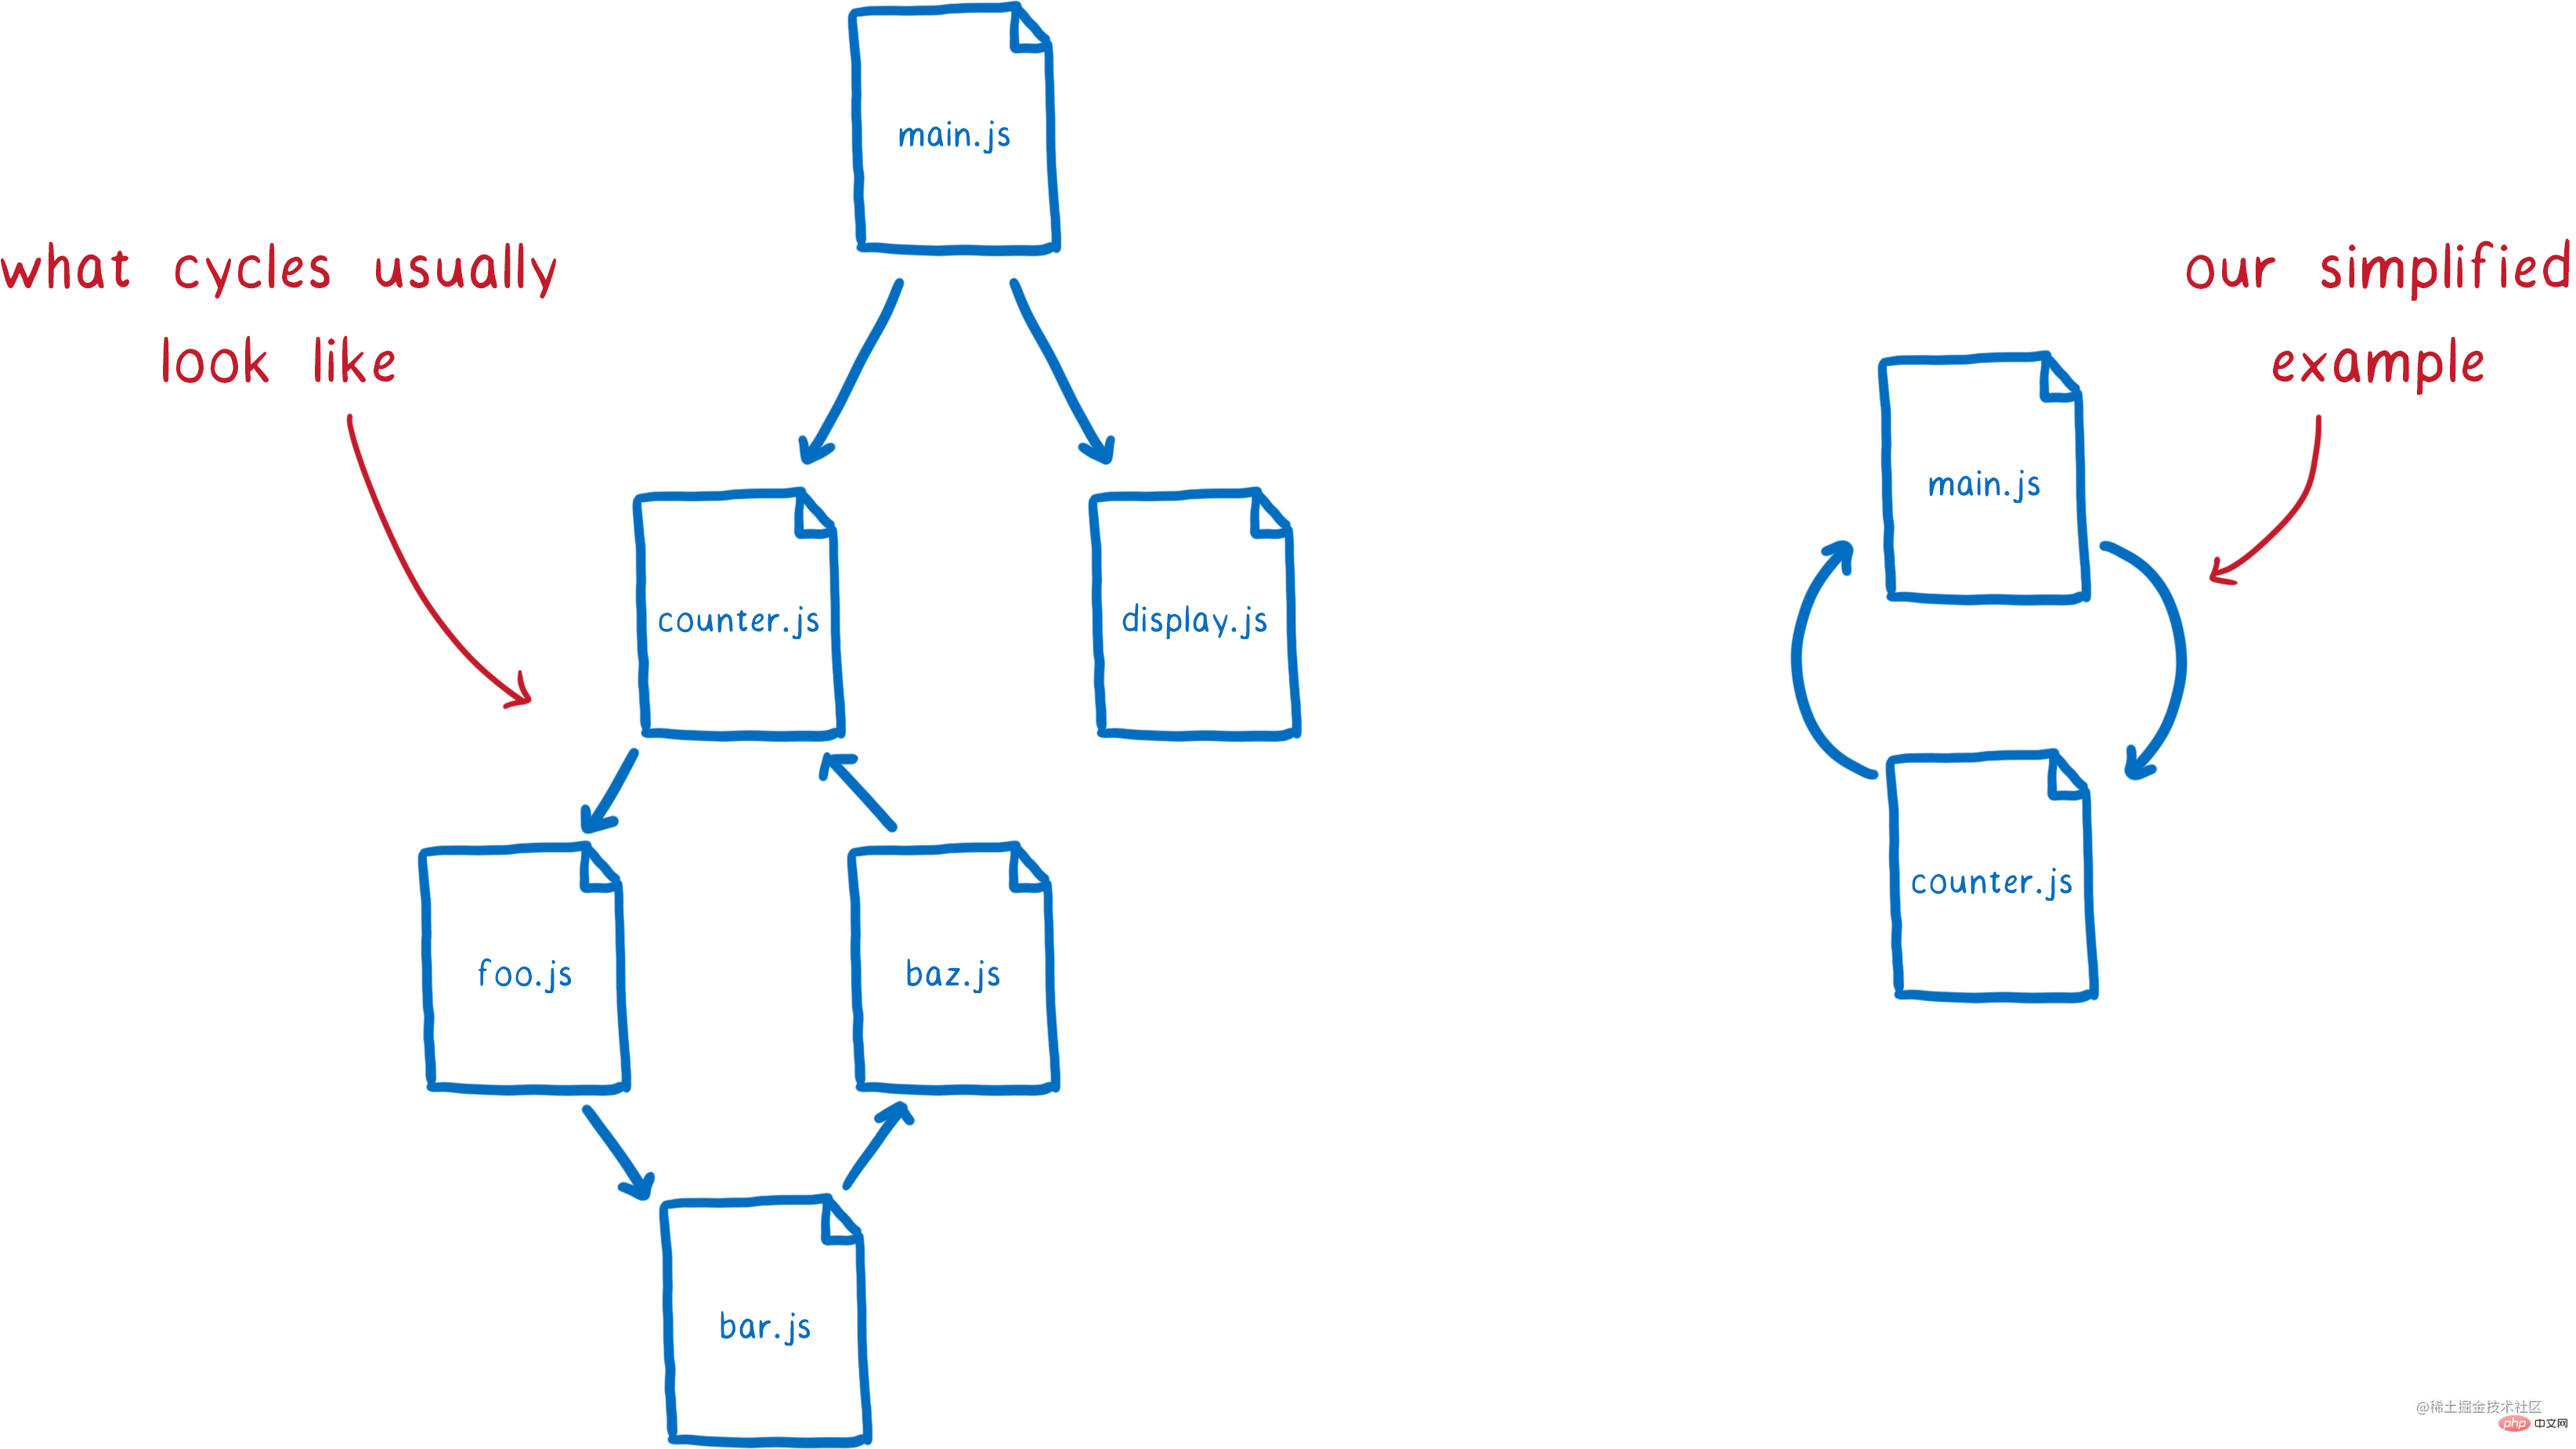
// main.js import { bar } from "./bar.js"; export const main = "main"; console.log("main"); // foo.js import { main } from "./main.js"; export const foo = "foo"; console.log("foo"); // bar.js import { foo } from "./foo.js"; export const bar = "bar"; console.log("bar");
node运行main.js,得出以下结果:
| Export declaration | Export name | Module identifier | Import name | Local name |
|---|---|---|---|---|
| export var v; | "v" | null | null | "v" |
| export default function f() {} | "default" | null | null | "f" |
| export default function () {} | "default" | null | null | "default" |
| export default 42; | "default" | null | null | "default" |
| "x" | null | null | "x" | |
| "x" | null | null | "v" | ##export {x} from "mod"; |
| "mod" | "x" | null | export {v as x} from "mod"; | |
| "mod" | "v" | null | ##export * from "mod"; | |
| "mod" | all-but-default | null | ##export * as ns from "mod"; | "ns |
| all | null |
The above is the detailed content of Completely understand es6 modularization in one article. For more information, please follow other related articles on the PHP Chinese website!