MySQL binary installation method: 1. Download the binary package; 2. Mount the new logical volume to "/data"; 3. Unzip it to the installation directory and view the built-in installation information; 4. Set the configuration file; 5. Specify the database; 6. Service startup script; 7. Perform safe initialization.

The operating environment of this tutorial: CentOS 7 system, mysql version 8, Dell G3 computer.
MySQL Binary Installation
1. Download the binary package
https: //downloads.mariadb.org/mariadb/10.2.16/
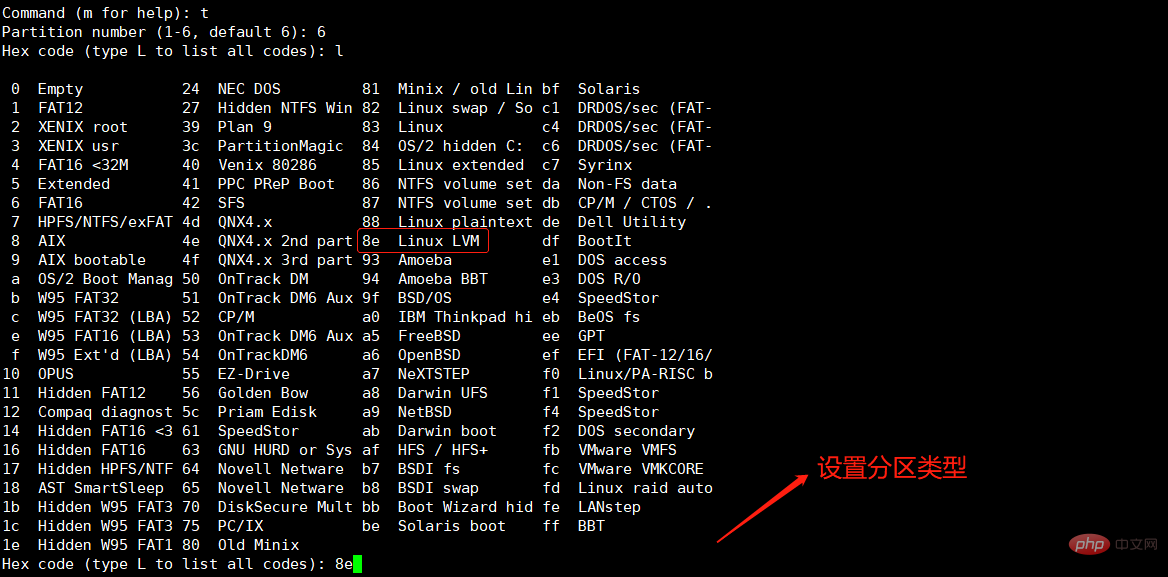
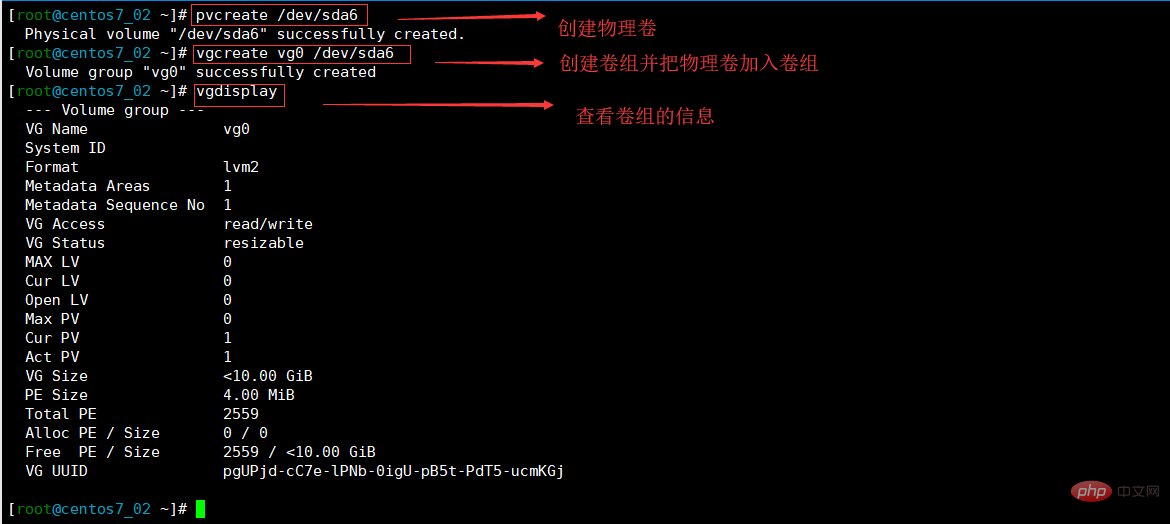
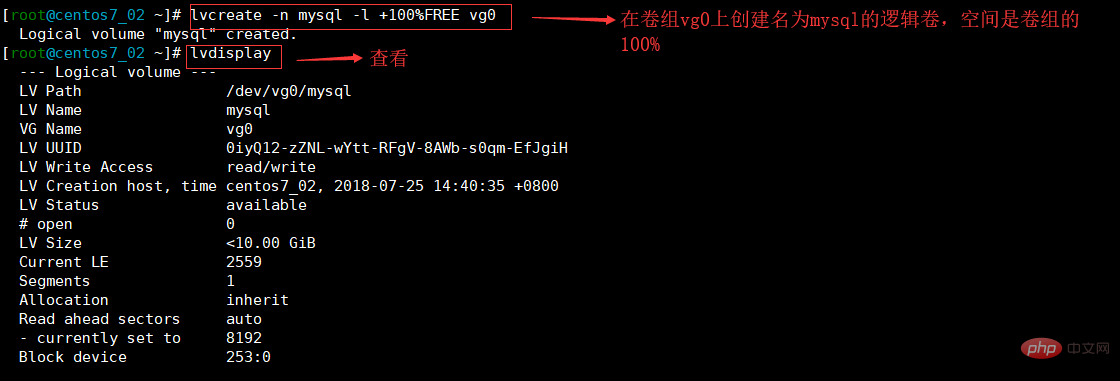
2. Clean logical volume lvm
3. New logical volume Mount to /data
4. Store the database in the /data/mysql directory
5. Unzip to the installation directory and view the built-in installation information
6. Set configuration file
7. Specify database
8. Service startup script
9. Safe initialization
1, create a new logical volume and set the space
fdisk /dev/sda #


##2. New logical volume type


partprobe # #


 ##5. Mount

vim /etc/fstab # #

1、创建mysql账号信息
useradd -r -s /sbin/nologin -d /data/mysql -m mysql # #
![How to install MySQL binary[39] How to install MySQL binary[39]](https://img.php.cn/upload/article/000/000/020/eb7f89f7099cbee44321ba866173f597-12.png)
2、解压mysql二进制文件
![How to install MySQL binary[41] How to install MySQL binary[41]](https://img.php.cn/upload/article/000/000/020/eb7f89f7099cbee44321ba866173f597-13.png)
备注:必须解压到/usr/local目录下
3、创建mysql软连接
![How to install MySQL binary[43] How to install MySQL binary[43]](https://img.php.cn/upload/article/000/000/020/826222e729197585205e9fd6a28e5b8e-14.png)
4、修改mysql目录下所有的权限
![How to install MySQL binary[45] How to install MySQL binary[45]](https://img.php.cn/upload/article/000/000/020/96faac6046b04c3c65ab5861884c11c0-15.png)
5、把执行文件bin放入 $PATH全局变量
vim /etc/profile.d/mysql.sh
#
#
![How to install MySQL binary[47] How to install MySQL binary[47]](https://img.php.cn/upload/article/000/000/020/d03015a83e32cacb50d0a87ce71442d0-16.png)
让设置生效
. /etc/profile.d/mysql.sh # #
6、生成数据库文件
scripts/mysql_install_db --datadir=/data/mysql --user=mysql # #
![How to install MySQL binary[49] How to install MySQL binary[49]](https://img.php.cn/upload/article/000/000/020/d03015a83e32cacb50d0a87ce71442d0-17.png)
7、编辑mysql配置文件
![How to install MySQL binary[51] How to install MySQL binary[51]](https://img.php.cn/upload/article/000/000/020/c33c6ea11eda402d4fab181e5bb73260-18.png)
备注:图上是复制配置模板覆盖原来的文件,根据环境来选着不同的模板文件
vim /etc/my.cnf # #
![How to install MySQL binary[53] How to install MySQL binary[53]](https://img.php.cn/upload/article/000/000/020/0f98c84943756c6a515a0d29fa8caa53-19.png)
备注:要注意这里数据库路径一定要和上面指定的存放数据库文件的路径一致
1、把mysql启动文件放入init.d
![How to install MySQL binary[55] How to install MySQL binary[55]](https://img.php.cn/upload/article/000/000/020/0f98c84943756c6a515a0d29fa8caa53-20.png)
2、加入启动列表
![How to install MySQL binary[57] How to install MySQL binary[57]](https://img.php.cn/upload/article/000/000/020/a302b749e4e5e50809c84e8af7e7034e-21.png)
2、启动服务
service mysqld start # #
备注:如果启动失败,注意检查权限和路径
到这mysql是可以登入了,但是现在随便一个用户都可以登入,无需密码验证,这样太不安全,下面简单的加固下
mysql_secure_installation # #
![How to install MySQL binary[59] How to install MySQL binary[59]](https://img.php.cn/upload/article/000/000/020/71c8c3d05efa65e07a7af890ebf468e6-22.png)
![How to install MySQL binary[61] How to install MySQL binary[61]](https://img.php.cn/upload/article/000/000/020/70c5d657103f0a98fb6791518e251504-23.png)
指定root用户 –p 输入密码登陆【推荐学习:mysql视频教程】

The above is the detailed content of How to install MySQL binary. For more information, please follow other related articles on the PHP Chinese website!