

 Database
phpMyAdmin
Detailed explanation of how to build a multi-database server with phpMyAdmin
Database
phpMyAdmin
Detailed explanation of how to build a multi-database server with phpMyAdmin
Detailed explanation of how to build a multi-database server with phpMyAdmin

This article will use the phpmyadmin tutorial column to introduce you to phpMyAdmin's method of building and managing multiple database servers. I hope it will be helpful to friends in need!
phpMyAdmin builds and manages multiple database servers
Environment description:
系统版本    CentOS 6.9 x86_64
软件版本    nginx-1.12.2        php-5.5.38        phpMyAdmin 4.8.0.1
1. Introduction to phpMyAdmin
phpMyAdmin is a PHP-based, Web-based -Base mode is a MySQL database management tool built on the website host, allowing administrators to use the Web interface to manage the MySQL database. This web interface can be a better way to input complex SQL syntax in a simple way, especially when it comes to importing and exporting large amounts of data. One of the greater advantages is that phpMyAdmin is executed on the web server like other PHP programs, but you can use the HTML pages generated by these programs anywhere, that is, to remotely manage the MySQL database, and easily create, modify, and delete Databases and data tables. You can also use phpMyAdmin to create commonly used PHP syntax to facilitate the correctness of SQL syntax required when writing web pages.
Official website: https://www.phpmyadmin.net
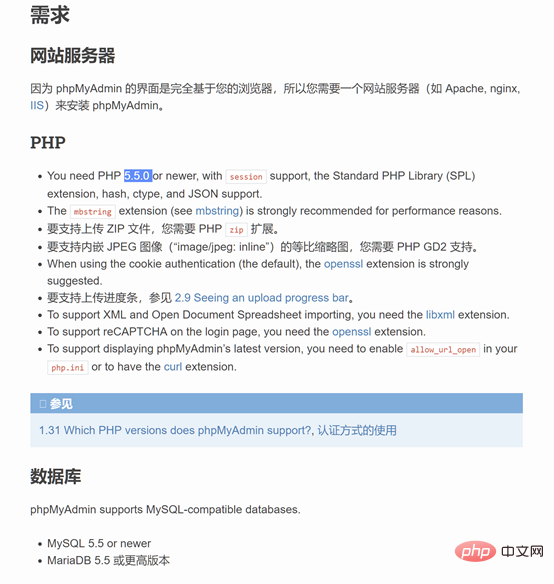
2. Environmental requirements for installing phpMyAdmin
3. Steps
3.1. Compile and install nginx and php. You can refer to the previous blog post. I will not go into details here. However, based on the environmental requirements of phpMyAdmin, the compilation parameters used when compiling php are:
./configure --prefix=/application/php5.5.38 --with-jpeg-dir=/usr/lib64 --with-freetype-dir=/usr/lib64/ --with-curl --enable-fpm --enable-mbstring --with-gd --with-fpm-user=nginx --with-fpm-group=nginx --with-mysqli=mysqlnd --with-mysql-sock=/tmp/mysql.sock --with-openssl --enable-zip
3.2. Configure phpMyAdmin
Put the downloaded phpmyadmin source code package into the nginx site root directory, that is, the html directory, unzip and modify the nginx configuration file, and rename the default phpMyAdmin configuration file cp config.sample.inc.php config.inc. php
3.3. Build the database and perform database creation authorization (refer to the previous blog post)
3.4. Browser access login
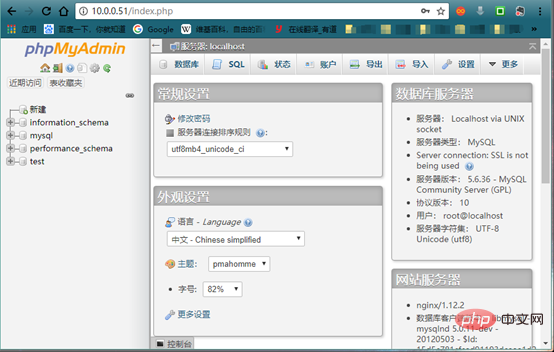
4 , Configure phpMyAdmin to manage multiple database servers
Take 10.0.0.51 and 10.0.0.52 as examples
4.1 Install mysql on 10.0.0.52
Set password and log in to mysql
[root@db02 mysql]# mysql -uroot -p123456
Authorize the database to 10.0.0.51
mysql> grant all on *.* to root@'10.0.0.51' identified by '123456';
4.2 Configure db01 with phpMyAdmin installed
vim /application/nginx/html/phpMyAdmin-4.8.0.1-all-languages/config.inc.php
复制粘贴并修改
$i++;
/* Authentication type */
$cfg['Servers'][$i]['auth_type'] = 'cookie';
/* Server parameters */
$cfg['Servers'][$i]['host'] = '10.0.0.52';
$cfg['Servers'][$i]['compress'] = false;
$cfg['Servers'][$i]['AllowNoPassword'] = false;
Refresh the page to log in to the 10.0.0.52 database.
The above is the detailed content of Detailed explanation of how to build a multi-database server with phpMyAdmin. For more information, please follow other related articles on the PHP Chinese website!

Hot AI Tools

Undress AI Tool
Undress images for free

Undresser.AI Undress
AI-powered app for creating realistic nude photos

AI Clothes Remover
Online AI tool for removing clothes from photos.

Clothoff.io
AI clothes remover

Video Face Swap
Swap faces in any video effortlessly with our completely free AI face swap tool!

Hot Article
Hot Tools

Notepad++7.3.1
Easy-to-use and free code editor

SublimeText3 Chinese version
Chinese version, very easy to use

Zend Studio 13.0.1
Powerful PHP integrated development environment

Dreamweaver CS6
Visual web development tools

SublimeText3 Mac version
God-level code editing software (SublimeText3)


 How to set primary key in phpmyadmin
Apr 07, 2024 pm 02:54 PM
How to set primary key in phpmyadmin
Apr 07, 2024 pm 02:54 PM
The primary key of a table is one or more columns that uniquely identify each record in the table. Here are the steps to set a primary key: Log in to phpMyAdmin. Select database and table. Check the column you want to use as the primary key. Click "Save Changes". Primary keys provide data integrity, lookup speed, and relationship modeling benefits.
 How to add foreign keys in phpmyadmin
Apr 07, 2024 pm 02:36 PM
How to add foreign keys in phpmyadmin
Apr 07, 2024 pm 02:36 PM
Adding a foreign key in phpMyAdmin can be achieved by following these steps: Select the parent table that contains the foreign key. Edit the parent table structure and add new columns in "Columns". Enable foreign key constraints and select the referencing table and key. Set update/delete operations. save Changes.
 How to delete data table in phpmyadmin
Apr 07, 2024 pm 03:00 PM
How to delete data table in phpmyadmin
Apr 07, 2024 pm 03:00 PM
Steps to delete a data table in phpMyAdmin: Select the database and data table; click the "Action" tab; select the "Delete" option; confirm and perform the deletion operation.
 Where does the wordpress database exist?
Apr 15, 2024 pm 10:39 PM
Where does the wordpress database exist?
Apr 15, 2024 pm 10:39 PM
The WordPress database is housed in a MySQL database that stores all website data and can be accessed through your hosting provider’s dashboard, FTP, or phpMyAdmin. The database name is related to the website URL or username, and access requires the use of database credentials, including name, username, password, and hostname, which are typically stored in the "wp-config.php" file.
 What should I do if navicat cannot connect?
Apr 23, 2024 am 10:00 AM
What should I do if navicat cannot connect?
Apr 23, 2024 am 10:00 AM
When Navicat cannot connect, you can try the following solutions in order: Check whether the connection information is correct, such as database name, host name, port number, user name and password. Make sure the database is up and running. Check the firewall rules to confirm that Navicat and related services are not blocked. Try using the ping command to test your network connection. Update Navicat client software to the latest version. Check the server logs for error messages related to failed connections. Try connecting using other database tools to troubleshoot Navicat-specific issues.
 How to set foreign keys in phpmyadmin
Apr 07, 2024 pm 03:03 PM
How to set foreign keys in phpmyadmin
Apr 07, 2024 pm 03:03 PM
How to set up foreign keys? Create main table and sub-table. Open the phpMyAdmin dashboard. Select the main table. Open the "Structure" tab. Add a foreign key column and select the related column in the child table. Select the foreign key type (such as "CASCADE"). save Changes.
 What to do if the installation of phpmyadmin fails
Apr 07, 2024 pm 03:15 PM
What to do if the installation of phpmyadmin fails
Apr 07, 2024 pm 03:15 PM
Troubleshooting steps for failed phpMyAdmin installation: Check system requirements (PHP version, MySQL version, web server); enable PHP extensions (mysqli, pdo_mysql, mbstring, token_get_all); check configuration file settings (host, port, username, password); Check file permissions (directory ownership, file permissions); check firewall settings (whitelist web server ports); view error logs (/var/log/apache2/error.log or /var/log/nginx/error.log); seek Technical support (phpMyAdmin
 How to export excel using phpmyadmin
Apr 07, 2024 pm 02:24 PM
How to export excel using phpmyadmin
Apr 07, 2024 pm 02:24 PM
Export data to Excel format via phpMyAdmin: After logging in to phpMyAdmin, select the database and table to export. Click the "Export" option and select "Excel" in the "Format" drop-down menu. Choose your own export columns, query options, and other export options. Click the "Dump" button to start the export and download the exported Excel file.
