Essential tutorial for getting started with fastadmin
Directory structure
Preface
1. Installation
2. Configure it as a background template that you can use
3. Add yourself The background module
4. About database design
5. The request interface returns 403
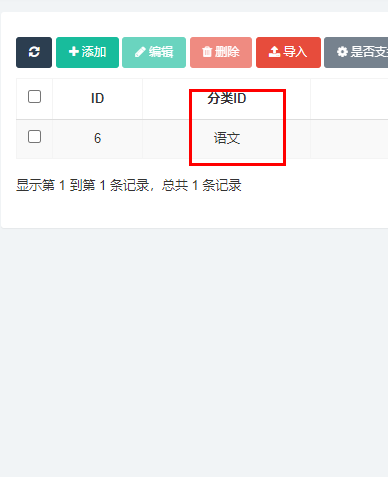
6. The solution list page displays the category ID instead of the category name
7. Why do additions and modifications not work?
8. List fields are displayed in English
9. How to set buttons on a template and then display the set table
10. About setting database fields to state query The condition is useless
11. Why is the enum type page set a drop-down box, not a radio button
12. How to refresh the data after successfully initiating ajax
Preface
This article will briefly install and configure fastadmin, and fully record the problems encountered during the use of fastadmin.
If you also have related questions, please see us in the comment area
1. Installation
# #Download address: https://www.fastadmin.net/download.html?ref=docsThe source code installation method used here is more convenient. Click the download address above, then download the source code package and unzip it.Then place the decompressed files into the PHP environment directory.
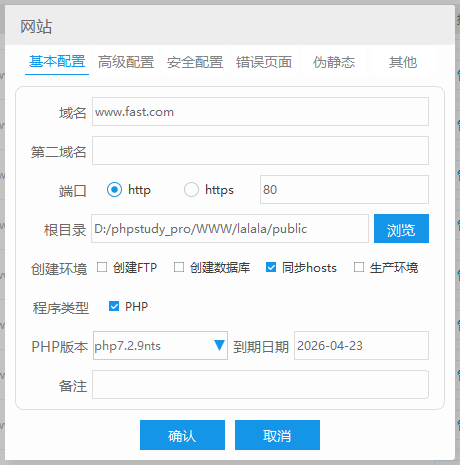
Configure phpstudy virtual domain name.
Be sure to pay attention to your PHP environment here.
“PHP >= 7.1 and = 5.5.0 (need to support innodb engine) Apache or Nginx PDO PHP Extension MBstring PHP Extension CURL PHP Extension Node.Essential tutorial for getting started with fastadmin (optional, used to install Bower and LESS, and also required for packaging and compression) Composer (optional, used to manage third-party extension packages) Bower (optional, used to manage front-end resources) Less (optional, used to edit less files, if you need to add or change css styles, it is best to install it)
”
The address of the Kaka configuration here is www.fast.com.
Then directly access www.fast.com/install.php
The next step is to fill in some database information .
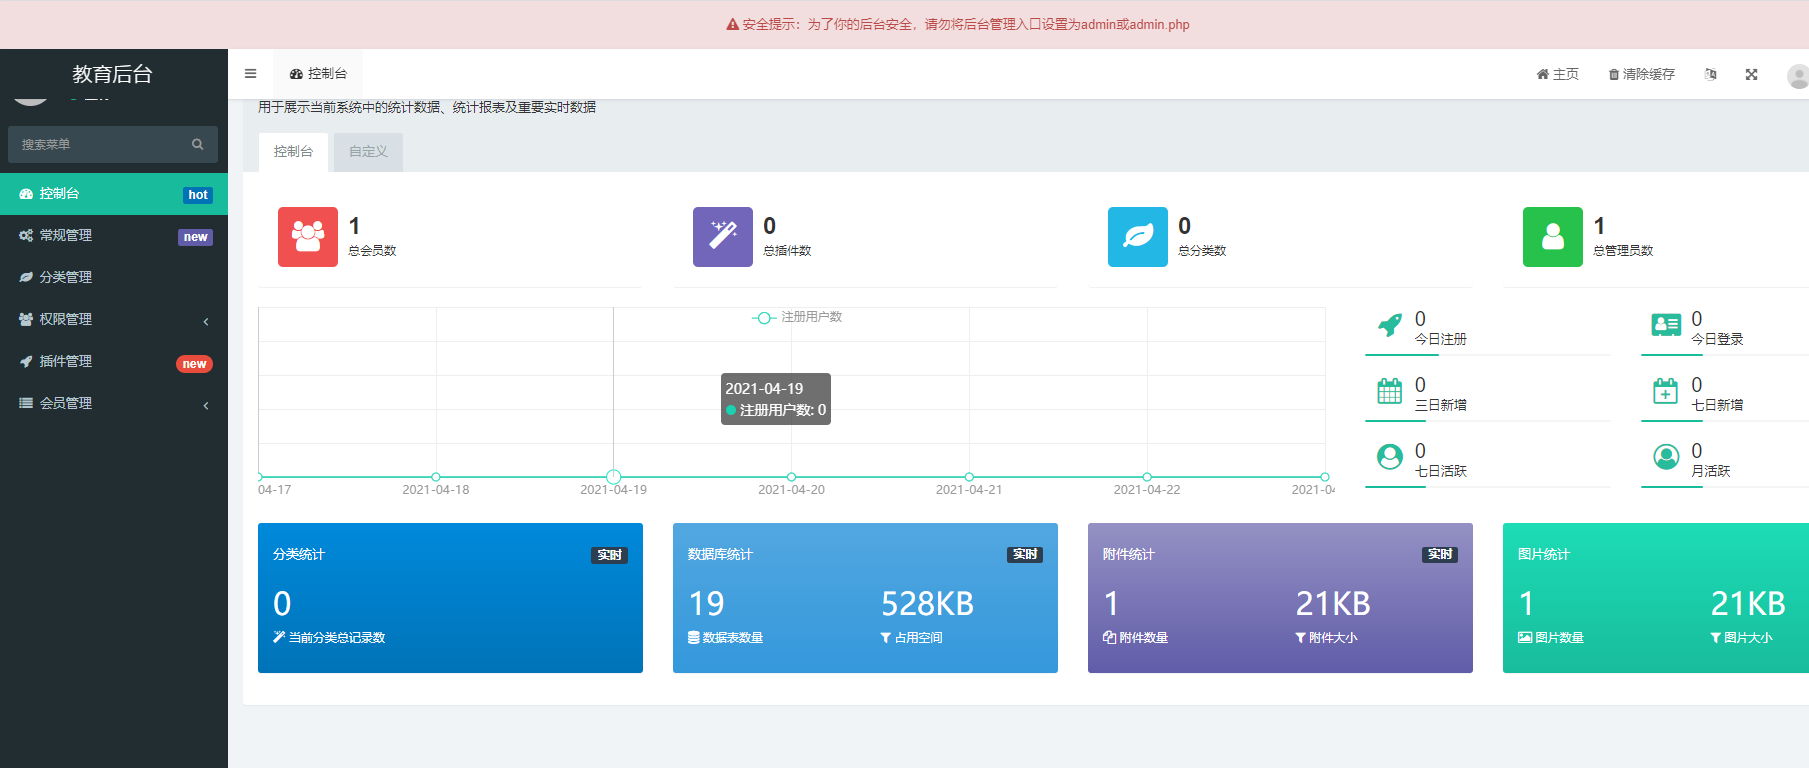
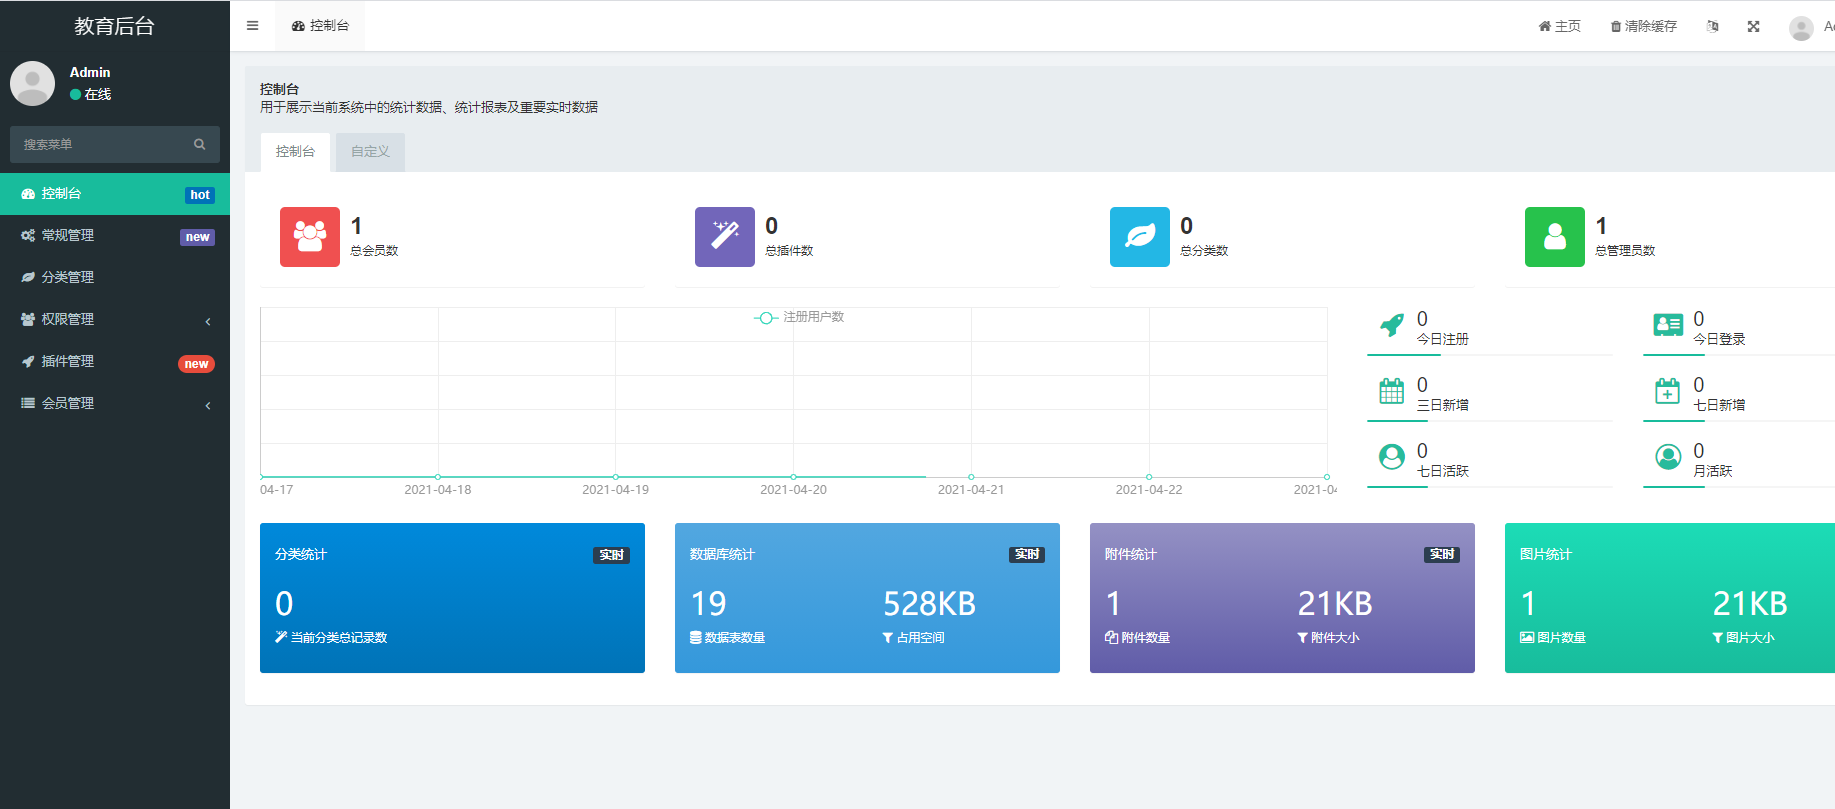
The background appearance of successful installation.
Here you can see a small prompt above, this prompt is After successful installation, the background access directory is a series of automatically generated directories.
This is because Kaka changed the directory address to admin and then gave the prompt.
Here, change admin to fastadmin, in Come and take a look.
so that it can be used normally.
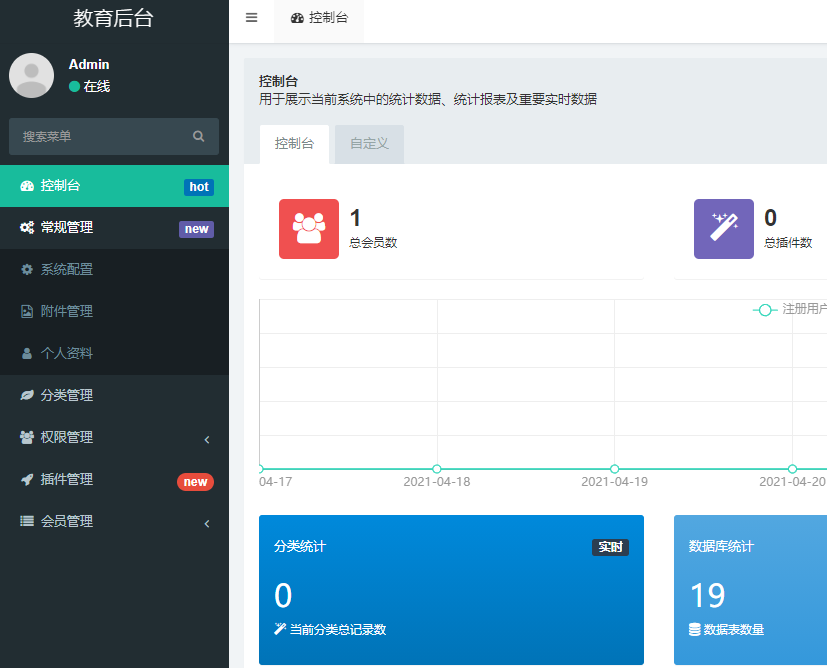
2. Configure it as a background template that you can use yourself
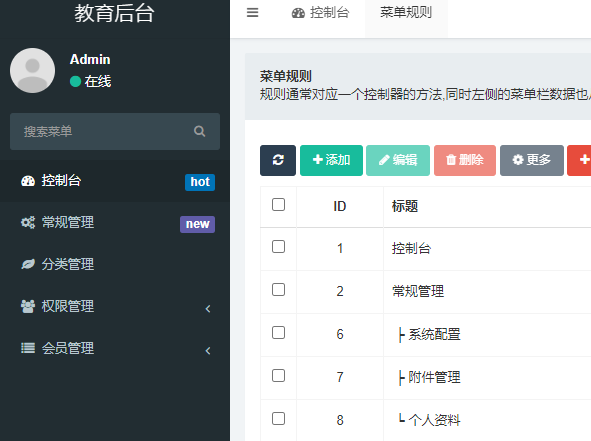
You can see the menu according to the picture above. Many of them are unnecessary and will be deleted next.
As an example, delete this menu of plug-in management.
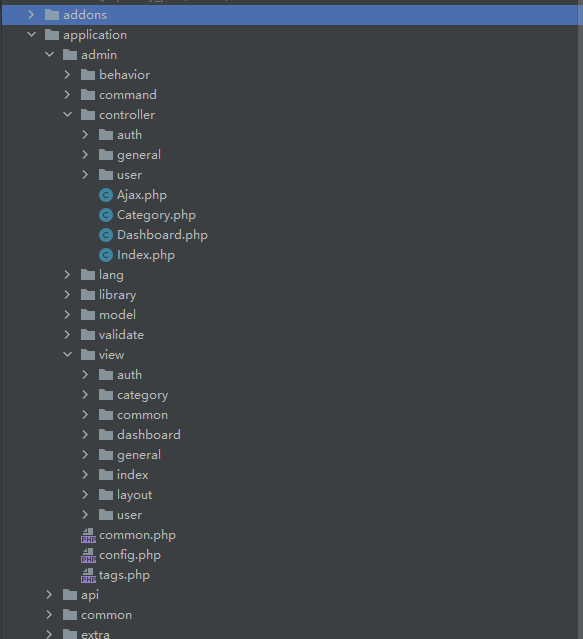
Delete all the plug-in code in the code, the address here can be seen in the browser
Then delete this option of the plug-in in the background menu management.
The rest of the menus are the same. Since this plug-in does not have a table, there is no table structure deletion involved.
3. Add your own backend module
Create a first-level file: php think crud -t picture -u 1
Create a secondary folder: php think crud -t video -c video/video -u 1
Create the camel-shaped file: php think crud -t video_subject -c video/videoSubject -u 1
Delete the secondary file directory: php think crud -t picture -d picture/picture -u 1
4. About database design
Use the image upload function
image smallimage varchar is recognized as an image file , automatically generate a component that can upload images, single image
images smallimages varchar is recognized as an image file, automatically generate a component that can upload images, multiple images
createtime creation time int record adding time field, No manual maintenance is required
updatetime update time int field that records the update time, no manual maintenance is required
text text type automatically generates textarea text box
weigh weight int background sorting field, if the field exists, a sort button will appear. You can drag it up and down to sort
5. The request interface returns 403
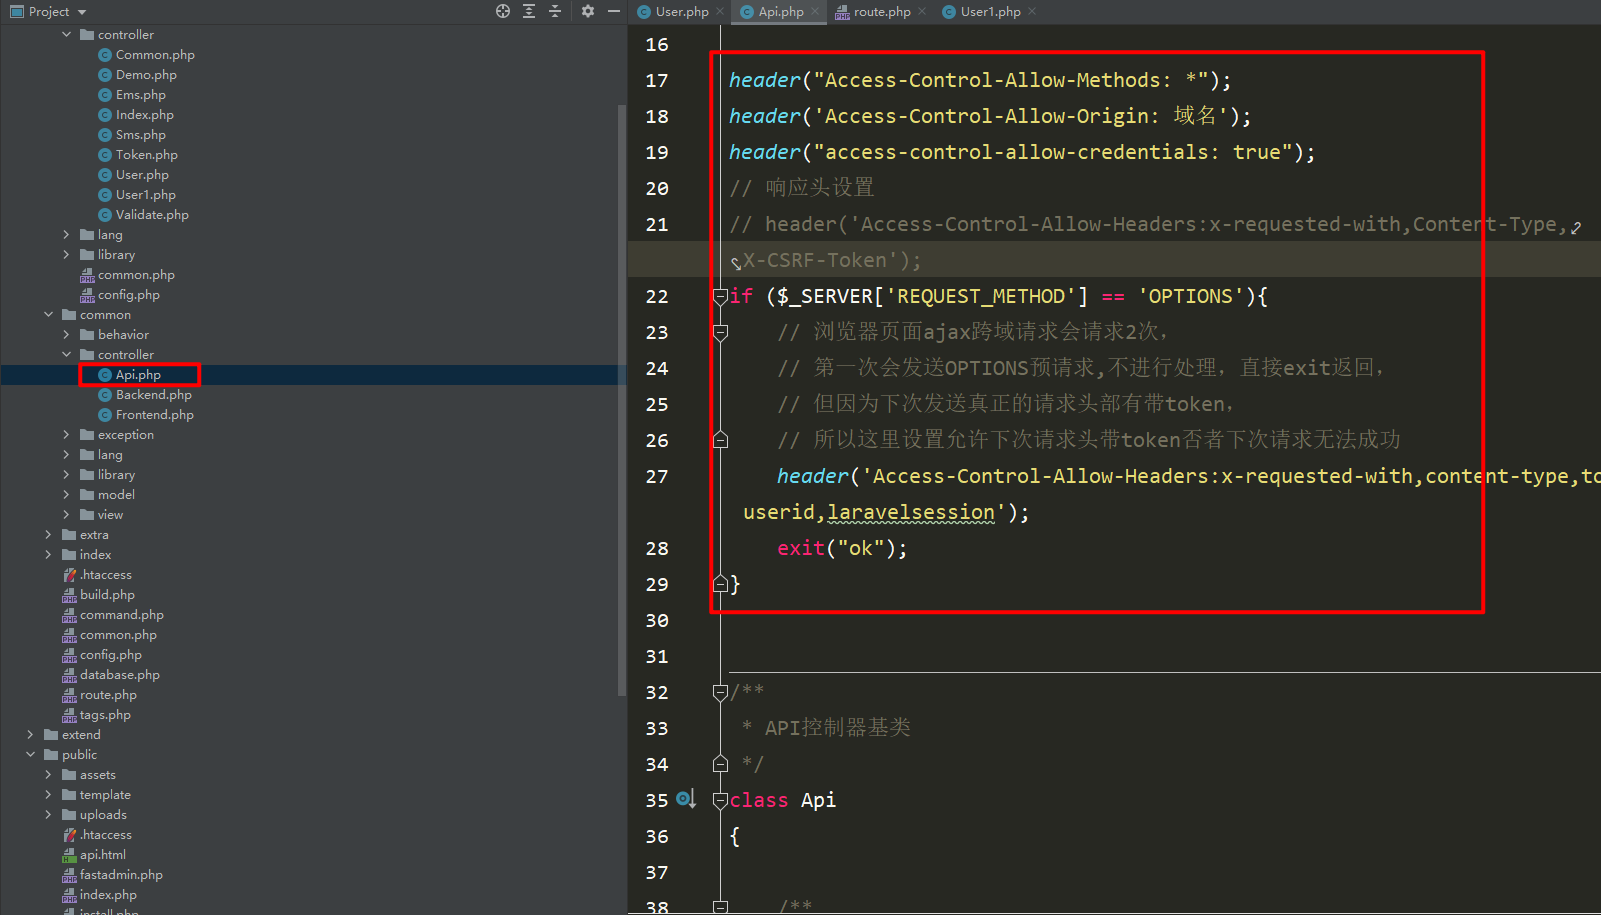
Add the following code to the api base class
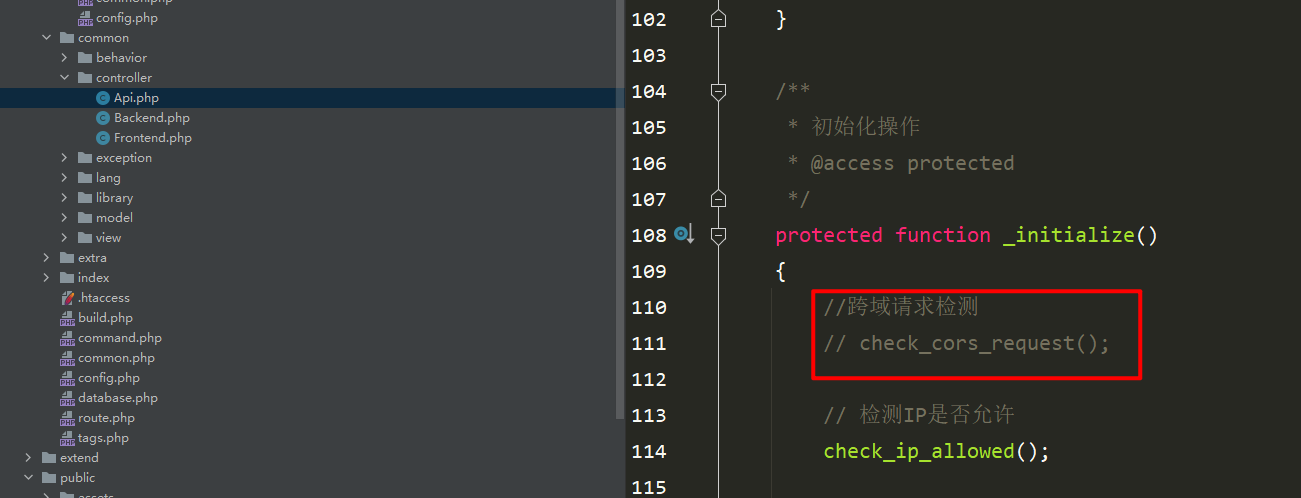
<span style="display: block; background: url(https://files.mdnice.com/user/3441/876cad08-0422-409d-bb5a-08afec5da8ee.svg); height: 30px; width: 100%; background-size: 40px; background-repeat: no-repeat; background-color: #282c34; margin-bottom: -7px; border-radius: 5px; background-position: 10px 10px;"></span><code class="hlEssential tutorial for getting started with fastadmin" style="overflow-x: auto; padding: 16px; color: #abb2bf; display: -webkit-box; font-family: Operator Mono, Consolas, Monaco, Menlo, monospace; font-size: 12px; -webkit-overflow-scrolling: touch; padding-top: 15px; background: #282c34; border-radius: 5px;">header(<span class="hlEssential tutorial for getting started with fastadmin-string" style="color: #98c379; line-height: 26px;">"Access-Control-Allow-Methods: *"</span>);<br/>header(<span class="hlEssential tutorial for getting started with fastadmin-string" style="color: #98c379; line-height: 26px;">'Access-Control-Allow-Origin: 域名'</span>);<br/>header(<span class="hlEssential tutorial for getting started with fastadmin-string" style="color: #98c379; line-height: 26px;">"access-control-allow-credentials: true"</span>);<br/><span class="hlEssential tutorial for getting started with fastadmin-comment" style="color: #5c6370; font-style: italic; line-height: 26px;">// 响应头设置</span><br/><span class="hlEssential tutorial for getting started with fastadmin-comment" style="color: #5c6370; font-style: italic; line-height: 26px;">// header('Access-Control-Allow-Headers:x-requested-with,Content-Type,X-CSRF-Token');</span><br/><span class="hlEssential tutorial for getting started with fastadmin-keyword" style="color: #c678dd; line-height: 26px;">if</span> ($_SERVER[<span class="hlEssential tutorial for getting started with fastadmin-string" style="color: #98c379; line-height: 26px;">'REQUEST_METHOD'</span>] == <span class="hlEssential tutorial for getting started with fastadmin-string" style="color: #98c379; line-height: 26px;">'OPTIONS'</span>){<br/> <span class="hlEssential tutorial for getting started with fastadmin-comment" style="color: #5c6370; font-style: italic; line-height: 26px;">// 浏览器页面ajax跨域请求会请求2次,</span><br/> <span class="hlEssential tutorial for getting started with fastadmin-comment" style="color: #5c6370; font-style: italic; line-height: 26px;">// 第一次会发送OPTIONS预请求,不进行处理,直接exit返回,</span><br/> <span class="hlEssential tutorial for getting started with fastadmin-comment" style="color: #5c6370; font-style: italic; line-height: 26px;">// 但因为下次发送真正的请求头部有带token,</span><br/> <span class="hlEssential tutorial for getting started with fastadmin-comment" style="color: #5c6370; font-style: italic; line-height: 26px;">// 所以这里设置允许下次请求头带token否者下次请求无法成功</span><br/> header(<span class="hlEssential tutorial for getting started with fastadmin-string" style="color: #98c379; line-height: 26px;">'Access-Control-Allow-Headers:x-requested-with,content-type,token,userid,laravelsession'</span>);<br/> <span class="hlEssential tutorial for getting started with fastadmin-keyword" style="color: #c678dd; line-height: 26px;">exit</span>(<span class="hlEssential tutorial for getting started with fastadmin-string" style="color: #98c379; line-height: 26px;">"ok"</span>);<br/>}<br/></code>Then comment out the cross-domain detection
6. The solution list page displays the category ID instead of the category name
In fact, this problem is easy to solve, don’t think about it too complicated.
You can try to imagine how this problem is solved in the thinkphp framework.
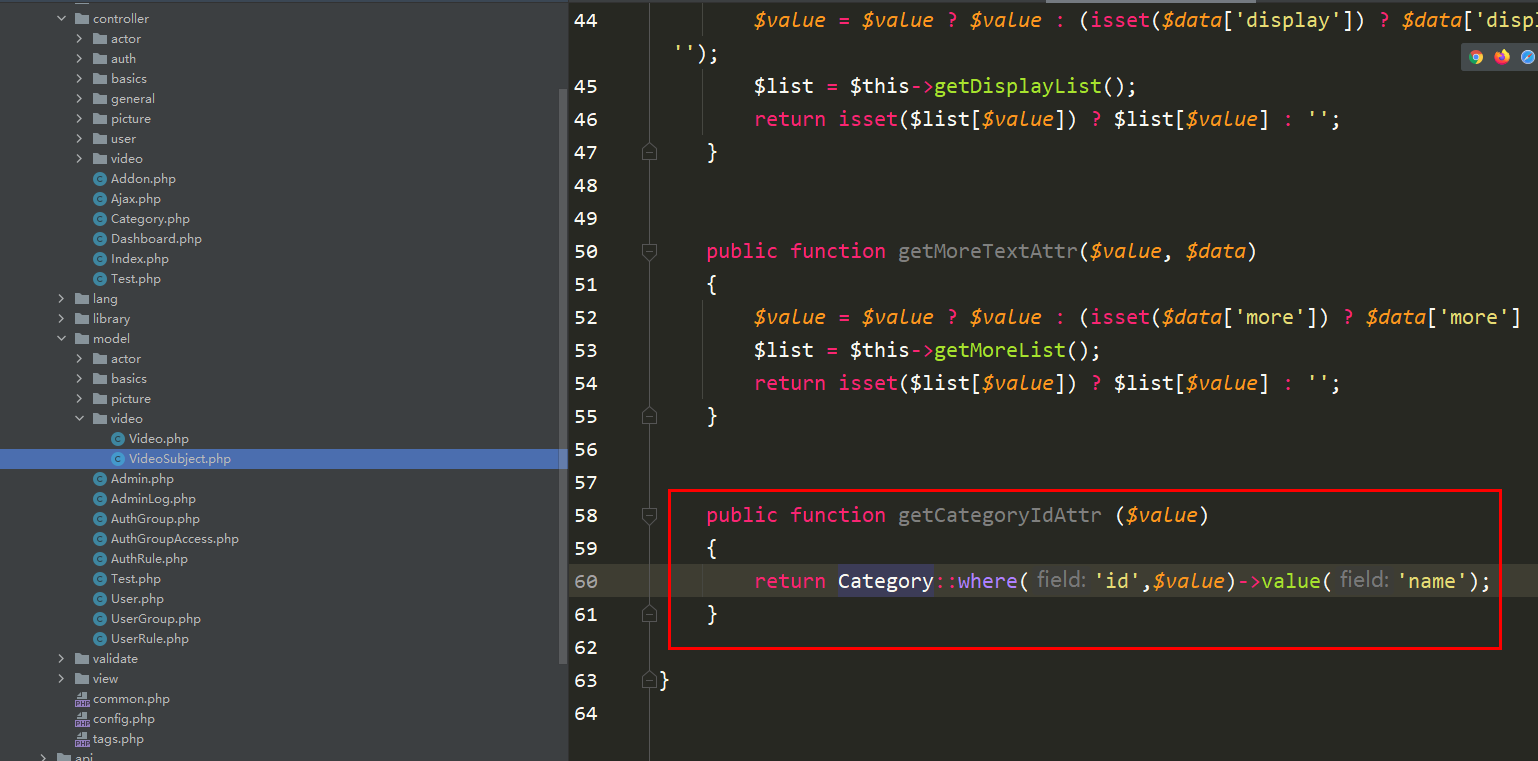
The solution to this problem in thinkphp is to use getters.
You only need to set the getter in the corresponding model.
Page display
But Is this really how it's handled? Don’t think everything will be fine once the data comes out.
You can think about it. The name of the category is not displayed on the index page, but the name appears during modification.
Then can we conclude that the home page does not use the getter, but the add and edit pages use the getter.
If you follow the above method and directly add a getter to the model violently, it will cause a very serious problem, that is, the modification will not display the data. If you don’t believe it, you can try it.
Just like the picture below, this is not a joke.
So this solution definitely won’t work.
试想一下,在thinkphp框架中,除了Essential tutorial for getting started with fastadmin可以表字段处理外,同样使用Essential tutorial for getting started with fastadmin也可以。当然用最原始的Essential tutorial for getting started with fastadminon方法也是可以的。
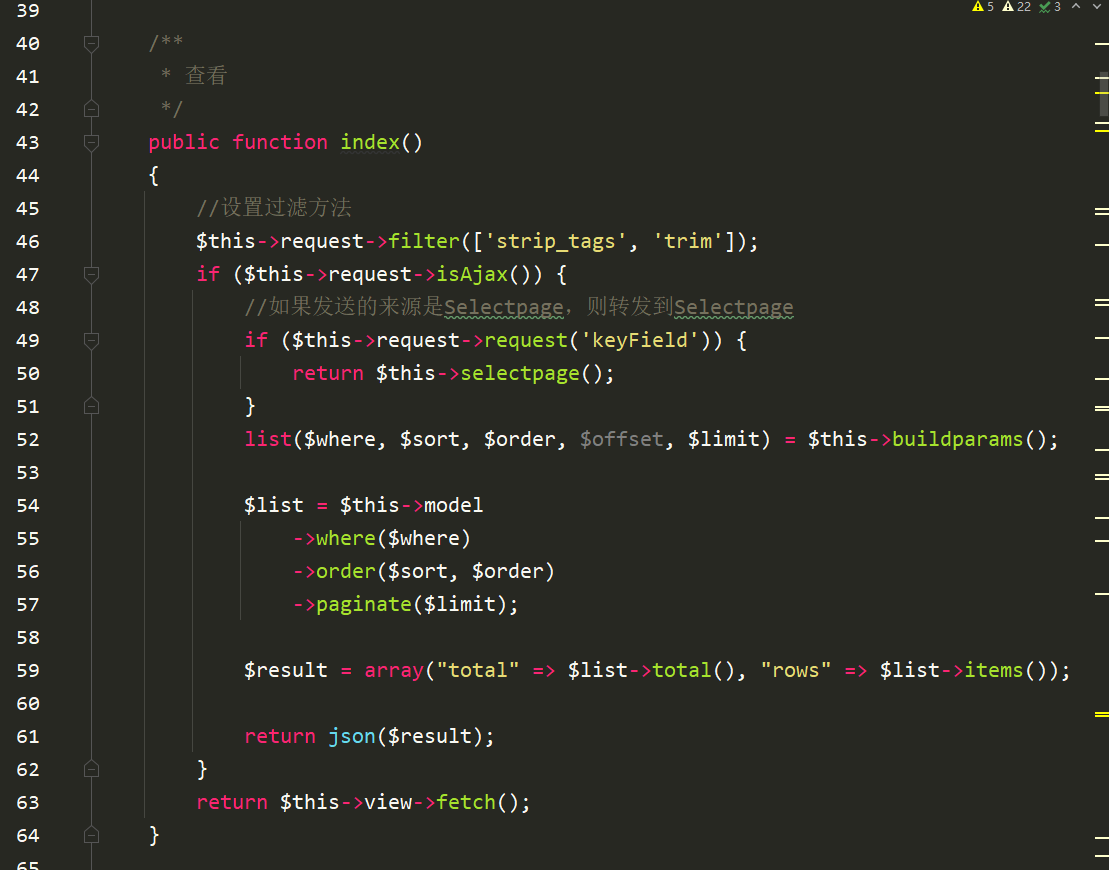
在fastadmin中,控制器的方法都继承于application/admin/library/traits/Backend.php这个文件中。
在这个文件中可以看到Essential tutorial for getting started with fastadmin
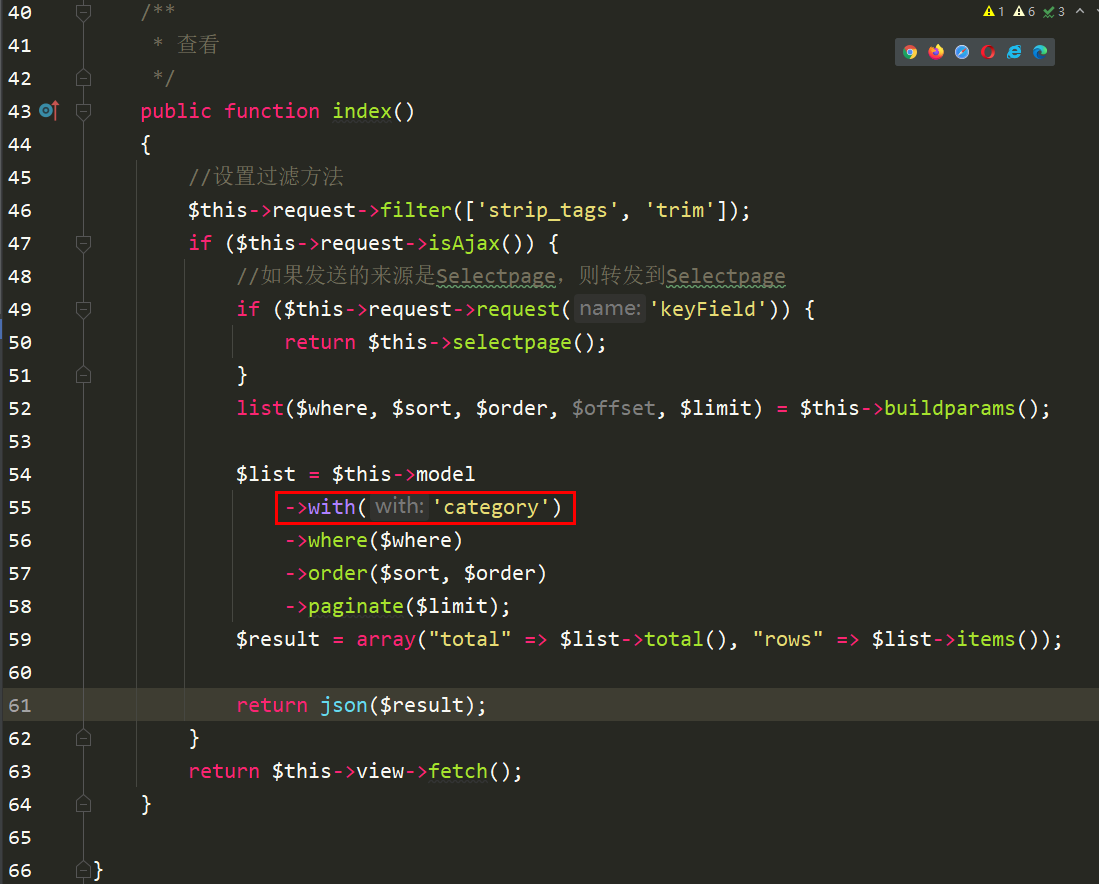
那只能做的一件事情就是在需要显示分类名称的控制器中重写这个方法index呗!
在重写之前需要做的一件事情就是需要在对应的模型中写上Essential tutorial for getting started with fastadmin
然后在你需要的控制器上Essential tutorial for getting started with fastadmin
源码
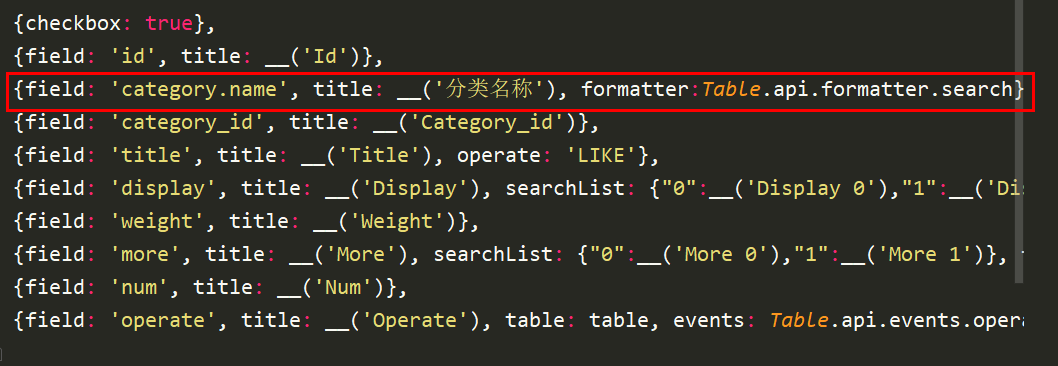
<span style="display: block; background: url(https://files.mdnice.com/user/3441/876cad08-0422-409d-bb5a-08afec5da8ee.svg); height: 30px; width: 100%; background-size: 40px; background-repeat: no-repeat; background-color: #282c34; margin-bottom: -7px; border-radius: 5px; background-position: 10px 10px;"></span><code class="hlEssential tutorial for getting started with fastadmin" style="overflow-x: auto; padding: 16px; color: #abb2bf; display: -webkit-box; font-family: Operator Mono, Consolas, Monaco, Menlo, monospace; font-size: 12px; -webkit-overflow-scrolling: touch; padding-top: 15px; background: #282c34; border-radius: 5px;"> <span class="hlEssential tutorial for getting started with fastadmin-comment" style="color: #5c6370; font-style: italic; line-height: 26px;">/**<br/> * 查看<br/> */</span><br/> <span class="hlEssential tutorial for getting started with fastadmin-keyword" style="color: #c678dd; line-height: 26px;">public</span> <span class="hlEssential tutorial for getting started with fastadmin-function" style="line-height: 26px;"><span class="hlEssential tutorial for getting started with fastadmin-keyword" style="color: #c678dd; line-height: 26px;">function</span> <span class="hlEssential tutorial for getting started with fastadmin-title" style="color: #61aeee; line-height: 26px;">index</span><span class="hlEssential tutorial for getting started with fastadmin-params" style="line-height: 26px;">()</span><br/> </span>{<br/> <span class="hlEssential tutorial for getting started with fastadmin-comment" style="color: #5c6370; font-style: italic; line-height: 26px;">//设置过滤方法</span><br/> <span class="hlEssential tutorial for getting started with fastadmin-keyword" style="color: #c678dd; line-height: 26px;">$this</span>->request->filter([<span class="hlEssential tutorial for getting started with fastadmin-string" style="color: #98c379; line-height: 26px;">'strip_tags'</span>, <span class="hlEssential tutorial for getting started with fastadmin-string" style="color: #98c379; line-height: 26px;">'trim'</span>]);<br/> <span class="hlEssential tutorial for getting started with fastadmin-keyword" style="color: #c678dd; line-height: 26px;">if</span> (<span class="hlEssential tutorial for getting started with fastadmin-keyword" style="color: #c678dd; line-height: 26px;">$this</span>->request->isAjax()) {<br/> <span class="hlEssential tutorial for getting started with fastadmin-comment" style="color: #5c6370; font-style: italic; line-height: 26px;">//如果发送的来源是Selectpage,则转发到Selectpage</span><br/> <span class="hlEssential tutorial for getting started with fastadmin-keyword" style="color: #c678dd; line-height: 26px;">if</span> (<span class="hlEssential tutorial for getting started with fastadmin-keyword" style="color: #c678dd; line-height: 26px;">$this</span>->request->request(<span class="hlEssential tutorial for getting started with fastadmin-string" style="color: #98c379; line-height: 26px;">'keyField'</span>)) {<br/> <span class="hlEssential tutorial for getting started with fastadmin-keyword" style="color: #c678dd; line-height: 26px;">return</span> <span class="hlEssential tutorial for getting started with fastadmin-keyword" style="color: #c678dd; line-height: 26px;">$this</span>->selectpage();<br/> }<br/> <span class="hlEssential tutorial for getting started with fastadmin-keyword" style="color: #c678dd; line-height: 26px;">list</span>($where, $sort, $order, $offset, $limit) = <span class="hlEssential tutorial for getting started with fastadmin-keyword" style="color: #c678dd; line-height: 26px;">$this</span>->buildparams();<br/><br/> $list = <span class="hlEssential tutorial for getting started with fastadmin-keyword" style="color: #c678dd; line-height: 26px;">$this</span>->model<br/> ->with(<span class="hlEssential tutorial for getting started with fastadmin-string" style="color: #98c379; line-height: 26px;">'category'</span>)<br/> ->where($where)<br/> ->order($sort, $order)<br/> ->paginate($limit);<br/> $result = <span class="hlEssential tutorial for getting started with fastadmin-keyword" style="color: #c678dd; line-height: 26px;">array</span>(<span class="hlEssential tutorial for getting started with fastadmin-string" style="color: #98c379; line-height: 26px;">"total"</span> => $list->total(), <span class="hlEssential tutorial for getting started with fastadmin-string" style="color: #98c379; line-height: 26px;">"rows"</span> => $list->items());<br/><br/> <span class="hlEssential tutorial for getting started with fastadmin-keyword" style="color: #c678dd; line-height: 26px;">return</span> Essential tutorial for getting started with fastadminon($result);<br/> }<br/> <span class="hlEssential tutorial for getting started with fastadmin-keyword" style="color: #c678dd; line-height: 26px;">return</span> <span class="hlEssential tutorial for getting started with fastadmin-keyword" style="color: #c678dd; line-height: 26px;">$this</span>->view->fetch();<br/> }<br/></code>到这里可并没有万事大吉啊!还需要修改模板,在对应的Essential tutorial for getting started with fastadmin文件中添加即可
<span style="display: block; background: url(https://files.mdnice.com/user/3441/876cad08-0422-409d-bb5a-08afec5da8ee.svg); height: 30px; width: 100%; background-size: 40px; background-repeat: no-repeat; background-color: #282c34; margin-bottom: -7px; border-radius: 5px; background-position: 10px 10px;"></span><code class="hlEssential tutorial for getting started with fastadmin" style="overflow-x: auto; padding: 16px; color: #abb2bf; display: -webkit-box; font-family: Operator Mono, Consolas, Monaco, Menlo, monospace; font-size: 12px; -webkit-overflow-scrolling: touch; padding-top: 15px; background: #282c34; border-radius: 5px;">{field: <span class="hlEssential tutorial for getting started with fastadmin-string" style="color: #98c379; line-height: 26px;">'category.name'</span>, title: __(<span class="hlEssential tutorial for getting started with fastadmin-string" style="color: #98c379; line-height: 26px;">'分类名称'</span>), formatter:Table.api.formatter.search},<br/></code>Essential tutorial for getting started with fastadmin中说是还需要设置属性设置属性protected $relationSearch = true;,反正咔咔测试设置不设置都一样,你们看着来,目前还没发现这个参数到底是控制什么的。官方Essential tutorial for getting started with fastadmin说是控制开启关联查询,但是经测试,好像没什么大碍。
来看一下Essential tutorial for getting started with fastadmin吧!
如果只是一对一那解决方案会有很多种。
你可以使用Essential tutorial for getting started with fastadminon来直接查询,同样你也可以循环查询出来的数据,然后根据每个分类ID进行查询出对应的分类名即可。
七、为什么添加和修改都不管用了?
这里的问题首先去看看数据库的表结构,看你的表结构是否有问题。
表结构不要设置为field_id结尾,这样的字段是不可以的。
直接暴力就是fieldId即可。
关于这块后期看一下fastadmin源码,看是不是后缀带id的都会做什么操作。
经过看源码得出的结论。
fastadmin在一键curd时会将后缀为_id的字段识别为表外键,在新增记录时无论填入任何值都和报错“xxx_id不能为空”,这是因为fastadmin将其识别为了外键在add.html语句中这个字段的input是这样的:
<span style="display: block; background: url(https://files.mdnice.com/user/3441/876cad08-0422-409d-bb5a-08afec5da8ee.svg); height: 30px; width: 100%; background-size: 40px; background-repeat: no-repeat; background-color: #282c34; margin-bottom: -7px; border-radius: 5px; background-position: 10px 10px;"></span><code class="hlEssential tutorial for getting started with fastadmin" style="overflow-x: auto; padding: 16px; color: #abb2bf; display: -webkit-box; font-family: Operator Mono, Consolas, Monaco, Menlo, monospace; font-size: 12px; -webkit-overflow-scrolling: touch; padding-top: 15px; background: #282c34; border-radius: 5px;"><input id=<span class="hlEssential tutorial for getting started with fastadmin-string" style="color: #98c379; line-height: 26px;">"c-xxx_id"</span> data-rule=<span class="hlEssential tutorial for getting started with fastadmin-string" style="color: #98c379; line-height: 26px;">"required"</span> data-source=<span class="hlEssential tutorial for getting started with fastadmin-string" style="color: #98c379; line-height: 26px;">"xxx/index"</span> <span class="hlEssential tutorial for getting started with fastadmin-class" style="line-height: 26px;"><span class="hlEssential tutorial for getting started with fastadmin-keyword" style="color: #c678dd; line-height: 26px;">class</span>="<span class="hlEssential tutorial for getting started with fastadmin-title" style="color: #e6c07b; line-height: 26px;">form</span>-<span class="hlEssential tutorial for getting started with fastadmin-title" style="color: #e6c07b; line-height: 26px;">control</span> <span class="hlEssential tutorial for getting started with fastadmin-title" style="color: #e6c07b; line-height: 26px;">selectpage</span>" <span class="hlEssential tutorial for getting started with fastadmin-title" style="color: #e6c07b; line-height: 26px;">data</span>-<span class="hlEssential tutorial for getting started with fastadmin-title" style="color: #e6c07b; line-height: 26px;">field</span>="<span class="hlEssential tutorial for getting started with fastadmin-title" style="color: #e6c07b; line-height: 26px;">name</span>" <span class="hlEssential tutorial for getting started with fastadmin-title" style="color: #e6c07b; line-height: 26px;">name</span>="<span class="hlEssential tutorial for getting started with fastadmin-title" style="color: #e6c07b; line-height: 26px;">row</span>[<span class="hlEssential tutorial for getting started with fastadmin-title" style="color: #e6c07b; line-height: 26px;">xxx_id</span>]" <span class="hlEssential tutorial for getting started with fastadmin-title" style="color: #e6c07b; line-height: 26px;">type</span>="<span class="hlEssential tutorial for getting started with fastadmin-title" style="color: #e6c07b; line-height: 26px;">text</span>" <span class="hlEssential tutorial for getting started with fastadmin-title" style="color: #e6c07b; line-height: 26px;">value</span>=""><br/><br/></span></code>
八、列表字段显示的为英文
这个问题就很简单了,咔咔没有看源码理解就是语言包没有你设置的这个字段名。
直接打开到对应的Essential tutorial for getting started with fastadmin文件,然后修改初始化表格中的title值即可。
修改完之后就可以看到中文名了。
九、如何在一个模板上Essential tutorial for getting started with fastadmin,然后显示设置的表格
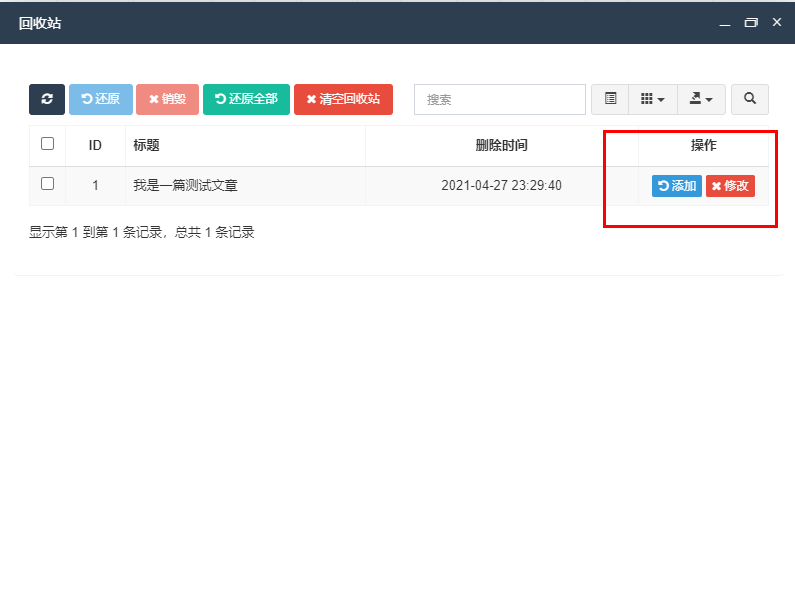
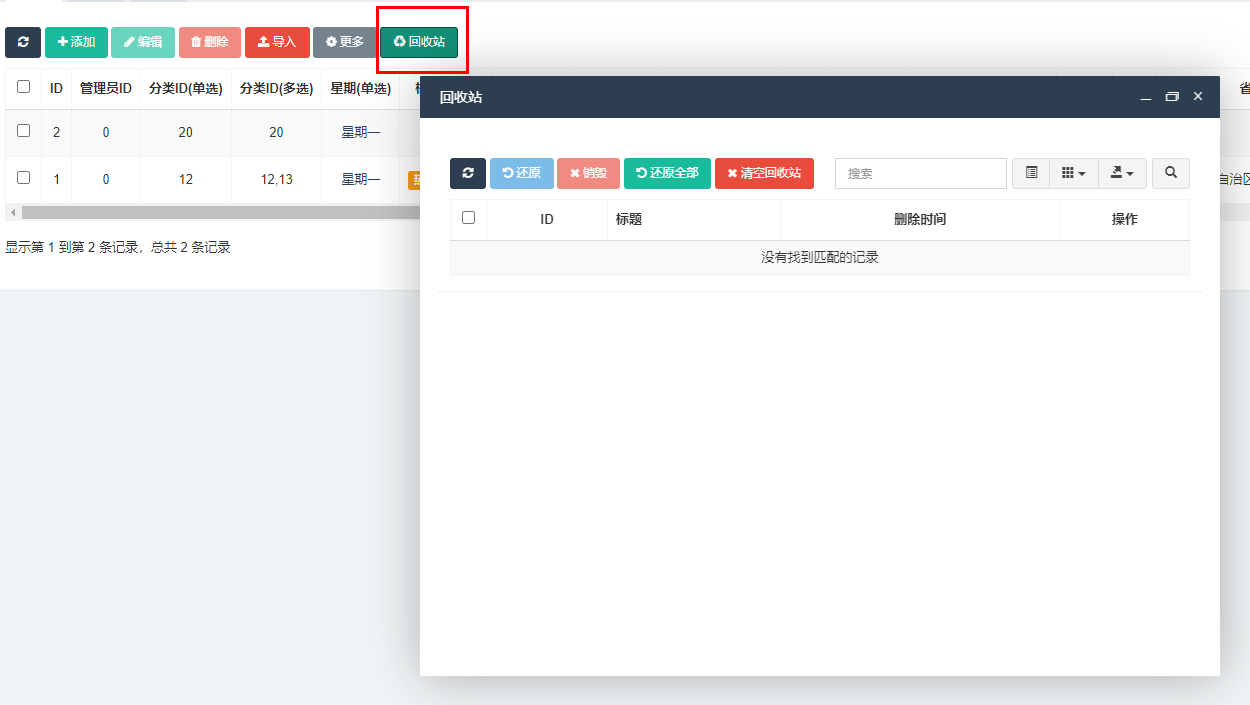
先看实现效果,点击回收站之后弹出一个表格。
那么如何给自己需要的模板设置同样的效果呢?
接下来就使用官方给的案例进行解读。
首先来到test的index模板中可以看到回收站的这个按钮。
这里需要注意这个herf的值,如果是自己自定义的按钮直接把title替换成自己设置的名字即可。
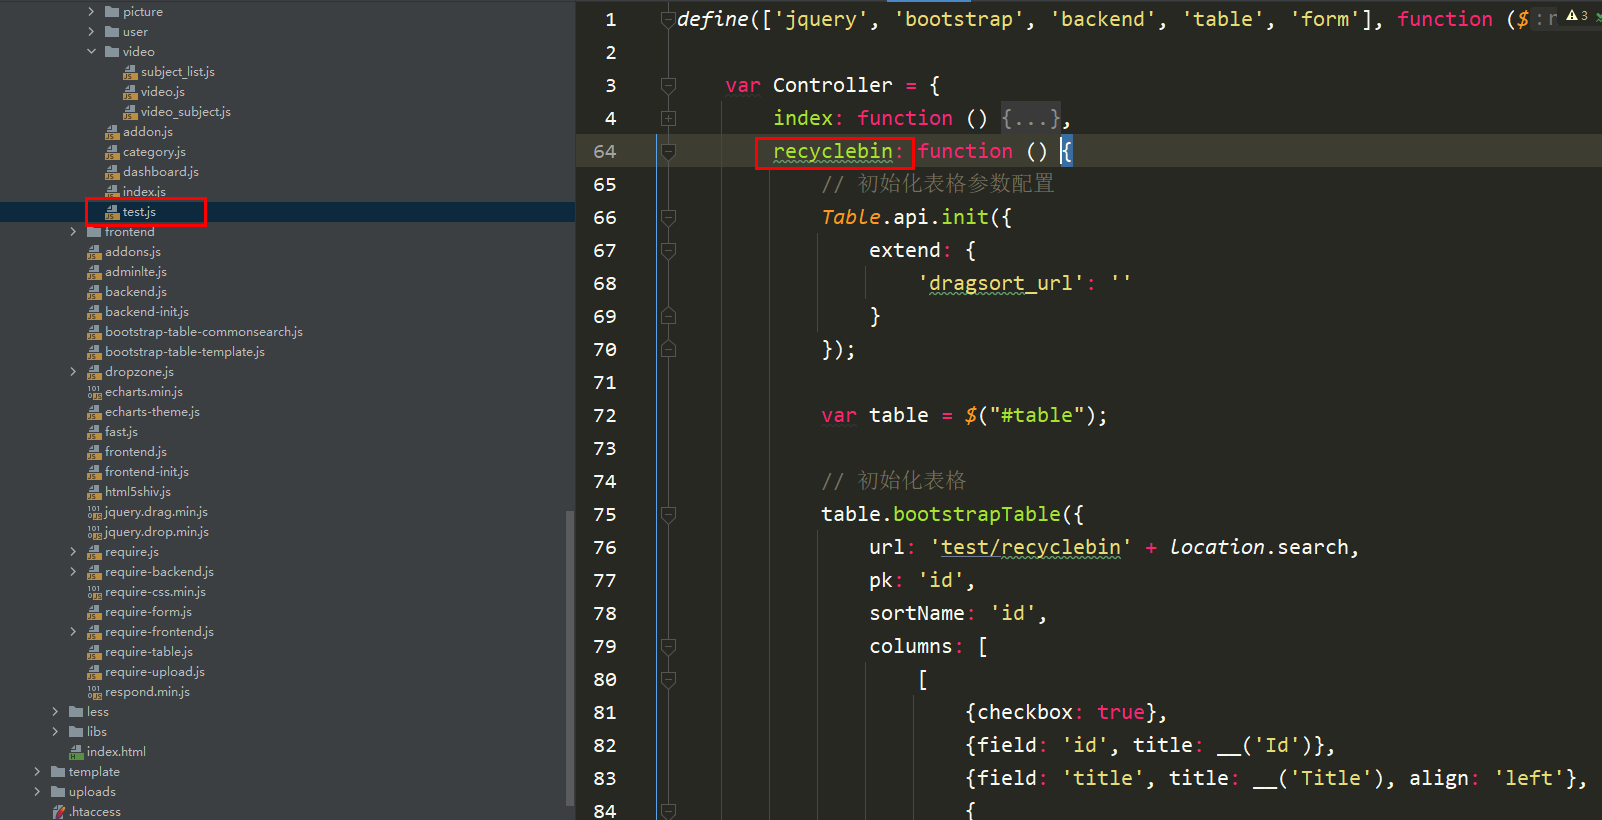
Then we come to the test Essential tutorial for getting started with fastadmin template. In this Essential tutorial for getting started with fastadmin, you can see that in addition to the index initialization form, there is also a recyclebinThis method.
If you don’t want to write, just use this method, but you must modify the url address!
But these modifications made at this time are far from enough. A controller is also needed, so testrecyclebin This method is in the file application/admin/library/traits/Backend.php.
If you want to set your own method, then you need to add a new method to the controller, and then copy the index method code in this file.
Now that we have the controller and Essential tutorial for getting started with fastadmin to create the table, what is missing!
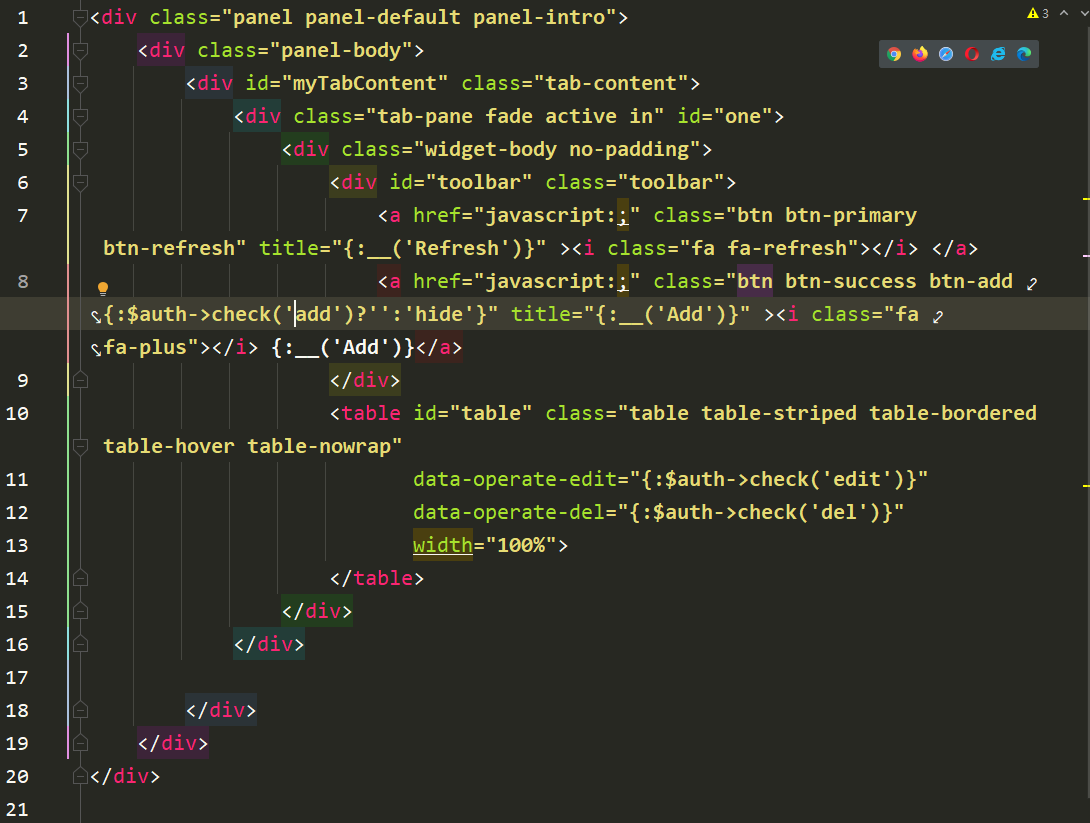
I still need a template! Create an html file with the same name as your method, and then copy an index.html template into it.
Only leave these codes when copying, and the rest can be deleted. If the above code is added to the KaKa test, it will be inaccessible.
The setting of the html file name is the same as the picture below
After completing these tasks, you can see what you want.
Implementation steps
Write the method that needs to display the list in the controller Test, such as the display method -
After creating the controller, you need to create the display.html template file corresponding to the display method The creation location of the html template file is in the Test directory Find the Essential tutorial for getting started with fastadmin file of Test, and then add the display method. If you don’t know how to write this method, just use recyclebin- ## in test.Essential tutorial for getting started with fastadmin in the case. #Then it’s done
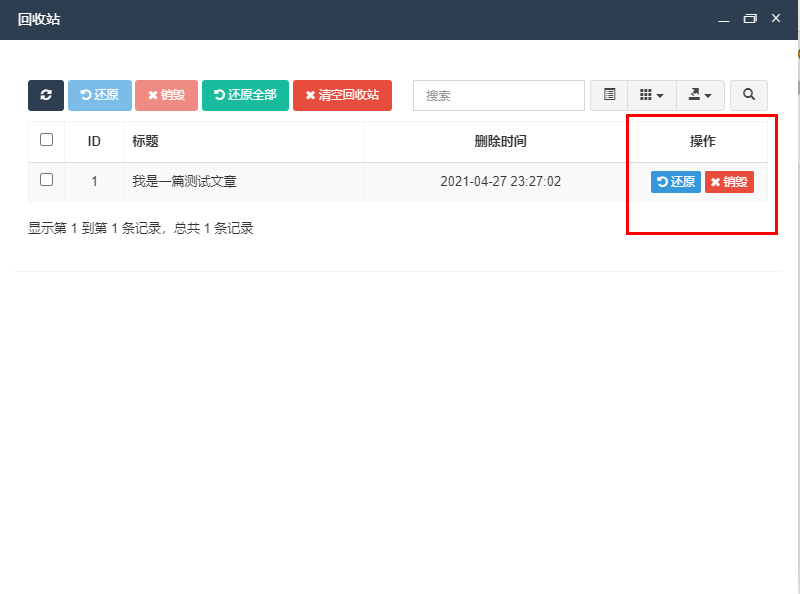
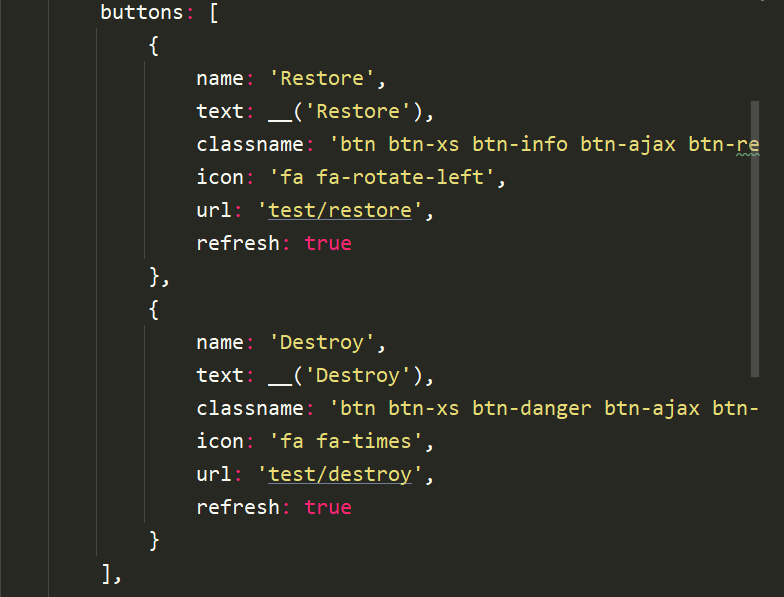
recyclebin in the .Essential tutorial for getting started with fastadmin method, then there will be a problem with the operation button.
recyclebin, you can set it yourself.
十、关于Essential tutorial for getting started with fastadmin设置为state查询条件没用
如果你发现你对state这个字段设置where条件后没有效果时,试着查询一条数据,然后看一下这个state类型
<span style="display: block; background: url(https://files.mdnice.com/user/3441/876cad08-0422-409d-bb5a-08afec5da8ee.svg); height: 30px; width: 100%; background-size: 40px; background-repeat: no-repeat; background-color: #282c34; margin-bottom: -7px; border-radius: 5px; background-position: 10px 10px;"></span><code class="hlEssential tutorial for getting started with fastadmin" style="overflow-x: auto; padding: 16px; color: #abb2bf; display: -webkit-box; font-family: Operator Mono, Consolas, Monaco, Menlo, monospace; font-size: 12px; -webkit-overflow-scrolling: touch; padding-top: 15px; background: #282c34; border-radius: 5px;">string(<span class="hlEssential tutorial for getting started with fastadmin-number" style="color: #d19a66; line-height: 26px;">1</span>) <span class="hlEssential tutorial for getting started with fastadmin-string" style="color: #98c379; line-height: 26px;">"1"</span><br/></code>
如果类型是上边打印的结果,那么你就要注意了,在查询条件中需要写上"1" ,也就是字符串1,而非整型1。
看到这里是不是恍然大悟,赶紧去改你的查询条件吧!
十一、设置的Essential tutorial for getting started with fastadmin页面怎么是下拉框,不是单选框
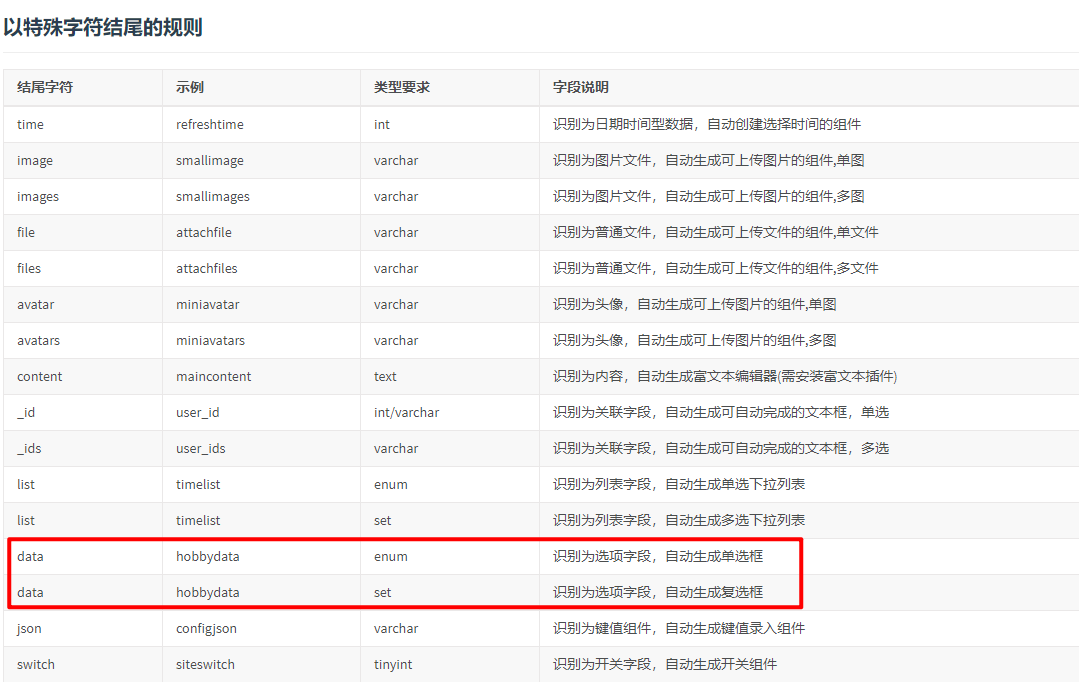
如果你使用的Essential tutorial for getting started with fastadmin,则会出现上的两种情况。
一种是下拉框,一种是单元框。
那么是什么原因造成的不一致呢?
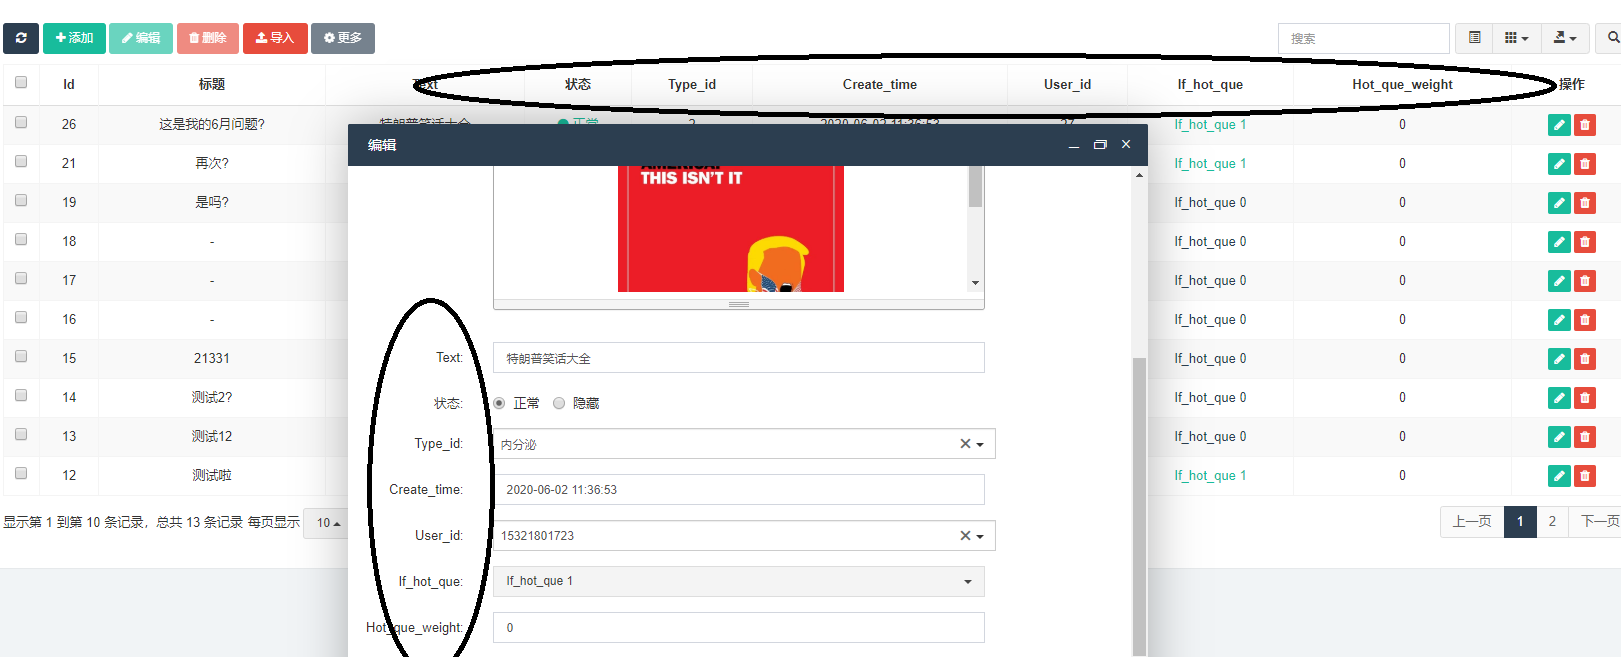
Please look at the picture above. If you want to generate the form of a unit, use the enum type and use data at the end of the field name.
12. How to refresh data after successfully initiating ajax
You can understand this process as the user uploads a picture.
Then the background needs to be reviewed.
After clicking the audit button in the background, this data needs to be removed. If you find that the data has not been removed.
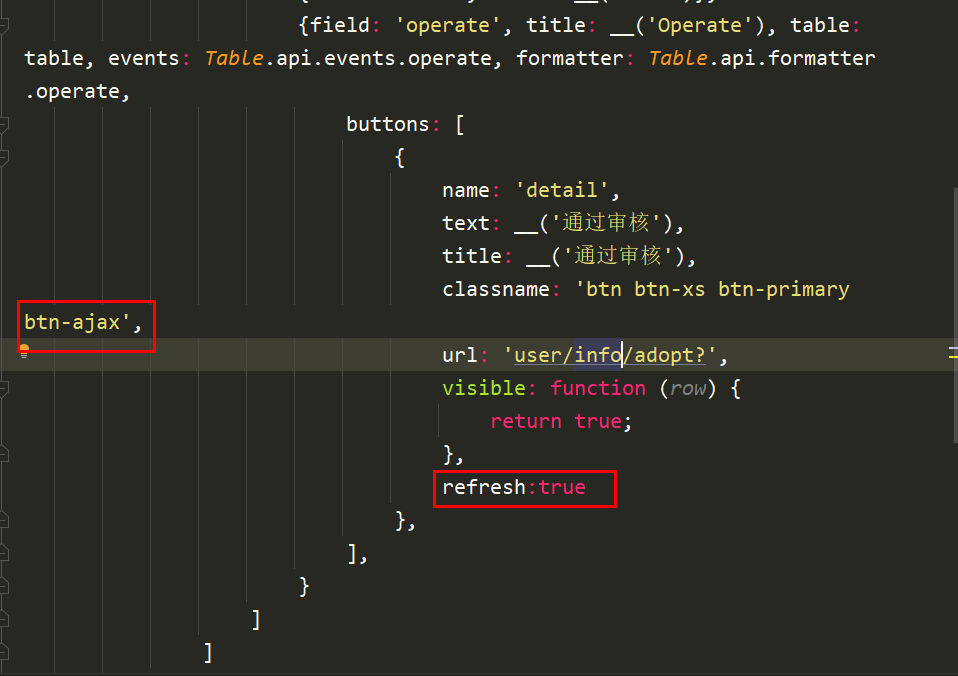
You need to add refresh:true to the corresponding Essential tutorial for getting started with fastadmin file.
Let’s talk about how to initiate an ajax request. It is also very simple to set the button’s attribute to btn-ajax.
This section’s practical questions about fastadmin end here. If you have other related questions, you can privately chat with Kaka , or you can leave it in the comment area, and I will reply as soon as I see it.
“Persistence in learning, persistence in writing, and persistence in sharing are the beliefs that Kaka has always upheld since his career. I hope that Kaka’s articles in the huge Internet can bring you a little Help. I’m Kaka, see you next time.
”
The above is the detailed content of Essential tutorial for getting started with fastadmin. For more information, please follow other related articles on the PHP Chinese website!

Hot AI Tools

Undress AI Tool
Undress images for free

Undresser.AI Undress
AI-powered app for creating realistic nude photos

AI Clothes Remover
Online AI tool for removing clothes from photos.

Clothoff.io
AI clothes remover

Video Face Swap
Swap faces in any video effortlessly with our completely free AI face swap tool!

Hot Article

Hot Tools

Notepad++7.3.1
Easy-to-use and free code editor

SublimeText3 Chinese version
Chinese version, very easy to use

Zend Studio 13.0.1
Powerful PHP integrated development environment

Dreamweaver CS6
Visual web development tools

SublimeText3 Mac version
God-level code editing software (SublimeText3)







 Operation button problem
 Setting button