
This article will share with you a one-minute explanation of what phpMyAdmin is? What are the tutorials for using it? (Sharing) has certain reference value. Friends in need can refer to it. I hope it will be helpful to everyone.

##What is phpMyAdmin?
phpMyAdmin is the most widely used among many MySQL graphical management tools. It is a MySQL client software based on B/S mode developed using PHP. This tool is based on Web cross-platform management program and supports Simplified Chinese. Users can download the latest version from the official website. phpMyAdmin provides Web developers with a graphical database operation interface similar to Access and SQL Server. Through this management tool, you can perform various operations on MySQL, how to create databases, data tables, and generate MySQL database script files, etc. .Features
PHP is a server-based scripting language for creating dynamic websites. You can use PHP and HTML to generate the website homepage. When a visitor opens the homepage, the server executes PHP commands and sends the execution results to the visitor's browser. This is similar to ASP and CoildFusion. However, the difference between PHP and them is that PHP is open source and cross-platform. PHP can run on WINDOWSNT and various versions of UNIX. It doesn't require any pre-processing for fast feedback, and it doesn't require mod_perl tweaks to make your server's memory image smaller. PHP consumes fewer resources. When PHP is used as part of the Apache Web server, there is no need to call external binaries to run the code, and the server does not need to bear any additional burden. In addition to being able to manipulate your pages, PHP can also send HIIP headers. You can set cookies, manage digital signatures and redirect users, and it provides excellent connectivity to other databases (also ODBC), integrating various external libraries to do anything from parsing XML with PDF documents. [1]phpMyAdmin is a software tool written in PHP that can control and operate the MySQL database through the web. Through phpMyAdmin, you can completely operate the database, such as creating, copying and deleting data, etc. Managing MySQL databases becomes quite simple if you use the right tools. Using the MySQL command line method requires very familiarity with MySQL knowledge, and the same is true for the SQL language. Not only that, if the database has a large number of accesses, it will be quite difficult to read the data in the list.
There are currently many GUI MySQL client programs, the most outstanding of which is the Web-based phpMyAdmin tool. This is a PHP-based tool for the MySQL database frontend.
The disadvantage of PhpMyAdmin is that it must be installed on the web server, so without appropriate access rights, other users may compromise the SQL data.
Installation process
If you use the integrated installation package to configure the PHP development environment, there is no need to download the phpMyAdmin graphical management tool separately, because the integrated The installation package basically contains graphical management tools. We use the integrated installation package phpStudy here.
If you are not using the integrated installation package, you need to install the phpMyAdmin graphical management tool yourself. You can go to the official website to download the latest version. We will not introduce the specific installation process in detail here. You can read the article "//m.sbmmt.com/php-weizijiaocheng-357397.html", which introduces the phpMyAdmin installation process in detail!
Use
phpMyAdmin is a MySQL database management tool based on PHP and structured in Web-Base mode on the website host.
Can manage the entire MySQL server (requires super user) or a single database. In order to achieve the latter, you will need to set up the MySQL user appropriately so that he can only read/write to allowed databases. That's until you read the relevant section in the MySQL manual.
Whether it is a Windows operating system or a Linux operating system, the method of using the phpMyAdmin graphical management tool is the same.
phpMyAdmin operates the database in the visual interface of the graphical management tool
Operation database
Enter: localhost/phpMyAdmin/ in the address bar of the browser and press Enter to enter the main interface of phpMyAdmin. Next, you can operate the MySQL database.
1. Create a database
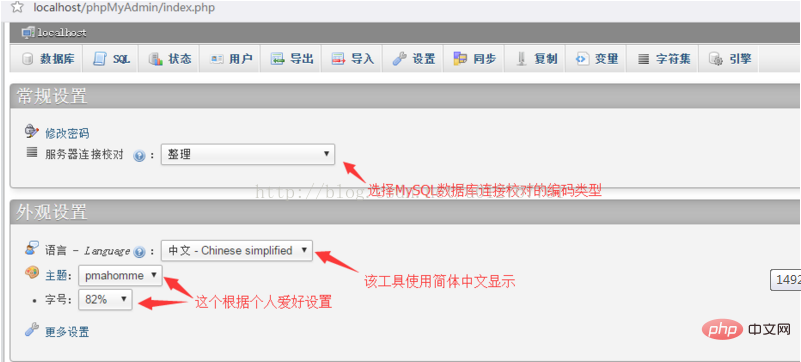
In the main interface of phpMyAdmin, you can see the drop-down box with "Language-languange", we can select "Chinese" in the drop-down box -Chinese simplified" option, and then there is "Server connection proofreading". We usually choose the utf8_general_ci simplified Chinese encoding format to prevent garbled characters.
After the above settings are completed, I will start to create the database. Click on the database in the upper left corner and the following interface will appear:
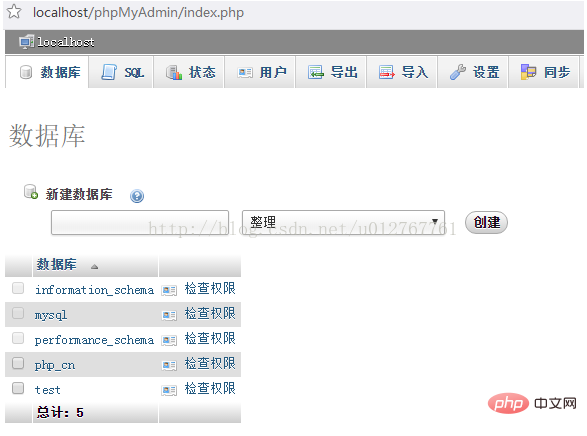
Then enter your database name in the text box, ours here is "php.cn", although we have set this encoding format at the beginning, but just in case, we You can select "utf8_general_ci" again here, then click the Create button and then you can see the database you created in the left column, as shown below:
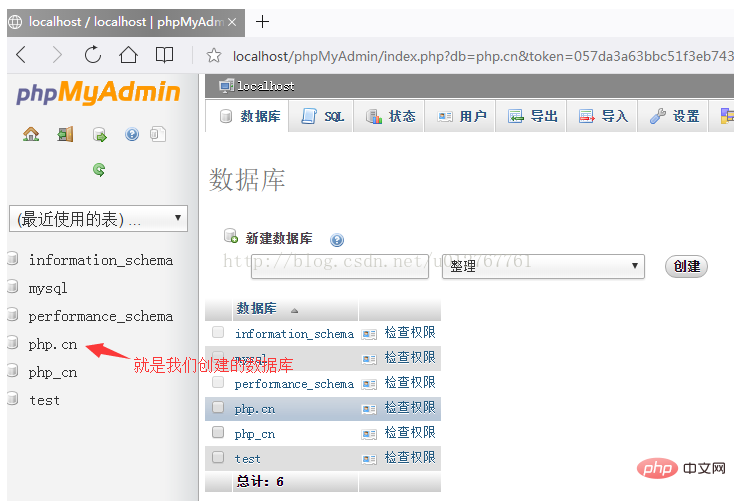
us You can click on the database we created to manage the database:

The above is the successful creation of the database!
2. Modify the database
In the database management interface (pictured above), there is an "Operation" button. Click to enter the page for modifying the operation database.
1. Enter the upper left corner of the modification page to create a data table for the current database. Enter the name of the data table to be created and the total number of fields in the two text boxes under the create data table prompt information, and click Click the "Execute" button to enter the page for creating a data table structure, which we will introduce in detail in a later article.
2. You can rename the database in the upper right corner of the modification page. Enter the database name in the text box of "Rename the database to:" and click "Execute" to successfully modify the database name.

3. Delete the database
Similarly click the "Action" button to enter the modification page, and click "New Data Table" Just below "Delete database, click to delete the database,
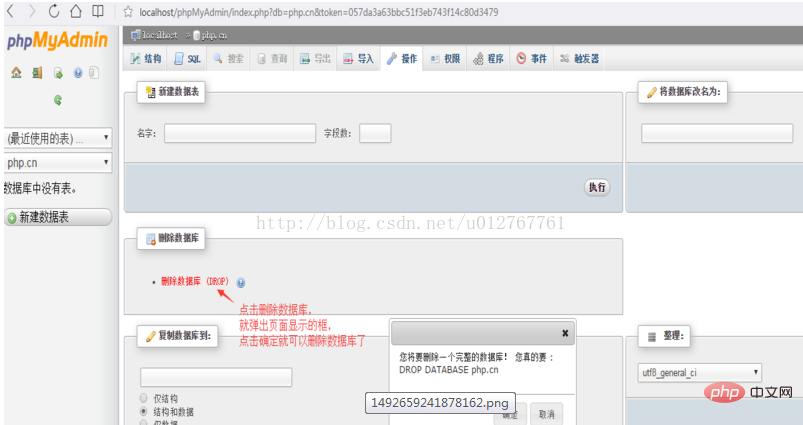
Note:
The database is very important in our daily development. There is a lot of data in it. If you want to delete it, you must be careful. Once Deletion cannot be restored. It is recommended to back up the database before deleting!
To operate a data table, you need to select a specified database, and then create and manage the data table in the database. Below we will introduce in detail how to create, modify and delete data tables!
1. Create a data table
Let’s use the user’s account as an example to introduce the creation method of the data table in detail.
After creating the php.cn database, click on the php.cn database, enter the name of the data table and the number of fields in the text box under "New Data Table", and then click the "Execute" button to create Data table, as shown below:
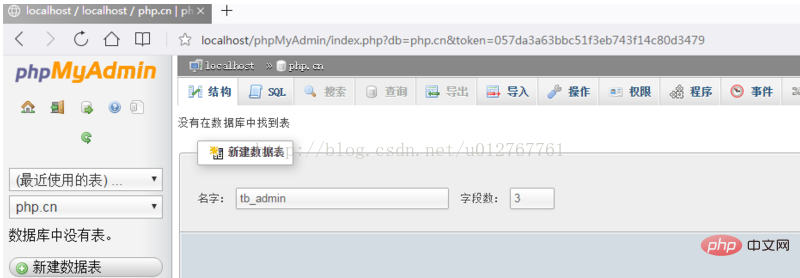
After the data table is successfully created, the interface of the data table structure will be displayed. Enter the details of each field in the form of this interface. Information, including field name, data type, length/value, encoding format, whether it is empty and primary key, etc., to complete the detailed setting of the table structure. After all the information is filled in, click "Save" to create The data table structure is as shown in the figure below,
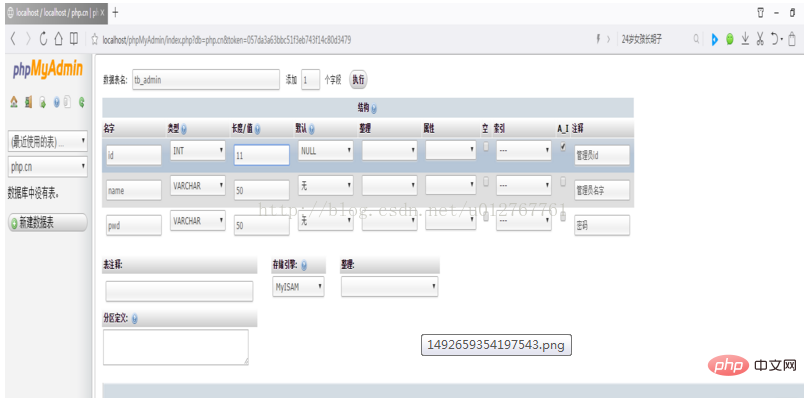
Tips:
After clicking the "Save" button, click "Data Table Name" to display the data table structure in horizontal format, making it easy to edit the structure!
2. Modify the data table
After creating a new data table, enter the data table structure page, where you can modify the table by changing the structure of the data table. You can perform operations such as adding columns, deleting columns, indexing columns, modifying the data type of columns or the length/value of fields, as shown below:
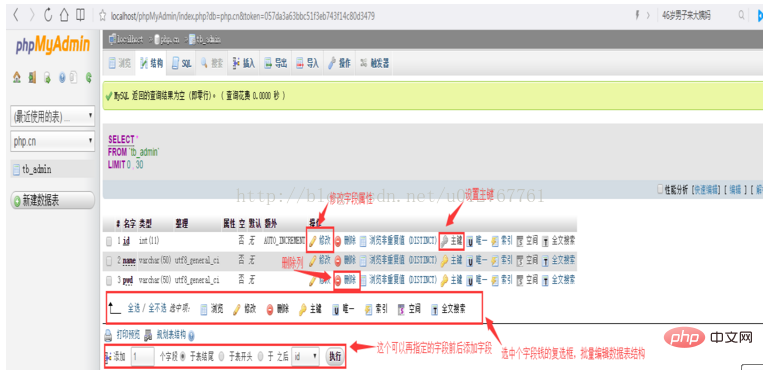
##3 .Delete a data table
Deleting a data table is similar to that of a database. Click the data table to enter the data table structure page. There is an "operation button" in the upper right corner. Click to enter the operation page. On this page, there are To modify the sorting of the table, you can move the table to other databases, modify table options, and maintain the table. There is a "Delete data or data table" in the lower right corner. Click "Delete data table" to delete the data table! As shown below: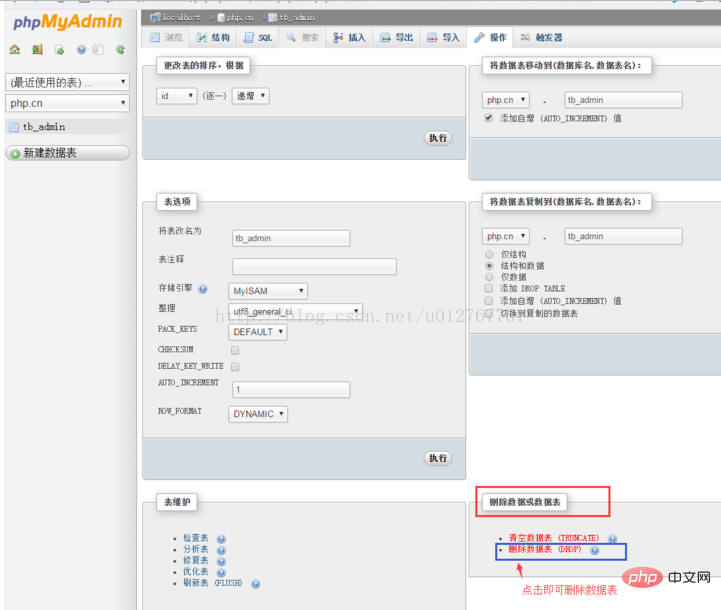
##Detailed graphic and text explanation of using SQL statements to operate data tables
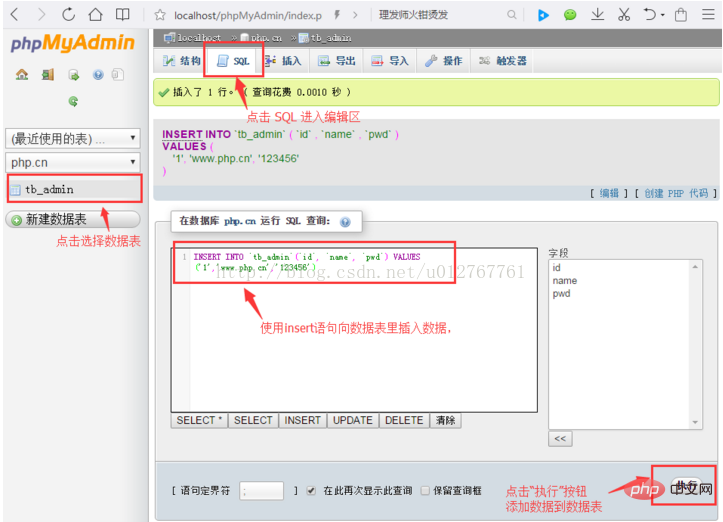
Click the "SQL" button in the main interface of phpMyAdmin to open the SQL statement editing area and enter the complete SQL statement to query, add, and modify data. and delete operations!
Use the insert statement item in the SQL statement editing area to insert data into the data table php.cn, and click the "Execute" button , insert a piece of data into the data table. If the submitted SQL statement contains errors, the system will give a warning and prompt the user to modify it, as shown below:
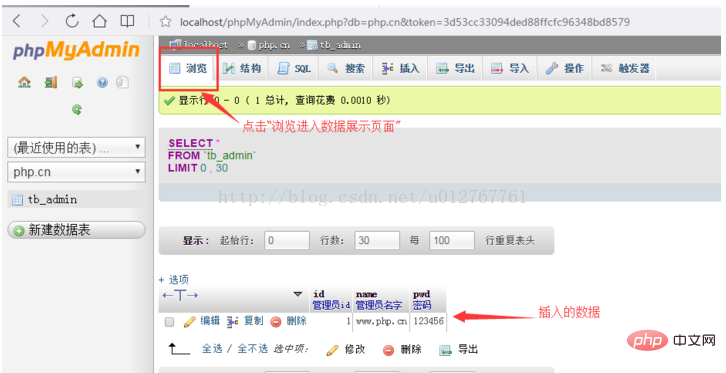
If the SQL statement has no errors and is submitted, click the "Browse" button in the upper left corner to enter the data display page, as shown below:
Tips:
#For the convenience of writing, you can use the attribute list on the right to select the column to be operated, just select To add a column, double-click its option or click the "<<" button to add a column name!
2. Use SQL statements to modify the data
Use the update statement in the SQL editing area to modify the data information. For example: the name of the user with id 1 is modified to "PHP Chinese website", change the password to: "654321", see the picture below for details:
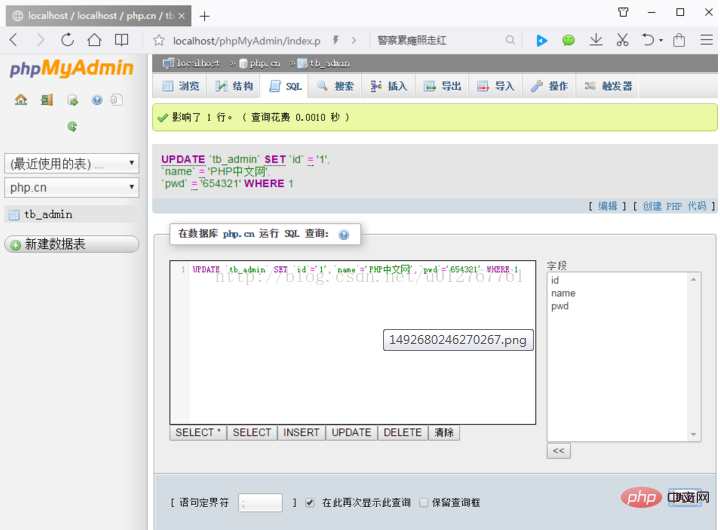
The above picture will make the page after success, so you can Take a look at the page where the data is displayed.
Before modification:

After modification:

It can be seen from the above that the modification has been successful!
3. Use SQL statements to query data
Use the select statement in the SQL statement editing area to retrieve the data information of the specified conditions, such as: all the information of di small and 4 When displayed, the SQL statement is as shown below:
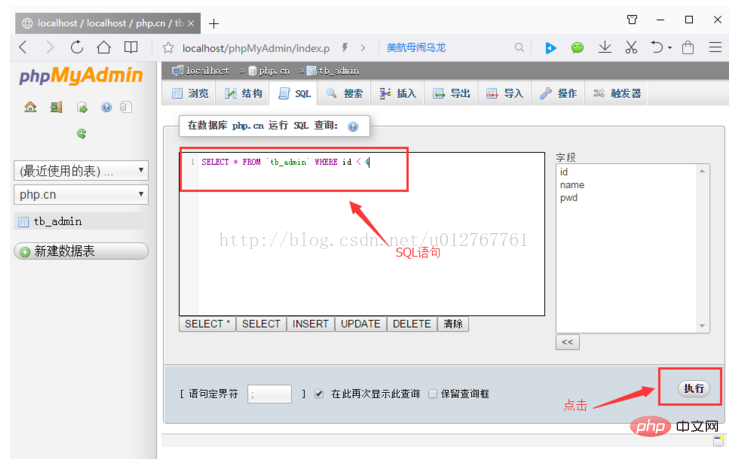
Click the "Execute" button to achieve the following picture:
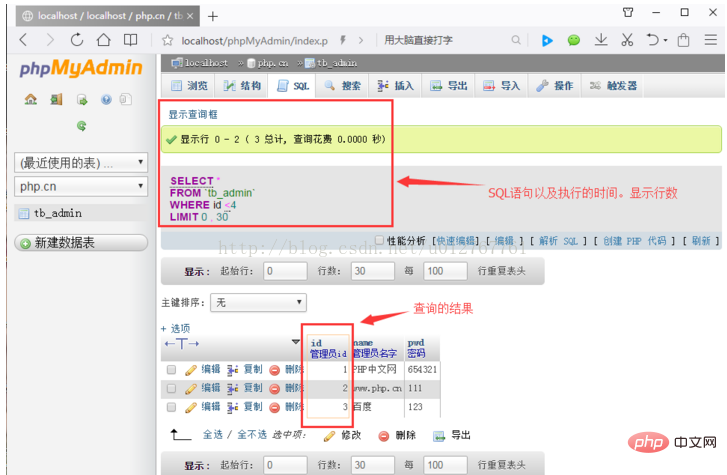
In addition to simple queries on the entire table, you can also perform some complex conditional queries (use where clauses to submit LIKE, ORDERBY, GROUP BY and other conditional query statements) and multi-table queries!
4. Use SQL statements to delete data
Use the delete statement in the SQL statement editing area to retrieve data or all information under specified conditions, for example: delete the name baidu.com The information, the SQL statement is as shown below:
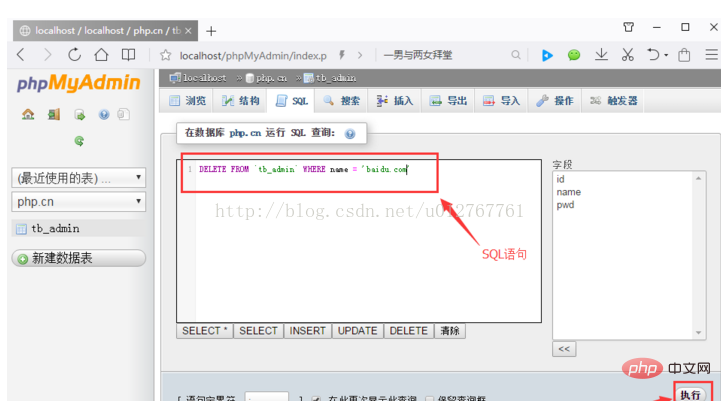
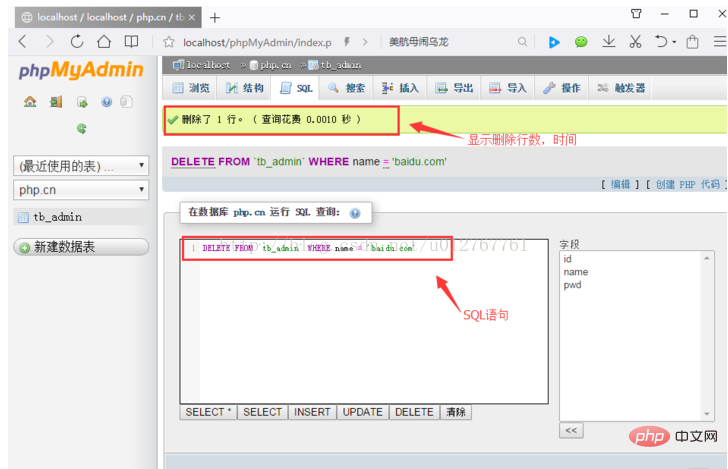
After clicking "Execute", a box will pop up asking you to confirm. After clicking Confirm, it will be as shown below:
After that click browse in the upper left corner, you will find that the user name baidu.com information has been deleted, as shown below:
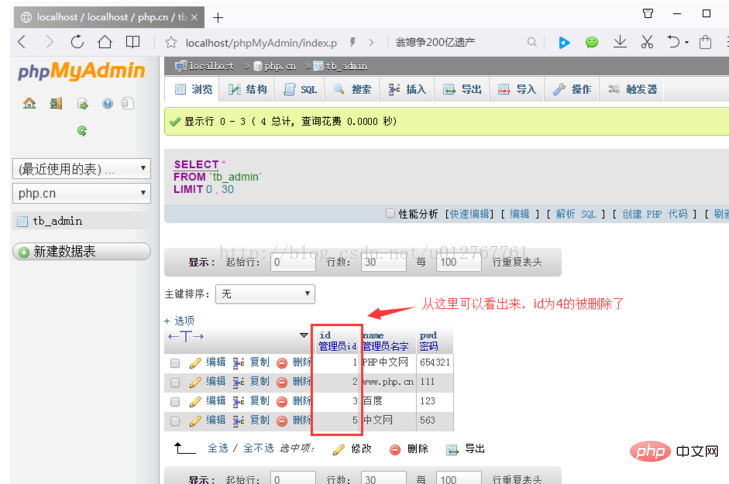
Note: If there is no where conditional statement after the delete statement, then the data in the specified data table will be deleted. All data.
Detailed graphic and text explanation of managing data records
After creating the database and data table, you can manage it by operating the data table data record. In this article, we will introduce the methods of inserting data, browsing data, and searching data respectively!
1. Insert data
After selecting a data table, there is an "Insert" button in the navigation position. Click to enter the insertion page. Enter each field value on the page and click the "Execute" button to insert data, as shown in the following figure:
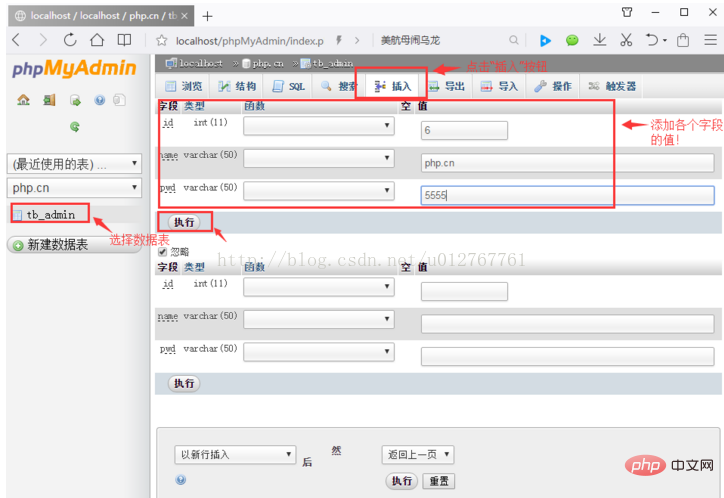
Finally click the "Execute" button. You can insert data, as shown below:
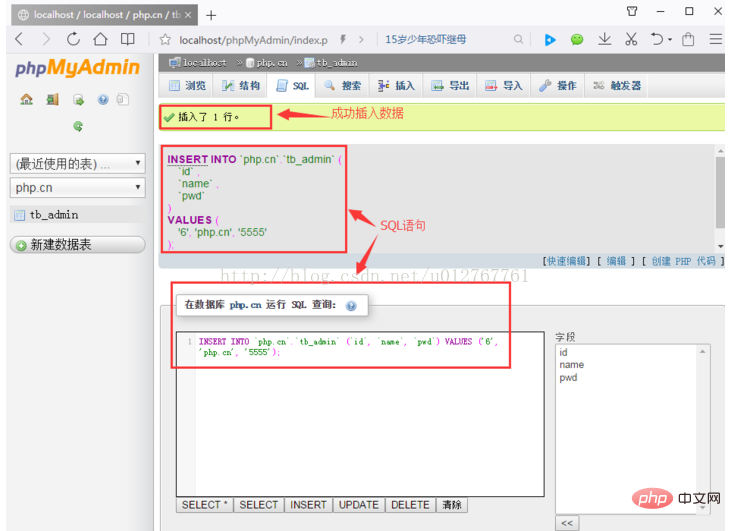
2. Browse data
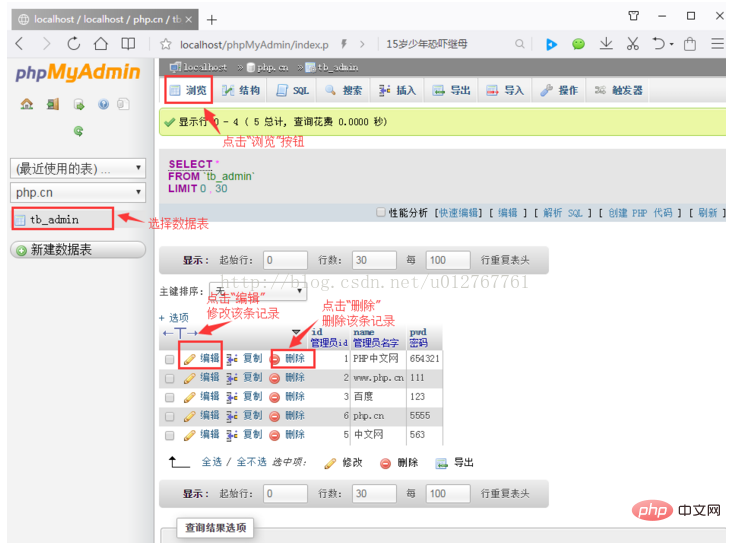
After selecting a certain data or successfully inserting data, click on the navigation bar Click the "Browse" button to enter the data display page. You can click the "Edit" button in the data list to edit the data. Click the "Delete" button to delete the record! As shown below:
3. Search data
After selecting a data table, click the "Search" button in the navigation bar to enter the search page. You can select one or more in the list box of the selection field. Multiple columns. If you select multiple columns, press the Ctrl key, and then click the field names to be selected in sequence. The query results will be output according to the selected field names.
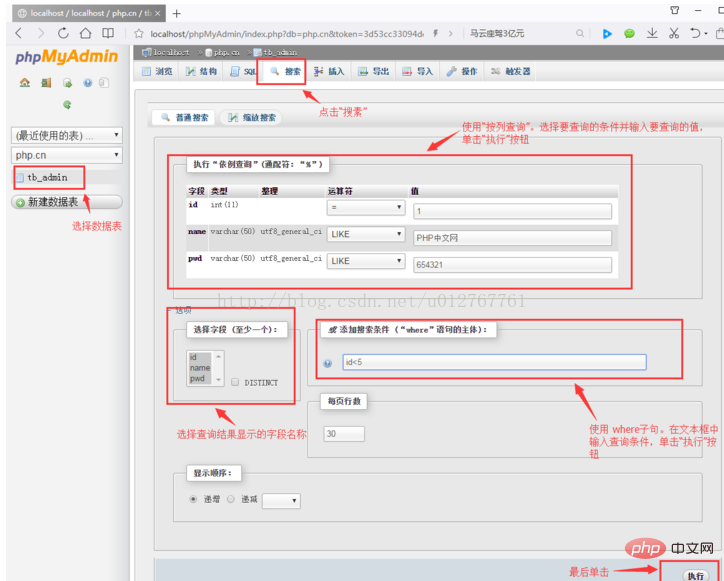
In this interface, you can query records according to conditions. There are two query methods:
The first one: choose to build a where statement To query, directly enter the query statement in the "Add search conditions" text box, and then click the execute button thereafter.
Second: Use column query, select the query conditions, enter the value to be queried in the text box, and click the "Execute button".
Picture and text introduction to importing and exporting data tables
Importing and exporting data are two reciprocal operations. Importing data is through expansion The file named .sql is imported into the database. The exported data is to store the data table structure and table records as .sql files. The backup and restore operations of the database can be realized through import and export. Below we will introduce the import and export methods respectively!
In the previous article "Detailed Graphical Explanation of Managing Data Records (phpMyAdmin Usage Tutorial 4)" we introduced how to manage data, so we will introduce how to import and export data!
1. Export data table
First we need to select the data table or database to be exported. Here we take the export data table as an example. After selecting the data table, Click the "Export" button in the navigation bar to enter the page for exporting data. There will be two options: "Quick" and "Custom" as shown below:
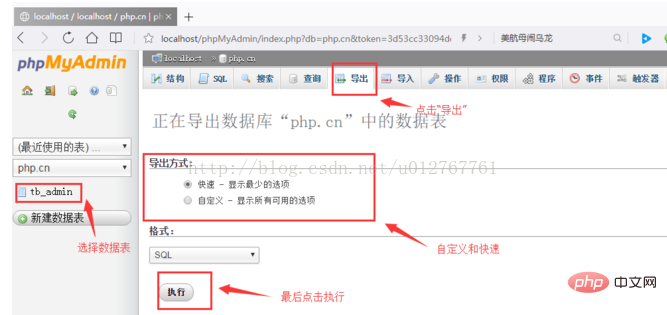
We normally select Quick directly, then select Format: SQL, and finally click Execute, and then save the location where the file is stored!
2. Import data table
First select the database, then click the "Import" button in the navigation bar, enter the import page, and then click "Select File" button to find the location of the .sql file. The import file format is SQL. Click the "Execute" button to import the data table into the database, as shown below:
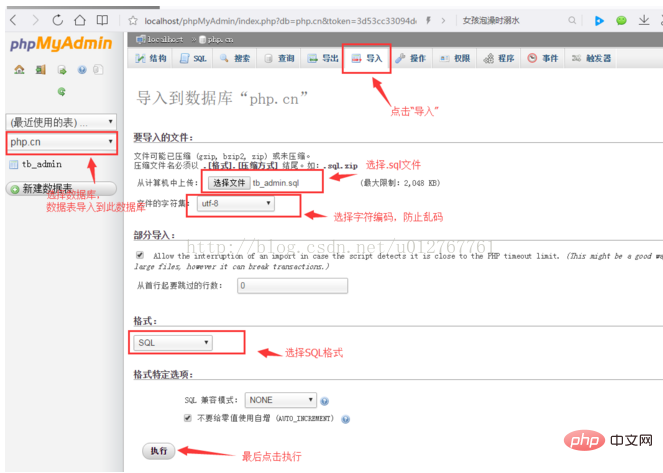
Note:
Before importing the file, first ensure that there is a database with the same name as the imported database. If there is not one with the same name, you must Create a database in the database with the same name as the database in the data file, and then import the data. In addition, in the current database, there cannot be a data table with the same name as the data table in the database to be imported. If a table with the same name exists, import the file It will fail and an error message will be prompted.
Summary:
phpMyAdmin is a visual tool that provides MySQL database management and operation. It can easily manage the MySQL database. By studying the content of this chapter, Friends can install and configure phpMyAdmin independently, and can use the visual tool phpMyAdmin to easily manage databases and data tables without creating bottlenecks in databases and data tables at the command prompt. For large websites, you can use import and export files to maintain the website database!
Recommended learning: "PHP Video Tutorial"
The above is the detailed content of What is phpMyAdmin? Tutorial? (share). For more information, please follow other related articles on the PHP Chinese website!