下面由phpstorm教程栏目给大家介绍使用phpstorm+docker搭建开发环境方法,希望对需要的朋友有所帮助!
以上技能是以下内容的前提。
集成环境能达到快速写代码的目的,但对“慢慢变成全栈”是不利的!不是用 docker 就会变成全栈,只是用一下之前没用过工具,会让自己学到新的知识,从而自我提升、掌握新的技能。
接手维护项目,写维护代码最好的环境是和服务器保持一致,那么 docker 可以轻松实现这一点。
比如,要维护一个用 PHP5.6.4、用ThinkPHP5.0开发的一个项目,可以用 php5.6.4 镜像为基础,在此基础上安装 ThinkPHP5.0 所需的扩展,编写如下 dockerfile:
立即学习“PHP免费学习笔记(深入)”;
FROM  php:5.6.4-fpm
RUN apt-get update && apt-get install libssl-dev -y \
    && pecl install redis-2.2.5  xdebug-2.5.5 \
&& docker-php-ext-install pdo_mysql mbstring ftp可以运行一下命令,生成定制镜像:
docker build -t php564:v1 .
docker-compose 可以编排多个容器,相互配合来完成某项任务,让项目跑起来,还需要 Nginx,所以新建了一个目录,来专门写 docker-compose 配置:
PS E:\docker\workEnv> pwdPath
----
E:\docker\workEnv
建一个文件:docker-compose.yml
两个目录:nginx、php564 用于保存相关容器的一些东西
目录结构如下:
PS E:\docker\workEnv> lsDirectory: E:\docker\workEnv
Mode                 LastWriteTime         Length Name
----                 -------------         ------ ----
d-----        27/04/2021     13:20                nginx
d-----        18/05/2021     10:15                php564
-a----        18/05/2021     10:47            560 docker-compose.yml
PS E:\docker\workEnv>
其他同事可能也需要维护这个项目,把 dockerfile 放到这个目录,其他其它同事也用 docker 的话,可以直接把当前目录(我这里是 workEnv)发给他,他通过 docker-compose 可直接编译。
在 php564 目录再建两个目录:conf.d、xdebug,用于映射配置 和 记录 xdebug 日志,在编写
docker-compose.yml 会排上用场。
version: '3'services:
    web:
        image: nginx        ports:
            - "80:80"
            - "443:443"
            - "1212:1212"
        depends_on:
            - php564        volumes:
            # nginx 目录映射到 nginx 容器配置目录
            - ./nginx:/etc/nginx/conf.d            # 本地项目目录 映射到 nginx 容器工作目录
            - E:/www:/usr/share/nginx    php564:
        build: ./php564        volumes:
            # 本地项目目录 映射到 php 容器工作目录
            - E:/www:/var/www            # php 配置文件
            - ./php564/conf.d/php.ini:/usr/local/etc/php/conf.d/php.ini            # xdebug 调试日志
            - ./php564/xdebug:/xdebug        ports:
- "9000:9000"到 nginx 目录,建一个项目对应的配置文件,我这里建了 oldErp.conf:
# oldERP.confserver {
    listen       1212;
    server_name  location;
    error_page   500 502 503 504  /50x.html;
    location = /50x.html {
        root   /usr/share/nginx/html;
    }
    location /erp/ {
        alias  /usr/share/nginx/olderp/;
        if (!-e $request_filename){
            rewrite  ^/erp/index.php/(.*)$  /index.php?s=/$1  last;
        }
    }
    location / {
        try_files $uri $uri/ /index.php?$query_string;
    }
    location ~ \.php$ {
       # 这里写php564,在docker-compose 定义好了
       fastcgi_pass   php564:9000;
       fastcgi_index  index.php;
       # 这里也要指定到php564容器内的项目路径
       fastcgi_param SCRIPT_FILENAME /var/www/olderp$fastcgi_script_name;
       include fastcgi_params;
}}到 workEnv 目录,执行:
docker-compose up -d
然后可以看看容器情况:
PS E:\docker\workEnv> docker-compose topworkenv_php564_1
  UID       PID    PPID    C   STIME   TTY     TIME                              CMD
-------------------------------------------------------------------------------------------------------------
root       12463   12442   0   03:03   ?     00:00:01   php-fpm: master process (/usr/local/etc/php-fpm.conf)www-data   12518   12463   0   03:03   ?     00:00:02   php-fpm: pool www
www-data   12519   12463   0   03:03   ?     00:00:02   php-fpm: pool www
root       12529   12442   0   03:03   ?     00:00:00   bashworkenv_web_1
 UID     PID    PPID    C   STIME   TTY     TIME                        CMD
-----------------------------------------------------------------------------------------------
root    12275   12254   0   02:50   ?     00:00:00   nginx: master process nginx -g daemon off;uuidd   12352   12275   0   02:50   ?     00:00:00   nginx: worker process
PS E:\docker\workEnv>
不用 xdebug 也可以写 php 代码,但在程序需要调试的时候,可能就是到处的 var_dump、die之类的断点代码…
使用 xdebug 可以避免这种尴尬,它可以一步一步慢慢调试,可以监听入参,可以改变入参, 所以有的公司把 是否会使用 xdebug 纳入技能评级,这是有原因的。
要想使用 xdebug,大概需要这两步:
1.配置 php 支持 xdebug
2.配置 phpstrom 远程调试 xdebug
在前面定制 php 镜像的已安装 xdebug,不过还需要配置下一些参数,在编写 docker-compose.yml 文件的时候,做了配置映射:
# 省略其它# php 配置文件- ./php564/conf.d/php.ini:/usr/local/etc/php/conf.d/php.ini# 省略其它
所以我们到 php564/conf.d 目录 编写 php.ini:
extension=redis.so
zend_extension=xdebug.so
xdebug.idekey=PHPSTORM # IED关键字xdebug.remote_autostart=on
xdebug.remote_enable=on
xdebug.remote_port=9100
xdebug.remote_host=192.168.2.159 # 本地IPxdebug.remote_log=/xdebug/debug.log # Xdebug logmemory_limit=1024M
完成以上配置,在 workEnv 目录,执行 docker-compose restart 重启 docker:
PS E:\docker\workEnv> docker-compose restart
Restarting workenv_web_1    ... doneRestarting workenv_php564_1 ... donePS E:\docker\workEnv>
不同的版本可能界面不一样,但思路都一样:
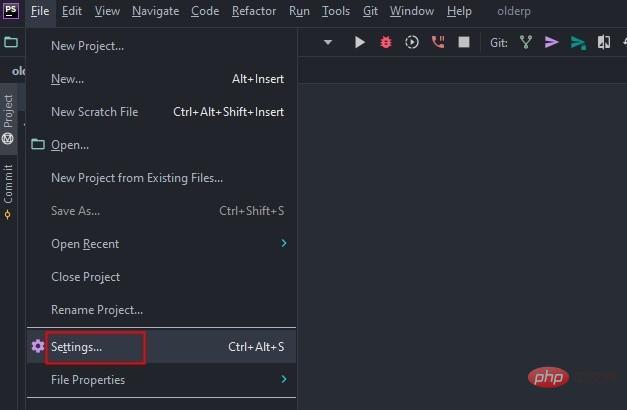
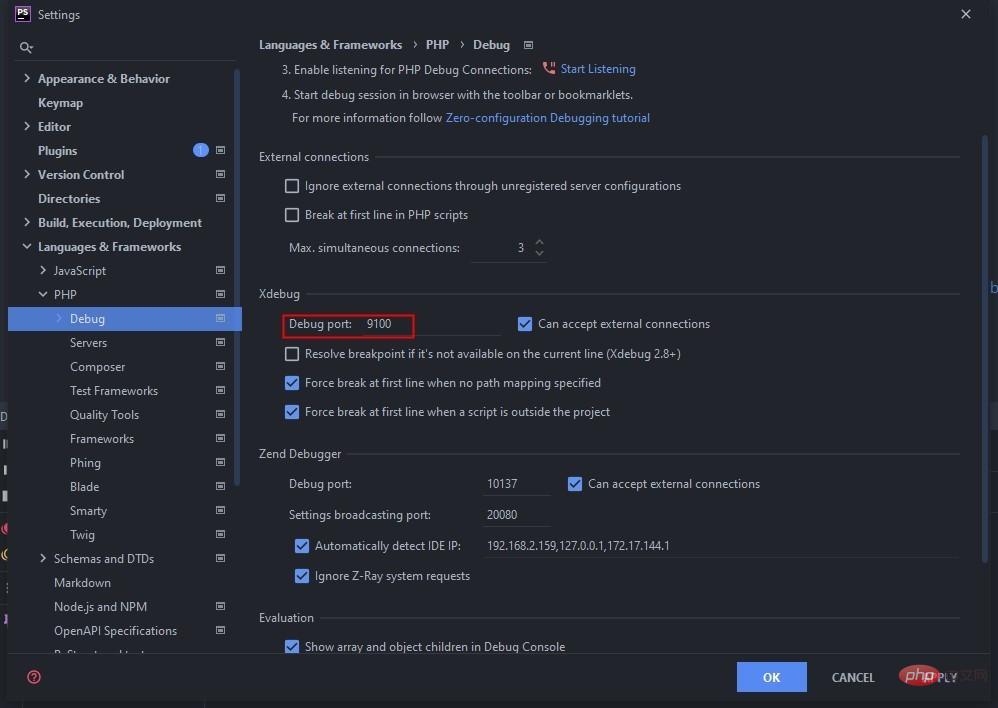
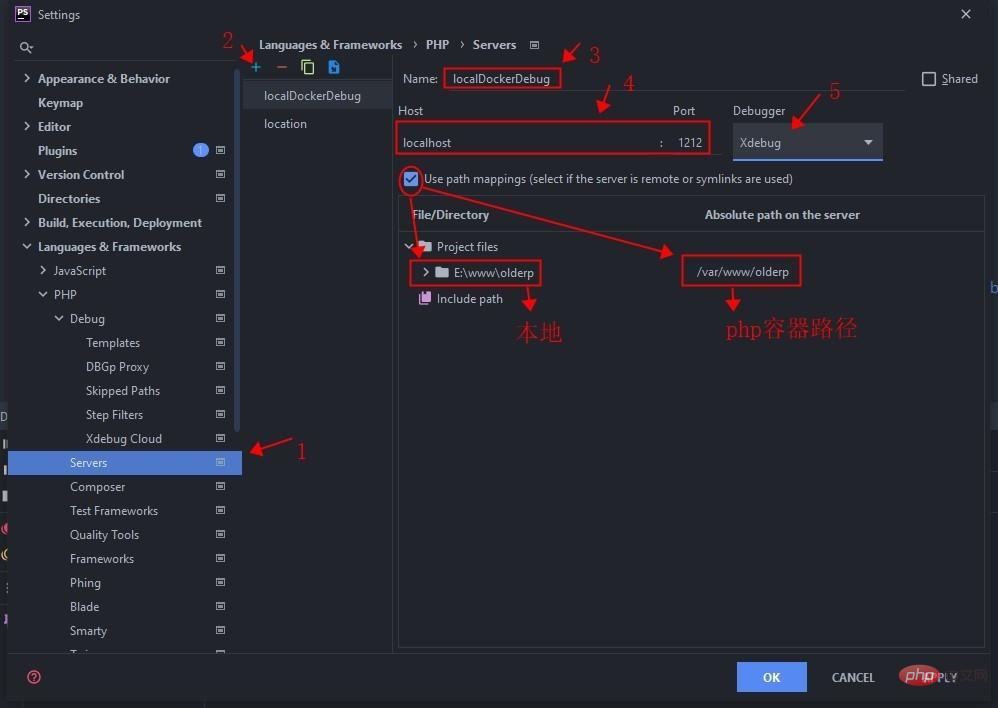
设置好了上面后,还需要配置 IED 的 RUN: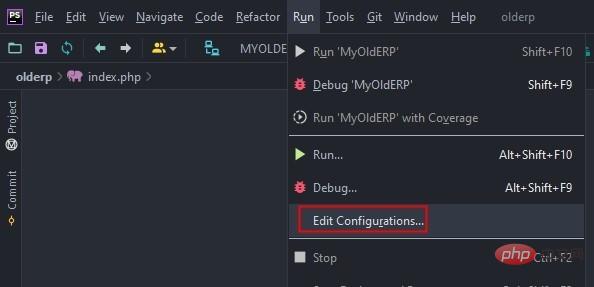
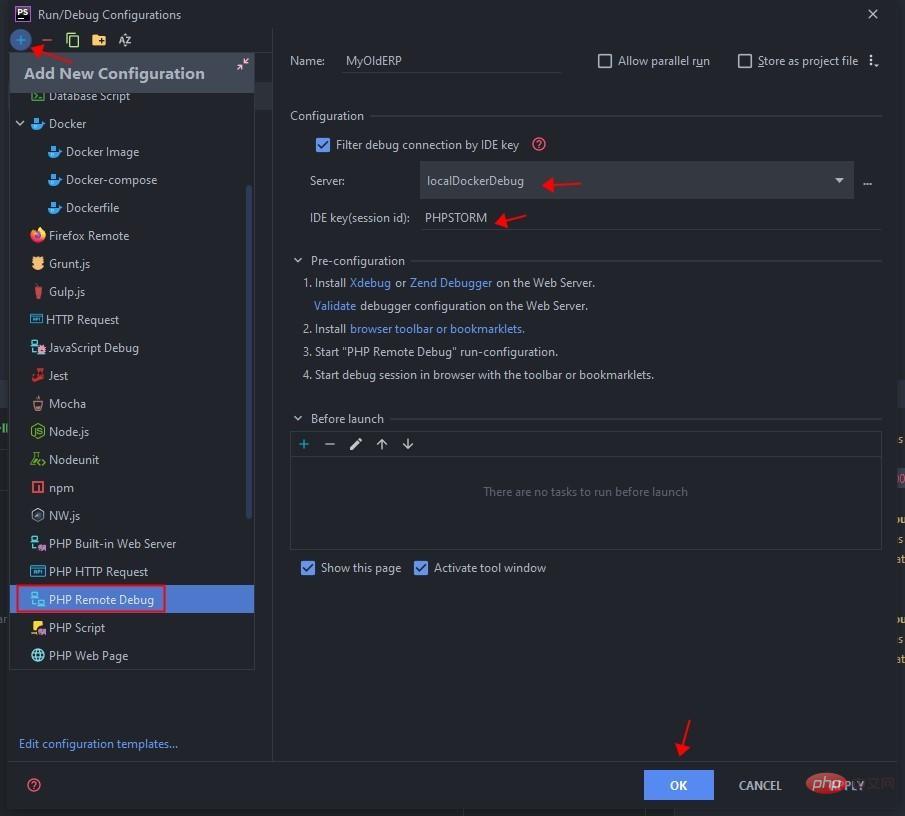
至此,我的环境是OK了。
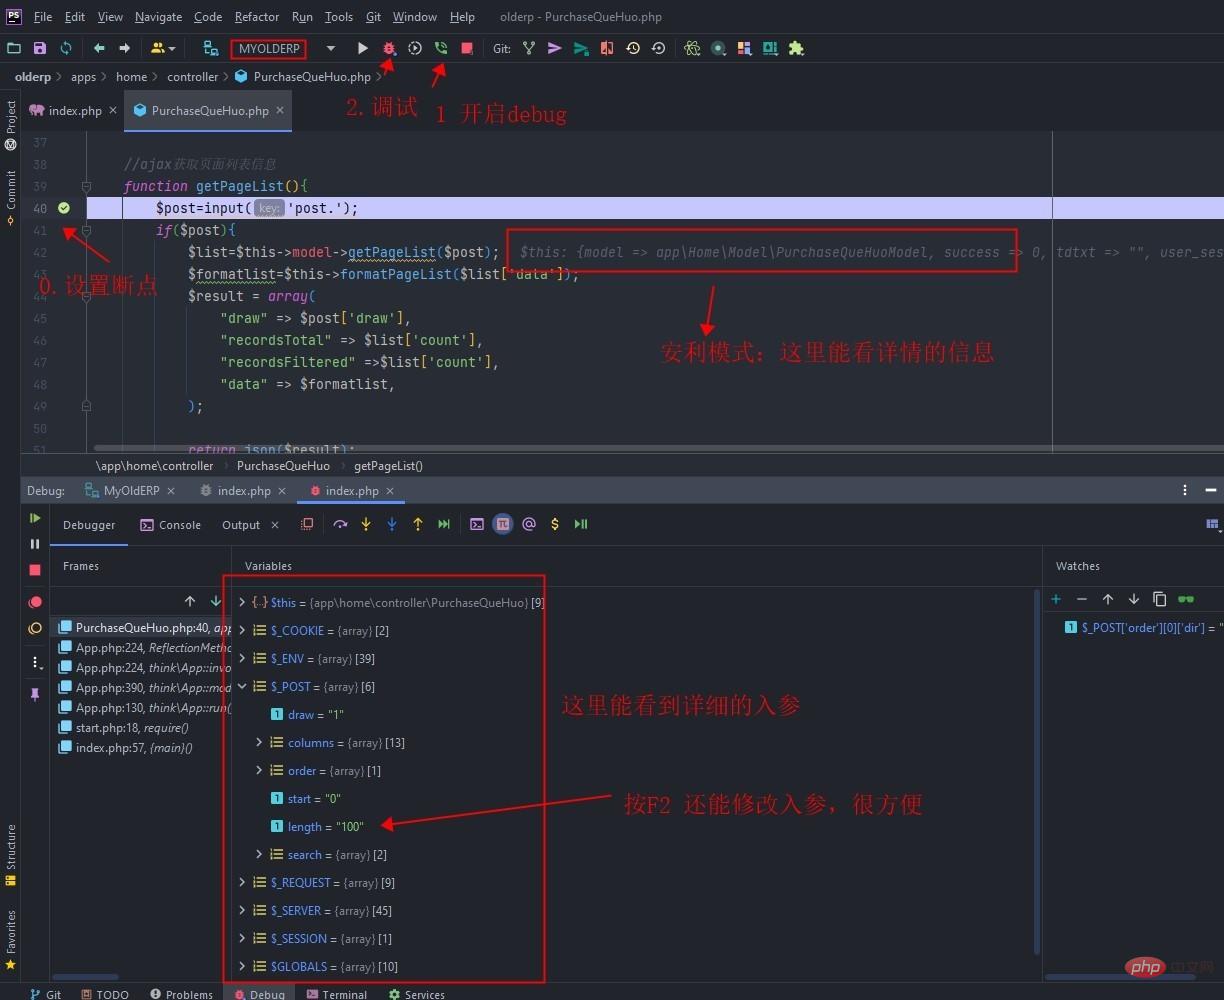
本博文如果能给你提供一些帮助,那我的目的就达到了!
在我使用尝试使用 docker 过程中,看了几遍文档,终于可以定制一个简单的 dockerfile,使用 docker-compose 更是反反复复尝试看文档,当练习到一定程度,突然之前的不理解变得合乎情理,如果不懂,就多看文档,多尝试!
以上就是详解如何使用PhpStorm+Docker搭建开发环境的详细内容,更多请关注php中文网其它相关文章!

PHP怎么学习?PHP怎么入门?PHP在哪学?PHP怎么学才快?不用担心,这里为大家提供了PHP速学教程(入门到精通),有需要的小伙伴保存下载就能学习啦!


Copyright 2014-2025 //m.sbmmt.com/ All Rights Reserved | php.cn | 湘ICP备2023035733号