
Free learning recommendation: javascript video tutorial
##Use native js to implement carousel images
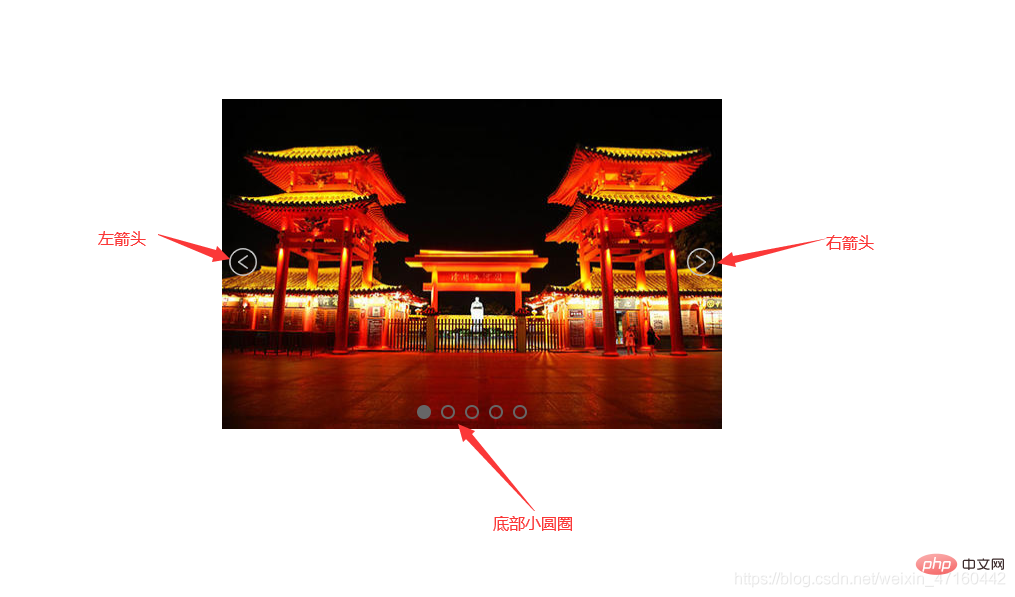
Today I will share a case of using native JS to implement carousel images, with a more detailed explanation of the process. Friends are welcome to browse and criticize. The static rendering is as follows:
Core idea
Tile some pictures in a row, then calculate the offset and then use a timer to implement it Scheduled rotation.Steps:
1. First build the basic HTML structure
<!-- 结构部分 --><!-- 结构说明:外层一个container盒子,用于放图片盒子(imgBox)、左箭头、右箭头、底部小圆圈,
        图片盒子中放的是轮播的图片 -->
    <p class="container">
      <!-- 注意:此处强调一下,图片盒子imgBox的left属性必须写成行内样式,否则js中拿不到left的值 -->
        <p class="imgBox" style="left: -500px;">
            <img src="./images/lunbo1.jpg" alt="轮播图1">
            <img src="./images/lunbo2.jpg" alt="轮播图2">
            <img src="./images/lunbo3.jpg" alt="轮播图3">
            <img src="./images/lunbo4.jpg" alt="轮播图4">
            <img src="./images/lunbo5.jpg" alt="轮播图5">
        </p>

        <a href="javascript:;" class="leftArrow"  style="display: none;">
            <img src="./images/leftArrow.png" alt="左箭头">
        </a>
        <a href="javascript:;" class="rightArrow"  style="display: none;">
            <img src="./images/rightArrow.png" alt="右箭头">
        </a>

        <ul class="circleFather">
            <li class="select"></li>
            <li></li>
            <li></li>
            <li></li>
            <li></li>
        </ul>
</p>2. Style part
Use absolute positioning to place the left and right arrows and the small circle at the bottom in the appropriate position. The width of the outer container box is equal to the width of a picture, and the width of the picture box is the sum of the widths of all pictures. All pictures are left floating to achieve horizontal arrangement.☆☆☆Note: It is emphasized here that the left attribute of the image box imgBox must be written in an inline style, otherwise the value of left cannot be obtained in js
 <style>
        /* 内联样式表 */

        * {
            margin: 0;
            padding: 0;
        }

        li {
            list-style: none;
        }
        /* 外层容器样式 */

        .container {
            height: 330px;
            width: 500px;  //外层容器盒子的宽度等于一张图片的宽度
            margin: 100px auto;
            position: relative;
            overflow: hidden;  //超出隐藏
        }
        /* 左右箭头样式 */

        .container .leftArrow,
        .container .rightArrow {
            position: absolute;
            top: 50%;
            transform: translate(0, -50%);
            z-index: 1;
        }

        .container .leftArrow {
            left: 5px;
        }

        .container .rightArrow {
            right: 5px;
        }
        /* 图片盒子样式 */

        .imgBox {
            position: absolute;
            transition: all 0.5s;
            height: 333px;
            width: 3500px;  //图片盒子的宽度为所有图片宽度之和
        }

        .imgBox img {
            height: 330px;
            width: 500px;
            float: left;  //所有图片左浮动,实现水平排列
        }
        /* 底部小圆圈样式 */

        .circleFather {
            position: absolute;
            bottom: 10px;
            left: 50%;
            transform: translate(-50%, 0);
        }

        .circleFather li {
            float: left;
            height: 10px;
            width: 10px;
            margin: 0 5px;
            border: 2px solid #e7641c;
            border-radius: 50%;
        }

        .select {
            background-color: #e7641c;
        }
</style>3. js logic part
3.1 First implement the function of clicking the left and right arrows to slide left and right
var container = document.querySelector('.container') //获取外层容器盒子
        var imgBox = document.querySelector('.imgBox') //获取图片盒子
        var leftArrow = document.querySelector('.leftArrow') //获取左箭头
        var rightArrow = document.querySelector('.rightArrow') //获取右箭头


        //给左箭头绑定点击事件
        leftArrow.onclick = function() {
            goLast()
        }

        //右箭头点击事件
        rightArrow.onclick = function() {
            goNext()
        }

        // 显示上一张图片
        // 1.点一次左箭头,就让left值-500,点一次右箭头,就让left值+500
        // 2.但是有两种特殊情况,(1)当前展示图片1时,点击左箭头则需展示图片5,(2)当前展示图片5时,点击右箭头则需展示图片1
        function goLast() {
            let newBoxLeft            if (imgBox.style.left === '0px') {
                newBoxLeft = -2000
            } else {
                // imgBox.style.left是一个字符串,所以要转化为数字才能进行计算,而设定left时就要加上px成为一个字符串
                newBoxLeft = parseInt(imgBox.style.left) + 500;
            }
            imgBox.style.left = newBoxLeft + "px"
        }

        // 显示下一张图片
        function goNext() {
            let newBoxLeft            if (imgBox.style.left === '-2000px') {
                newBoxLeft = 0
            } else {
                newBoxLeft = parseInt(imgBox.style.left) - 500;
            }
            imgBox.style.left = newBoxLeft + "px"
        }
// 使用setInterval()定时器实现自动切换功能
        var timer        function autoChange() {
            timer = setInterval(goNext, 1500)
        }
autoChange() // 监听鼠标移入事件和移出事件,实现鼠标悬停在图片上时,停止自动切换,停留在当前图片,
// 鼠标移出时继续自动切换
container.addEventListener('mouseenter', function() {
clearInterval(timer)
})
container.addEventListener('mouseleave', autoChange)Add a small episode here:
What I monitored at the beginning was mouseout event, but during testing it was found that the mouseout event would be triggered multiple times when the mouse moved out of the container box, resulting in multiple calls to the autoChange function, multiple timers being turned on, and chaotic image switching. I checked the difference between the mouseout event and the mouseleave event. :In short, it is:
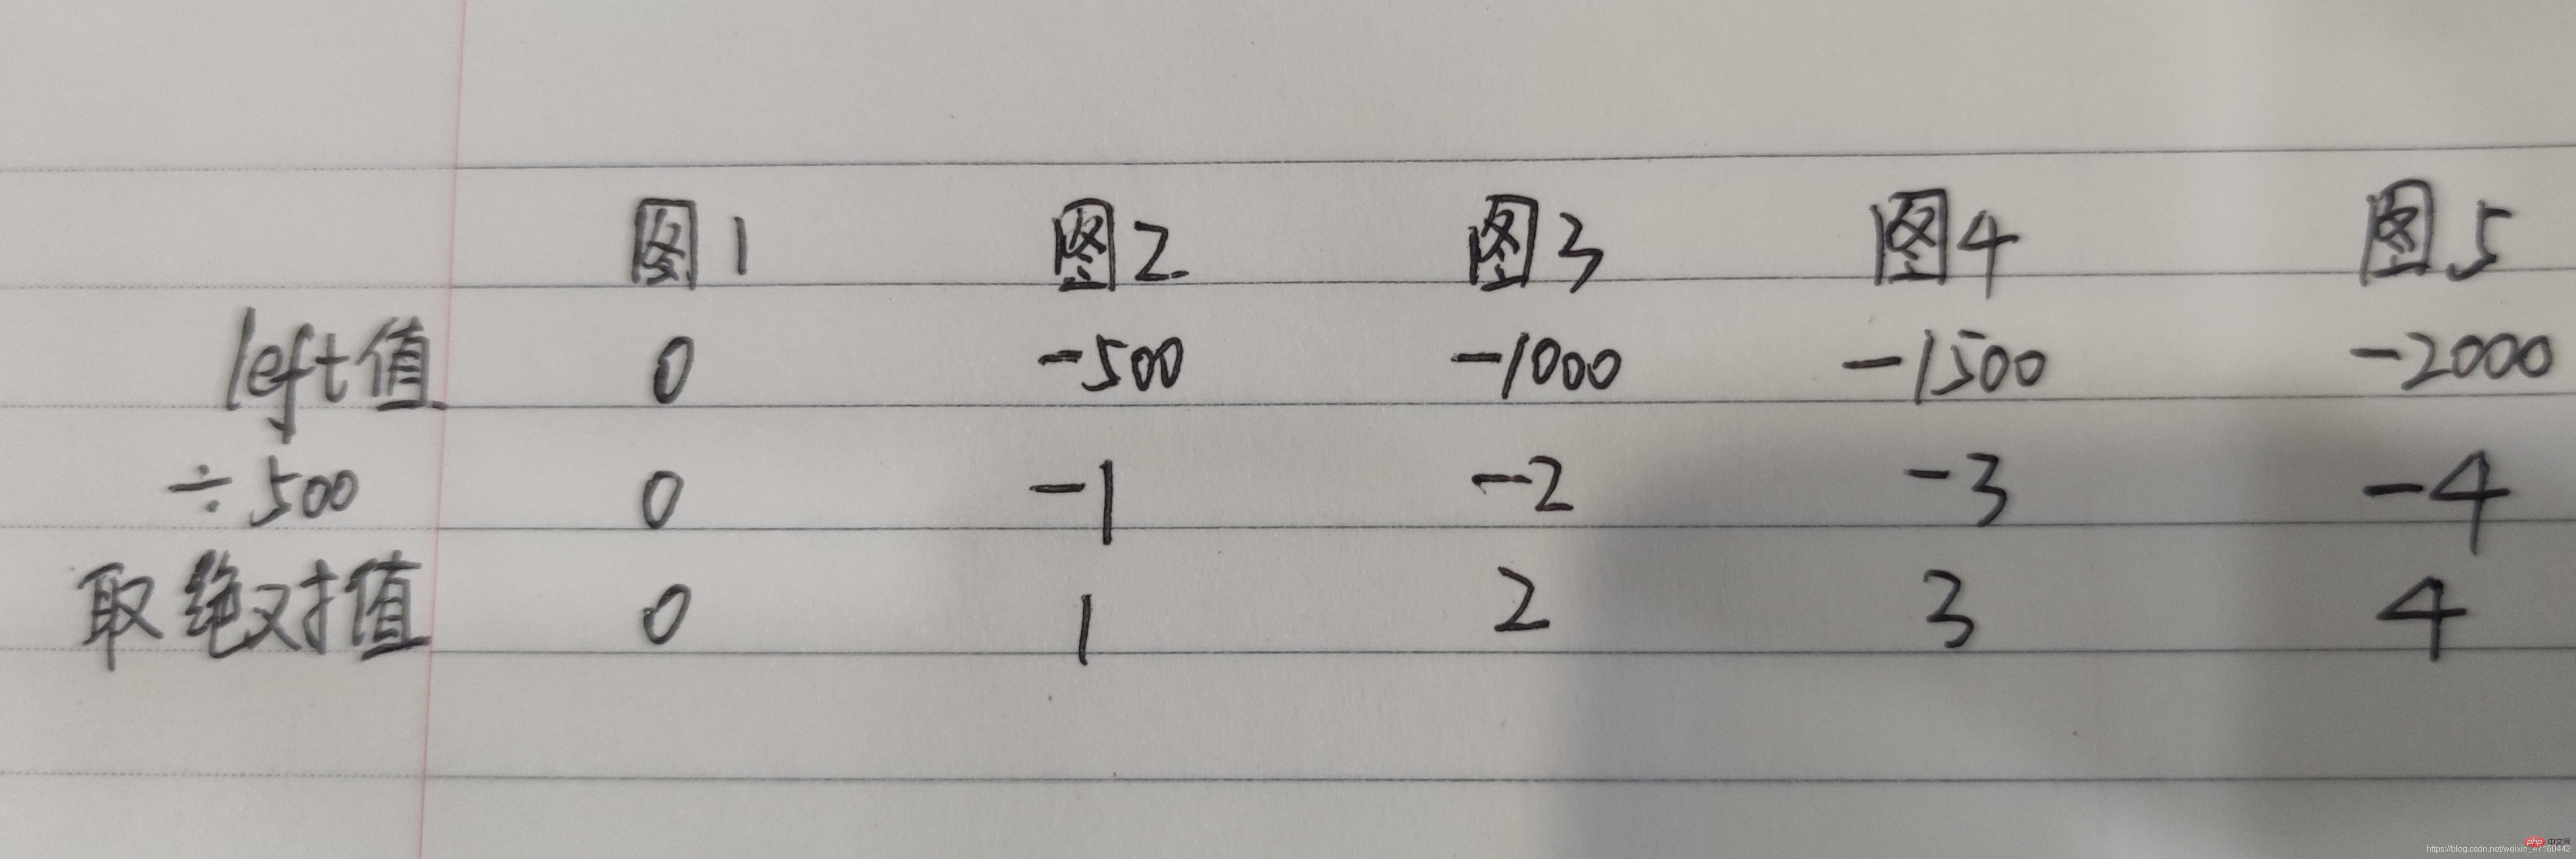
 It can be calculated/calculated in the goLast() function and goNext() function The index of the selected small circle
 var index = 0 // 定义index变量,表示第几个小圆圈被选中

 function goLast() {
            let newBoxLeft            if (imgBox.style.left === '0px') {
                newBoxLeft = -2000
            } else {
                // imgBox.style.left是一个字符串,所以要转化为数字才能进行计算,而设定left时就要加上px成为一个字符串
                newBoxLeft = parseInt(imgBox.style.left) + 500;
            }
            imgBox.style.left = newBoxLeft + "px"
            index = Math.abs(newBoxLeft / 500)  //计算出被选中小圆圈的索引
        }

 function goNext() {
            let newBoxLeft            if (imgBox.style.left === '-2000px') {
                newBoxLeft = 0
            } else {
                newBoxLeft = parseInt(imgBox.style.left) - 500;
            }
            imgBox.style.left = newBoxLeft + "px"
            index = Math.abs(newBoxLeft / 500)  ///计算出被选中小圆圈的索引
        }
// 实现点击底部某个小圆圈时切换成对应的图片
(function clickCircle() {
let circleArr = document.getElementsByTagName('li')
for (let j = 0; j < circleArr.length; j++) {
circleArr[j].addEventListener('click', () => {
index = j selectCircle()
imgBox.style.left = -(index * 500) + "px"
})
}
})() //函数自调用写法,格式:(函数)() So far, the functions of the carousel chart have been implemented, but as an obsessive-compulsive disorder, I found that when automatically switching, the left and right arrows are displayed and It doesn't look good, so I'll make some small adjustments.
//给左右箭头默认隐藏<a href="javascript:;" class="leftArrow"   style="max-width:90%">
    <img src="./images/leftArrow.png" alt="左箭头"></a><a href="javascript:;" class="rightArrow"   style="max-width:90%">
<img src="./images/rightArrow.png" alt="右箭头"></a>// 监听鼠标移入事件和移出事件,实现鼠标悬停在图片上时,停止自动切换,停留在当前图片,鼠标移出时继续自动切换
container.addEventListener('mouseenter', function() {
clearInterval(timer)
leftArrow.style.display = "inline"
rightArrow.style.display = "inline"
})
container.addEventListener('mouseleave', function() {
autoChange()
leftArrow.style.display = "none"
rightArrow.style.display = "none"
})
That’s it. It’s not easy to organize. If you like it, please like and save it!
Welcome to the personal blog Gedong Zhang
The following is the complete code.Related free learning recommendations: javascript(Video)
The above is the detailed content of Implement native js to implement carousel chart. For more information, please follow other related articles on the PHP Chinese website!