


(Learning video sharing:redis video tutorial)
Before introducing the formal content , first let’s introduce the steps to build the stand-alone version of redis.
1. Introduction to Redis Cluster
2. Environment required for cluster construction
2.1 Redis cluster requires at least 3 nodes, because the voting fault tolerance mechanism requires more than half of the nodes to think that a certain node has failed. It is down, so 2 nodes cannot form a cluster.
2.2 To ensure the high availability of the cluster, each node needs to have a slave node, that is, a backup node, so the Redis cluster requires at least 6 servers. Because I don’t have that many servers, and I can’t start that many virtual machines, so what I build here is a pseudo-distributed cluster, that is, one server runs 6 redis instances virtually, and the port number is modified to (7001-7006). Of course, the actual production environment The Redis cluster setup is the same as here.
2.3 Install ruby
3. The specific steps to build the cluster are as follows (note to turn off the firewall)
3.1 Create a new redis-cluster directory in the usr/local directory to store cluster nodes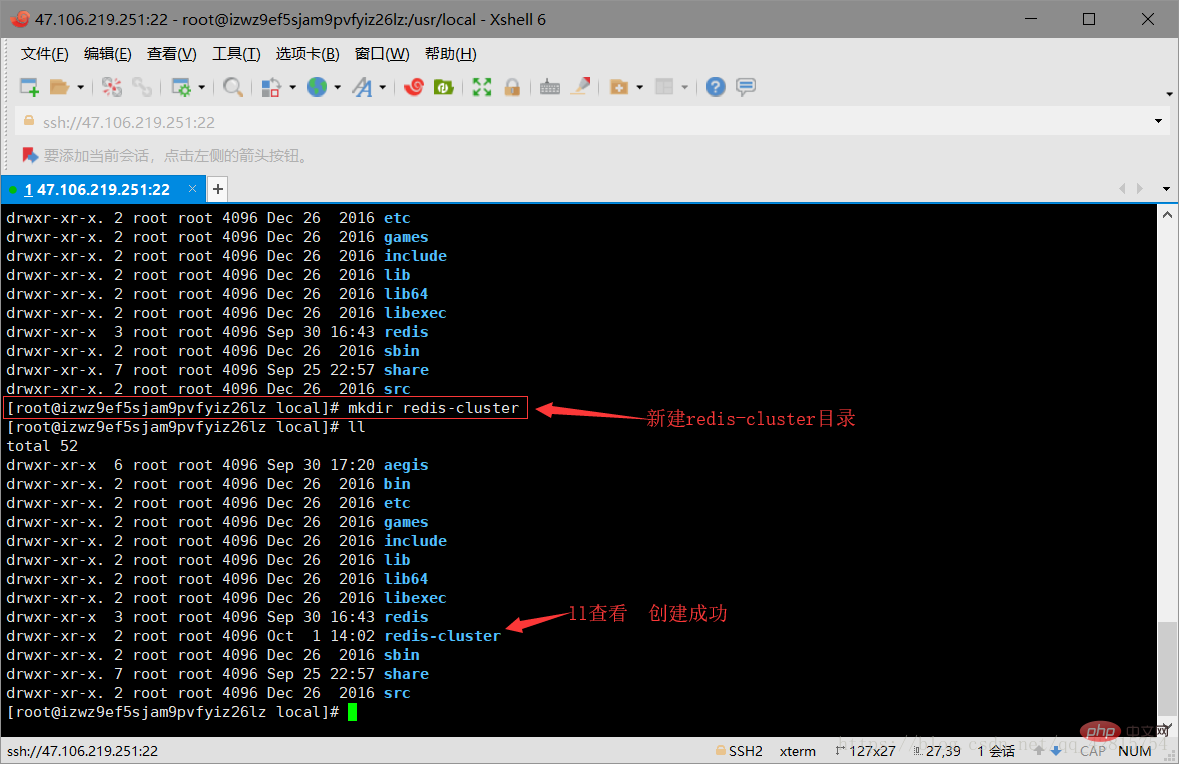
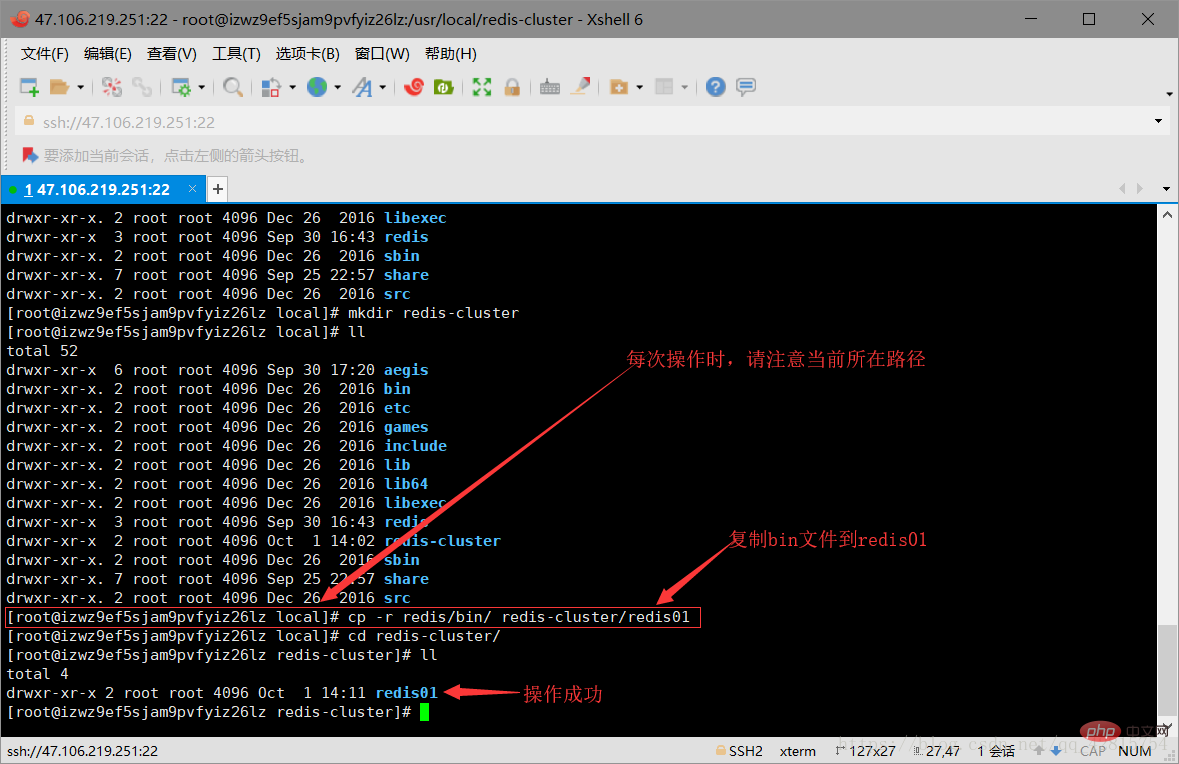
3.2 Copy all the files in the bin directory under the redis directory to the /usr/local/redis-cluster/redis01 directory. Don’t worry there is no redis01 directory here, it will be created automatically. The operation command is as follows (note the current path):
cp -r redis/bin/ redis-cluster/redis01
3.3 Delete the snapshot file dump.rdb in the redis01 directory, and modify the redis.cnf file in the directory. Specifically, modify two places: one is to change the port number to 7001, and the other is to open In cluster creation mode, just open comments. As shown in the figure below:
Delete the dump.rdb file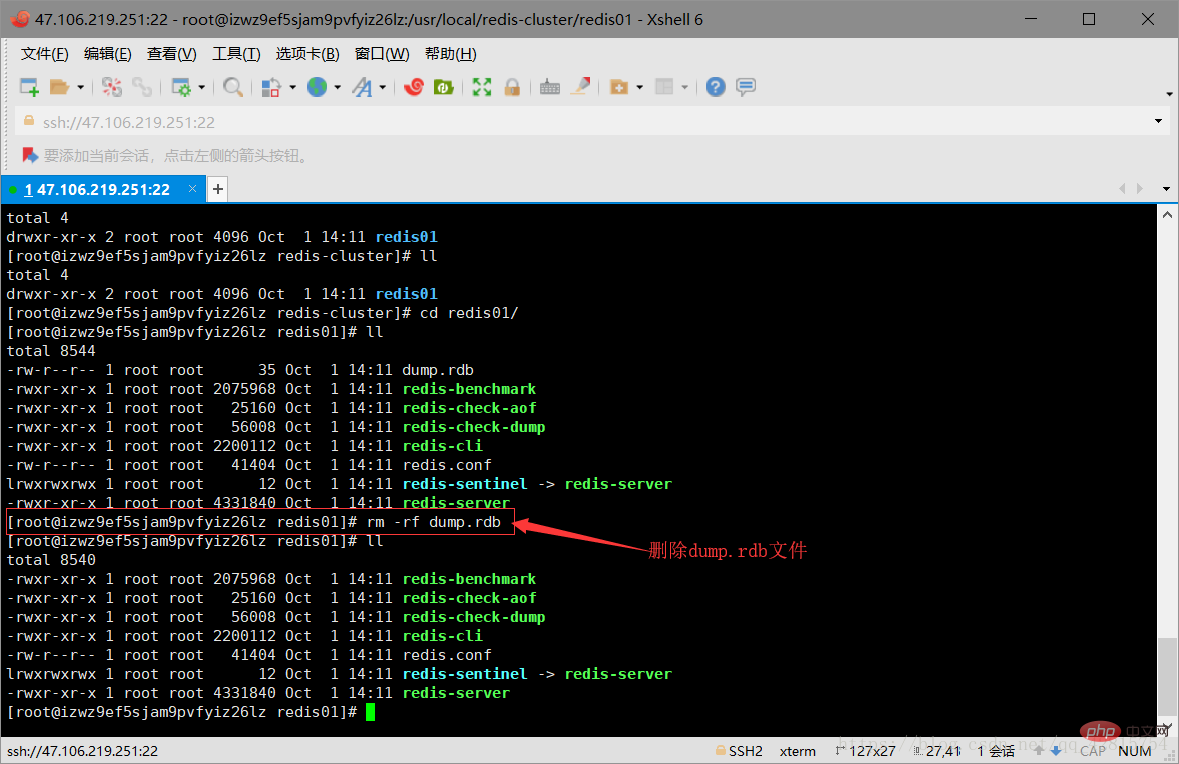
Modify the port number to 7001, the default is 6379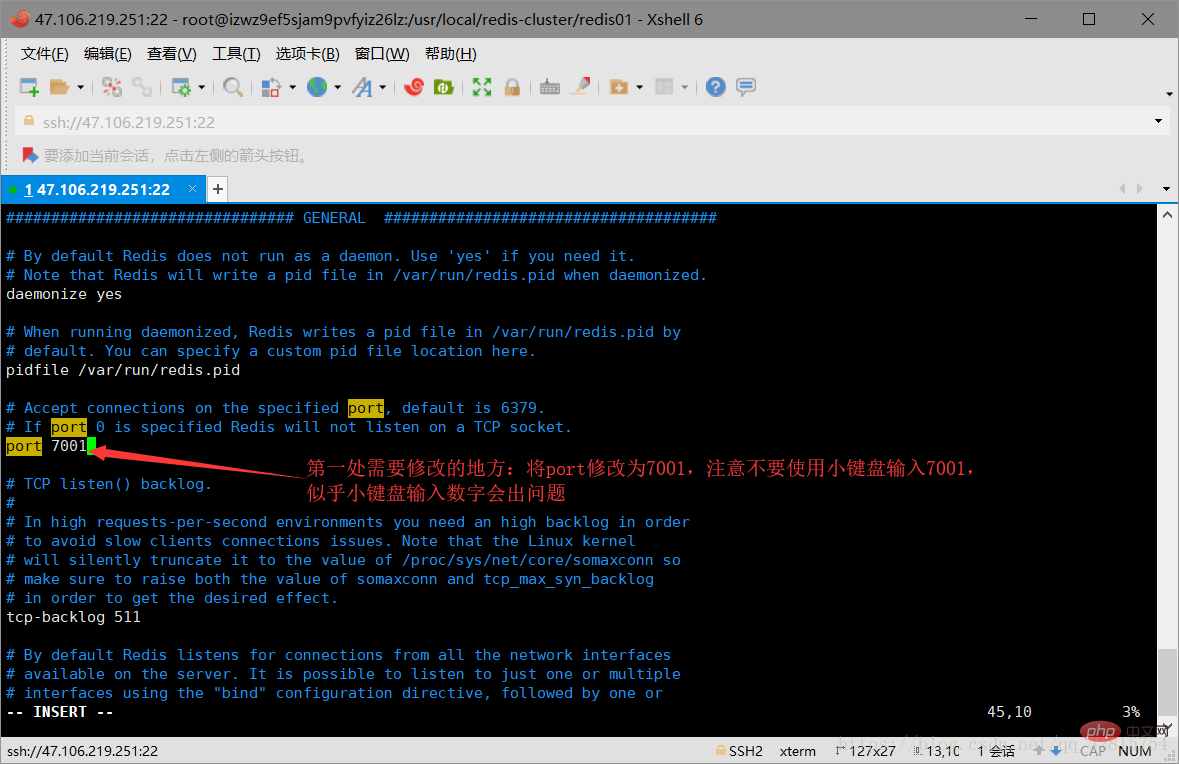
Turn on the comment of cluster-enabled yes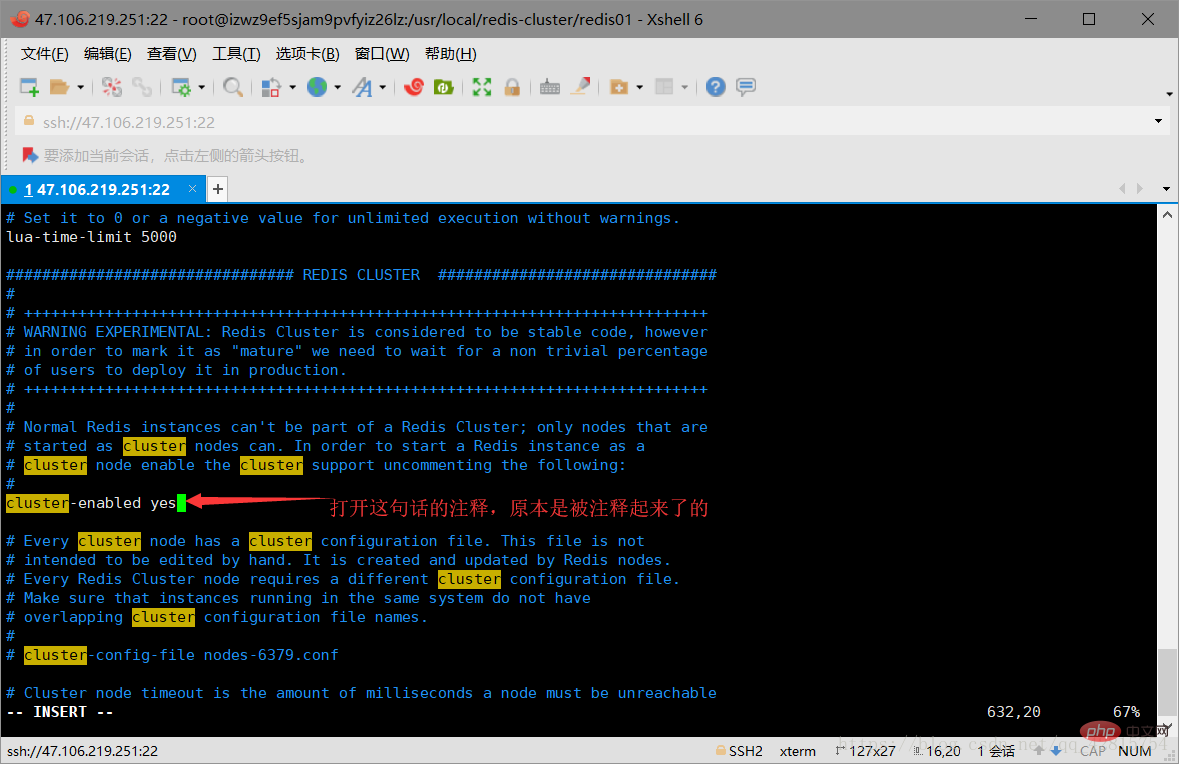
3.4 Copy 5 copies of the redis-cluster/redis01 file to the redis-cluster directory (redis02-redis06), create 6 redis instances, and simulate 6 nodes of the Redis cluster. Then change the port numbers in redis.conf under the remaining five files to 7002-7006 respectively. As shown in the figure below:
Create the redis02-06 directory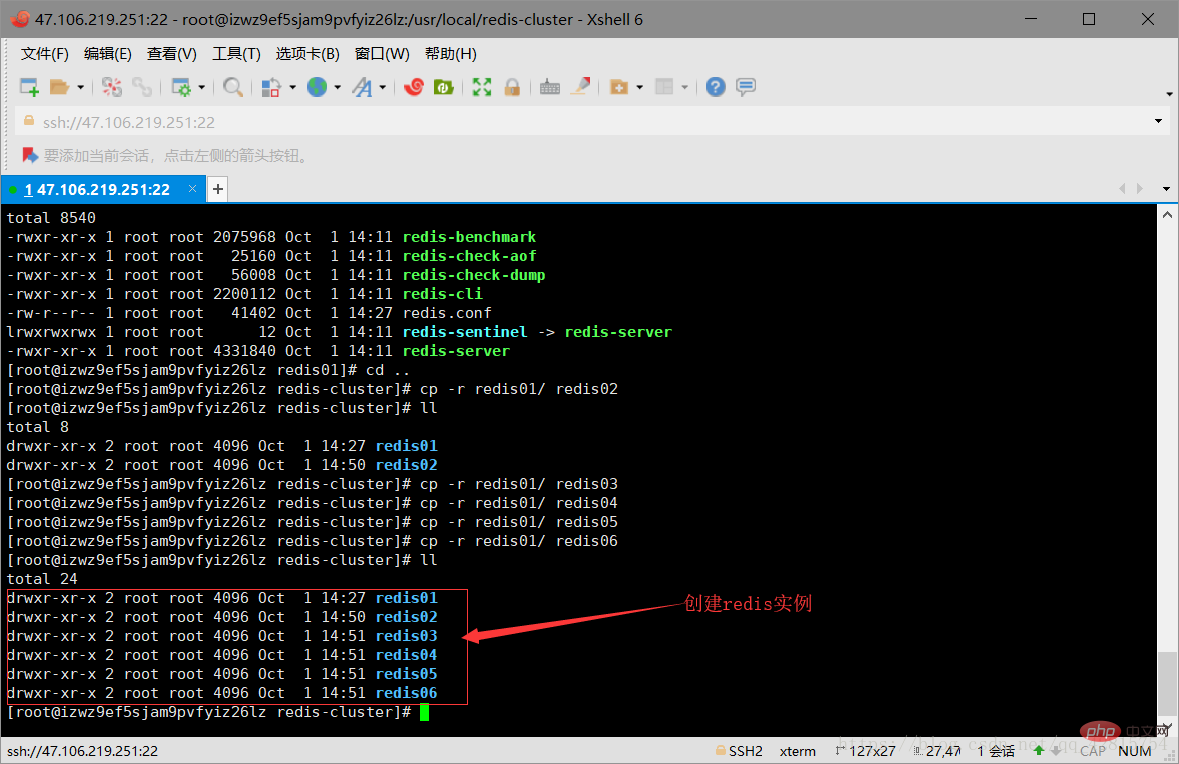
Modify the port number of the redis.conf file to 7002-7006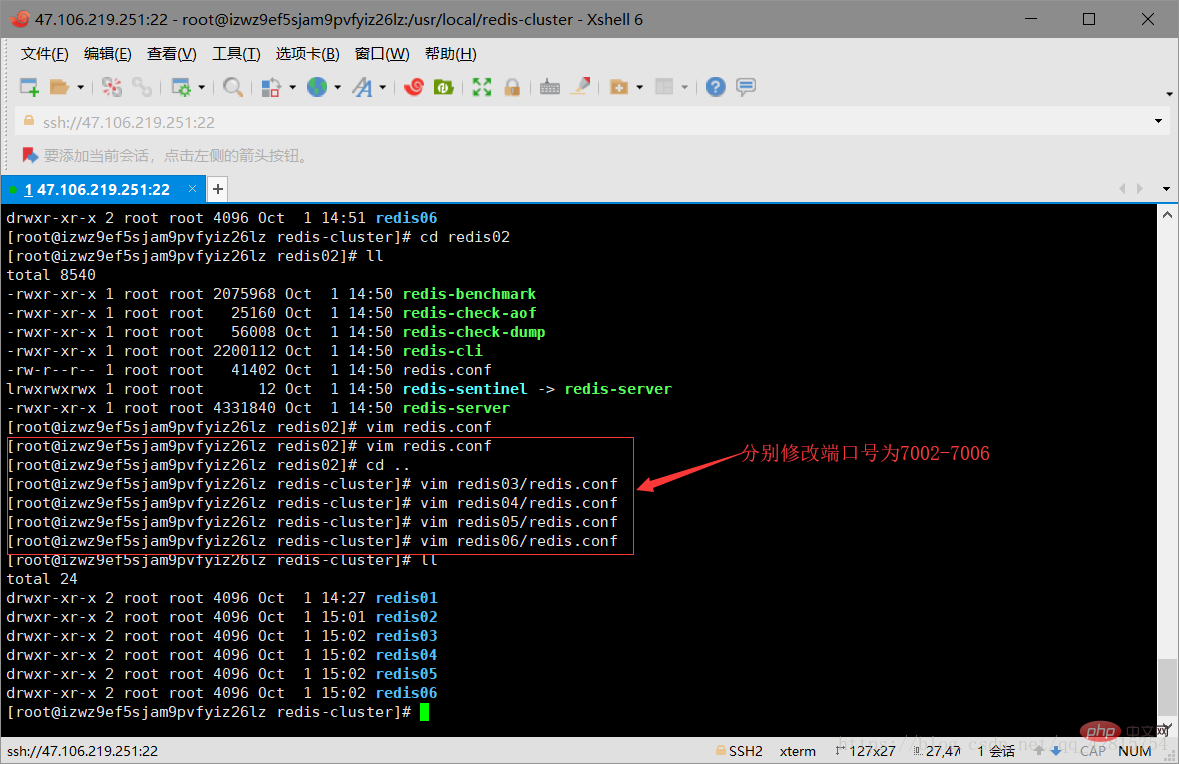
3.5 Then start Since starting all redis nodes one by one is too troublesome, here is a script file to start redis nodes in batches. The command is start-all.sh. The content of the file is as follows:
cd redis01 ./redis-server redis.conf cd .. cd redis02 ./redis-server redis.conf cd .. cd redis03 ./redis-server redis.conf cd .. cd redis04 ./redis-server redis.conf cd .. cd redis05 ./redis-server redis.conf cd .. cd redis06 ./redis-server redis.conf cd ..
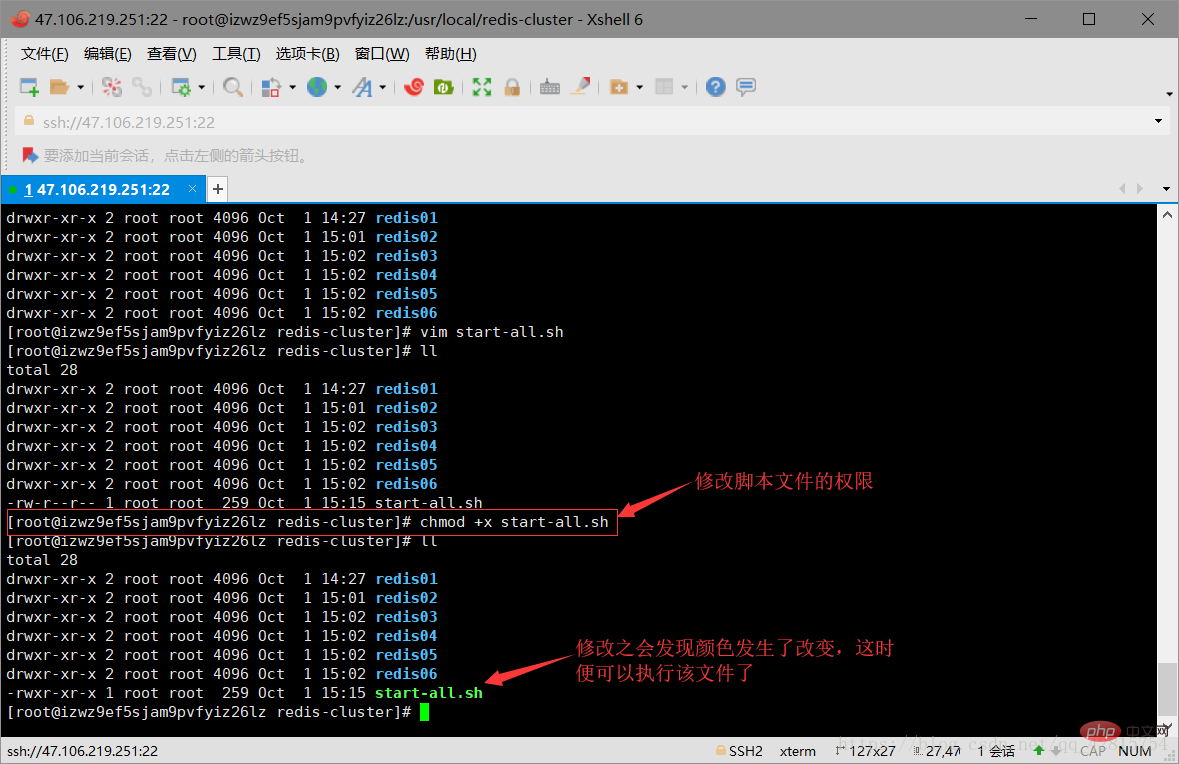
3.6 Create the startup script file After that, you need to modify the permissions of the script so that it can be executed. The instructions are as follows:
chmod +x start-all.sh
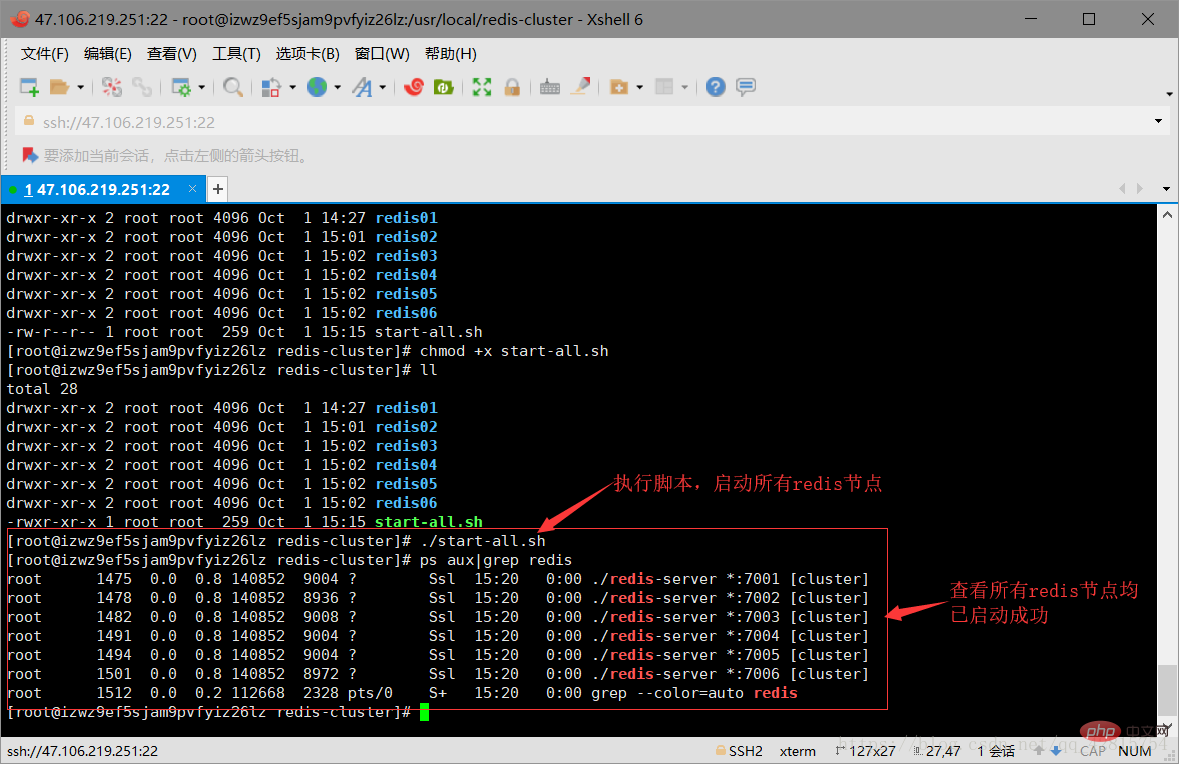
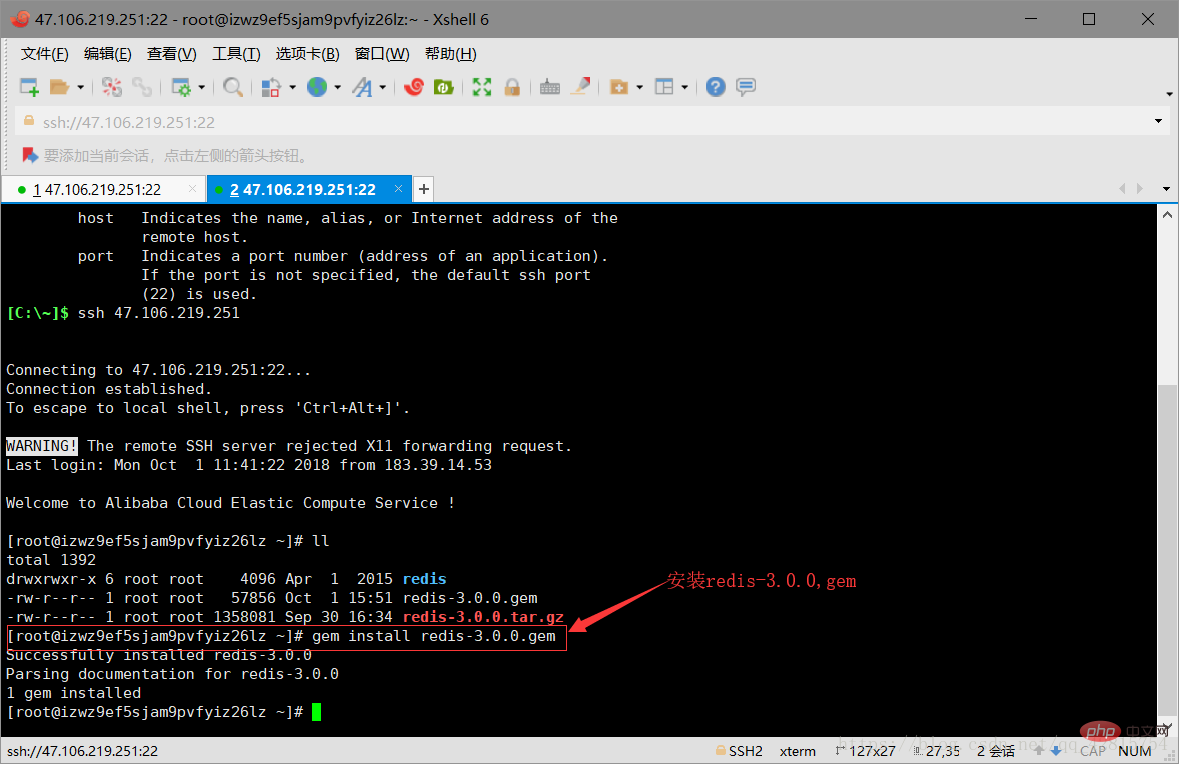
3.8 ok. So far, the six redis nodes have been started successfully. Next, the cluster will be officially started. The above are all preparatory conditions. Don’t think it’s troublesome because the pictures look lengthy. In fact, the above steps are just one sentence: create 6 redis instances (6 nodes) and start them.To build a cluster, you need to use a tool (script file), which is in the source code of the redis decompression file. Because this tool is a ruby script file, the running of this tool requires a ruby running environment, which is equivalent to the running of the java language on the jvm. So you need to install ruby. The instructions are as follows:
yum install ruby
 The installation command is as follows:
gem install redis-3.0.0.gem

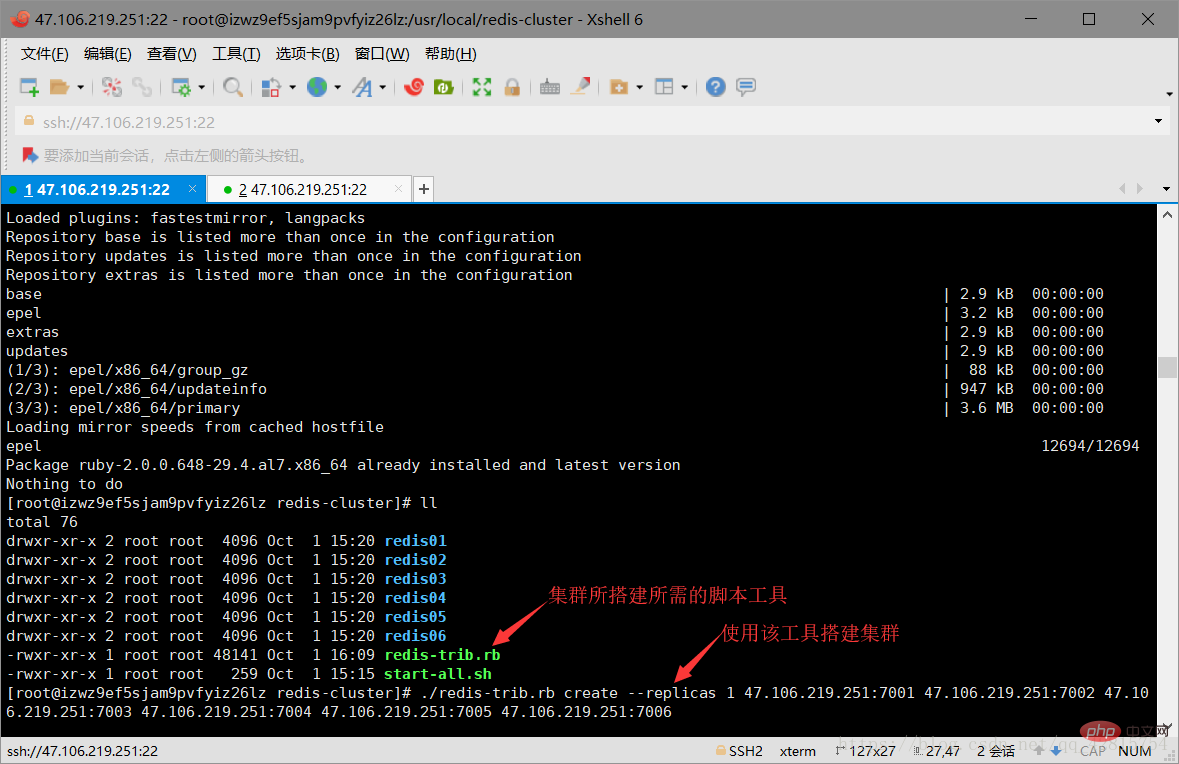
 3.10 Copy the ruby tool (redis-trib.rb) to the redis-cluster directory. The instructions are as follows:
cp redis-trib.rb /usr/local/redis-cluster
./redis-trib.rb create --replicas 1 47.106.219.251:7001 47.106.219.251:7002 47.106.219.251:7003 47.106.219.251:7004 47.106.219.251:7005 47.106.219.251:7006
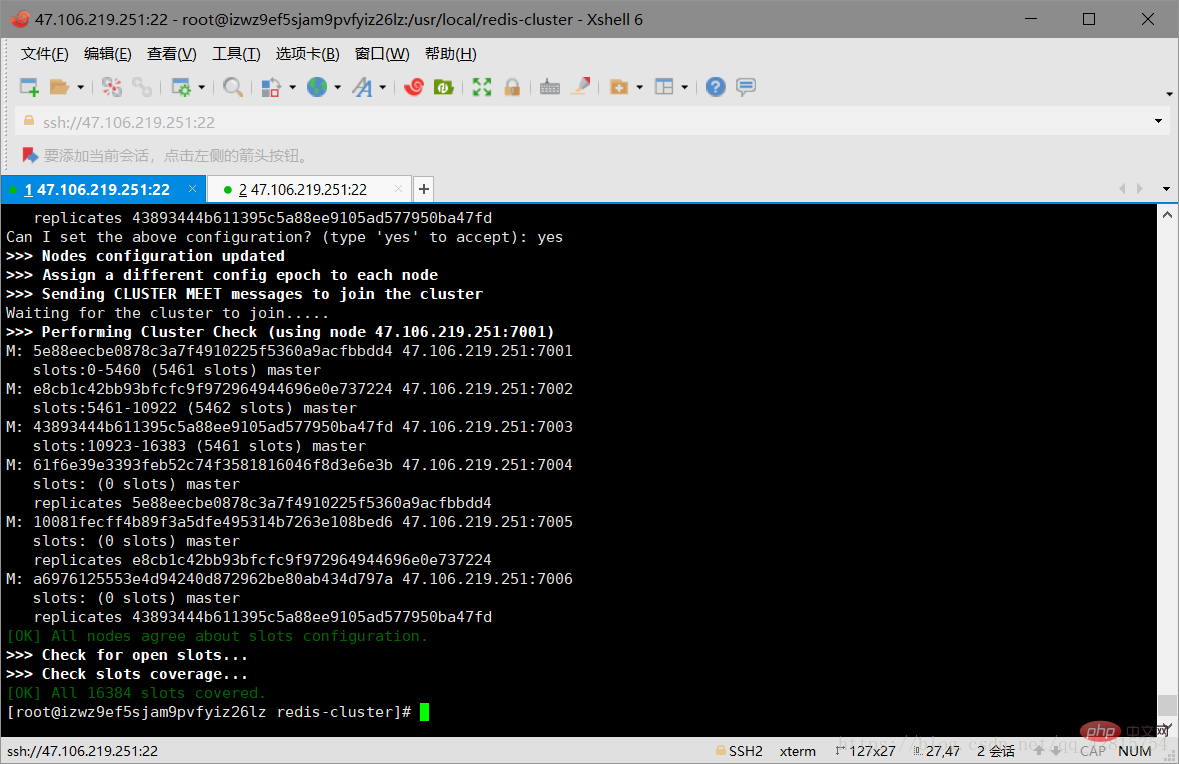 At this point, the Redi cluster is successfully established! Please pay attention to the last paragraph of text, which shows the slots (hash slots) assigned to each node. There are a total of 6 nodes here, 3 of which are slave nodes, so the 3 master nodes map 0-5460, 5461-10922, 10933-16383solts.
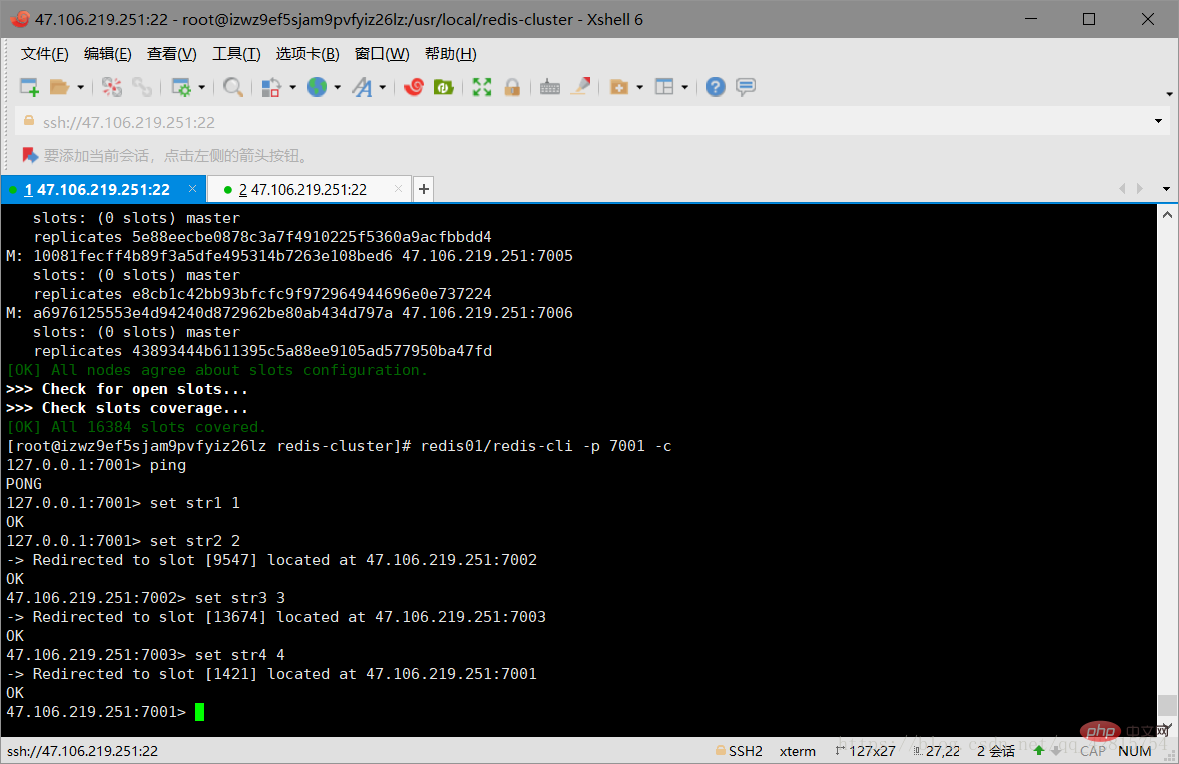
redis01/redis-cli -p 7001 -c
注意:一定要加上-c,不然节点之间是无法自动跳转的!如下图可以看到,存储的数据(key-value)是均匀分配到不同的节点的:
四、结语
呼~~~长舒一口气…终于搭建好了Redis集群。
整个过程其实挺简单,本篇主要正对入门级别的小伙伴,插入了很多图片,所以显得冗长,希望大家多多理解,如果不当之处,还望及时指正~
最后,加上两条redis集群基本命令:
1.查看当前集群信息
cluster info
2.查看集群里有多少个节点
cluster nodes
相关推荐:redis数据库教程
The above is the detailed content of Tutorial for beginners on redis cluster building. For more information, please follow other related articles on the PHP Chinese website!
 Commonly used database software
 What are the in-memory databases?
 Which one has faster reading speed, mongodb or redis?
 How to use redis as a cache server
 How redis solves data consistency
 How do mysql and redis ensure double-write consistency?
 What data does redis cache generally store?
 What are the 8 data types of redis


![[Web front-end] Node.js quick start](https://img.php.cn/upload/course/000/000/067/662b5d34ba7c0227.png)


