
Recently, when using vue-cli3 with the iview framework to build a new project, the menu menu in iview is used. It is not very good to fix it according to the official website writing method, because most projects are started from the back end. Dynamically obtain the menu list, so we need to slightly modify the official website code, the code is as follows:
Related learning recommendations: javascript tutorial
## Notes:
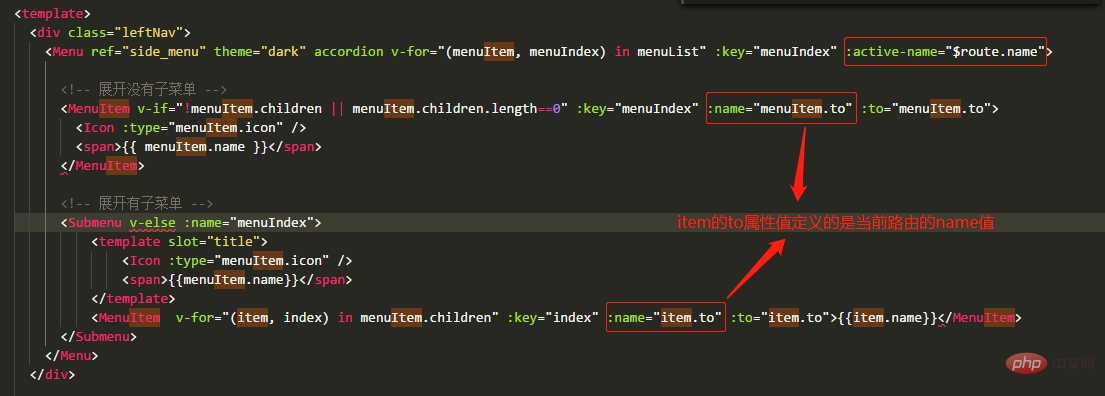
[1] The highlighted part of the menu is dynamically bound to the route jump page
There are some in the Menu component An active-name reflects the current highlighted area, so active-name can be dynamically bound to achieve highlighting. The premise is that the name bound to the MenuItem needs to be set to the name of the page route
[2] Dynamically obtain the menu data and update the menu
 this.$nextTick(() => {
 	this.$refs.side_menu.updateOpened()
  	this.$refs.side_menu.updateActiveName()
});Code:
<template>
 <p class="leftNav">
 <Menu ref="side_menu" theme="dark" accordion v-for="(menuItem, menuIndex) in menuList" :key="menuIndex" :active-name="$route.name">

  <!-- 展开没有子菜单 -->
  <MenuItem v-if="!menuItem.children || menuItem.children.length==0" :key="menuIndex" :name="menuItem.to" :to="menuItem.to">
  <Icon :type="menuItem.icon" />
  <span>{{ menuItem.name }}</span>
  </MenuItem>

  <!-- 展开有子菜单 -->
  <Submenu v-else :name="menuIndex">
   <template slot="title">
    <Icon :type="menuItem.icon" />
    <span>{{menuItem.name}}</span>
   </template>
   <MenuItem v-for="(item, index) in menuItem.children" :key="index" :name="item.to" :to="item.to">{{item.name}}</MenuItem>
  </Submenu>
 </Menu>
 </p>

</template>
<script>
export default {
 data() {
 return {
  menuList: [
  {
   name: "首页",
   to: "home",
   icon: "ios-archive-outline"
  },
  {
   name: "关于",
   to: "about",
   icon: "ios-create-outline"
  },
  {
   name: "菜单分类1",
   icon: "md-person",
   children: [
   {
    name: "用户",
    to: "user"
   }
   ]
  },
  {
   name: "菜单分类2",
   icon: "ios-copy",
   children: [
   {
    name: "测试",
    to: "test"
   }
   ]
  }
  ]
 };
 },
 created() {
 // 数据我先写静态的,可在初始化的时候通过请求,将数据指向menuList。
 // ajax成功回调后 this.menuList = response.data;
 // 别忘记更新菜单
 // this.$nextTick(() => {
 //	this.$refs.side_menu.updateOpened()
 //	this.$refs.side_menu.updateActiveName()
 //});
 }
};
</script>
<style lang="scss" scoped>
/deep/
 .ivu-menu-dark.ivu-menu-vertical
 .ivu-menu-item-active:not(.ivu-menu-submenu) {
 border-right: none;
 color: #fff;
 background: #2d8cf0 !important;
}
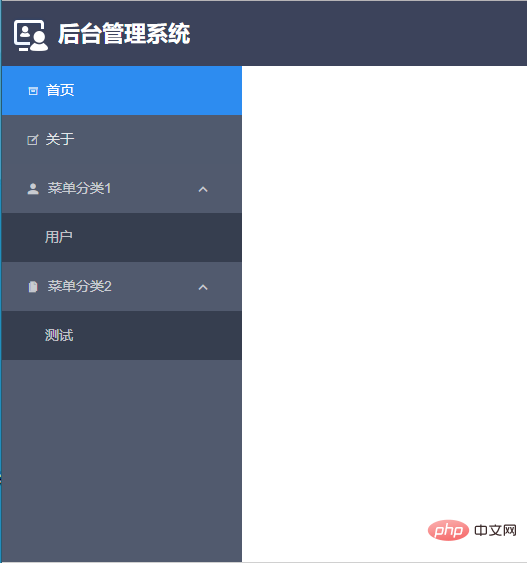
</style>Rendering:

Programming Video
The above is the detailed content of Example of implementing the dynamic menu function on the left using the vue+iview framework. For more information, please follow other related articles on the PHP Chinese website!