


How to convert wps word to PDF?

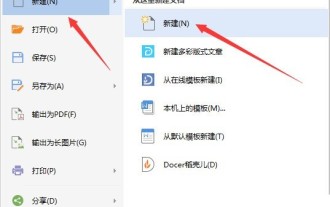
Method: 1. Enter wps and click "wps text" in the upper left corner; 2. In the pop-up window, click "Output to PDF format"; 3. On the pop-up page, make settings as needed. Then click "OK"; 4. The interface prompts 'Converting', just wait at this time; 5. When the interface prompts it is completed.

#Enter wps and click on the wps text in the upper left corner.
Click on the pop-up window to output to PDF format

In the pop-up window, you can set the general and permission settings for the output PDF [according to your own needs] ], then click OK;

The interface prompts 'Converting', just wait at this time;

Conversion After completion, click [Open File];
Finally, you can see the successfully converted PDF format.

Recommended tutorial: "Word Tutorial"
The above is the detailed content of How to convert wps word to PDF?. For more information, please follow other related articles on the PHP Chinese website!

Hot AI Tools

Undress AI Tool
Undress images for free

Undresser.AI Undress
AI-powered app for creating realistic nude photos

AI Clothes Remover
Online AI tool for removing clothes from photos.

Clothoff.io
AI clothes remover

Video Face Swap
Swap faces in any video effortlessly with our completely free AI face swap tool!

Hot Article
Hot Tools

Notepad++7.3.1
Easy-to-use and free code editor

SublimeText3 Chinese version
Chinese version, very easy to use

Zend Studio 13.0.1
Powerful PHP integrated development environment

Dreamweaver CS6
Visual web development tools

SublimeText3 Mac version
God-level code editing software (SublimeText3)


 How to use wps translation function_How to use wps translation function
Mar 27, 2024 pm 04:46 PM
How to use wps translation function_How to use wps translation function
Mar 27, 2024 pm 04:46 PM
1. First, we open wpsoffice on the mobile phone. 2. Then click Apply. 3. Click the image to translate. Method 2 1. First, we open wpsoffice on the mobile phone. 2. Open the document that needs to be translated and click the tool in the lower left corner. 3. Click Review and Translate.
 WPS and Office do not have Chinese fonts, and Chinese font names are displayed in English.
Jun 19, 2024 am 06:56 AM
WPS and Office do not have Chinese fonts, and Chinese font names are displayed in English.
Jun 19, 2024 am 06:56 AM
My friend's computer, all Chinese fonts such as imitation Song, Kai style, Xing Kai, Microsoft Yahei, etc. cannot be found in WPS and OFFICE. The editor below will tell you how to solve this problem. The fonts in the system are normal, but all fonts in the WPS font options are not available, only cloud fonts. OFFICE only has English fonts, not any Chinese fonts. After installing different versions of WPS, English fonts are available, but there is also no Chinese font. Solution: Control Panel → Categories → Clock, Language, and Region → Change Display Language → (Region and Language) Management → (Language for Non-Unicode Programs) Change System Regional Settings → Chinese (Simplified, China) → Restart. Control Panel, change the view mode in the upper right corner to "Category", Clock, Language and Region, change
 How to create a QR code using wps
Mar 28, 2024 am 09:41 AM
How to create a QR code using wps
Mar 28, 2024 am 09:41 AM
1. Open the software and enter the wps text operation interface. 2. Find the insert option in this interface. 3. Click the Insert option and find the QR code option in its editing tool area. 4. Click the QR code option to pop up the QR code dialog box. 5. Select the text option on the left and enter our information in the text box. 6. On the right side, you can set the shape of the QR code and the color of the QR code.
 How to set WPS value to automatically change color according to conditions_Steps to set WPS table value to automatically change color according to condition
Mar 27, 2024 pm 07:30 PM
How to set WPS value to automatically change color according to conditions_Steps to set WPS table value to automatically change color according to condition
Mar 27, 2024 pm 07:30 PM
1. Open the worksheet and find the [Start]-[Conditional Formatting] button. 2. Click Column Selection and select the column to which conditional formatting will be added. 3. Click the [Conditional Formatting] button to bring up the option menu. 4. Select [Highlight conditional rules]-[Between]. 5. Fill in the rules: 20, 24, dark green text with dark fill color. 6. After confirmation, the data in the selected column will be colored with corresponding numbers, text, and cell boxes according to the settings. 7. Conditional rules without conflicts can be added repeatedly, but for conflicting rules WPS will replace the previously established conditional rules with the last added rule. 8. Repeatedly add the cell columns after [Between] rules 20-24 and [Less than] 20. 9. If you need to change the rules, you can just clear the rules and then reset the rules.
 Introduction to the method of editing watermark with WPS
Mar 27, 2024 pm 02:06 PM
Introduction to the method of editing watermark with WPS
Mar 27, 2024 pm 02:06 PM
1. We use WPS to open a document. There is a watermark in it. It looks messy. How to remove it? Look down. 2. Find the Insert tab in the menu bar, select the header and footer icons under this tab, and click on them with the left mouse button. 3. At this time, the text on the page becomes gray and cannot be edited, but the watermark on the back of the text can be edited at this time. 4. Click on the watermark, you can see that this is a picture watermark, because there are several small squares around the picture, and the picture can be edited at this time. 5. Use the delete key on the keyboard to delete the picture, and you can see that the watermark is gone. 6. Double-click the mouse on the page to exit the header and footer editing mode. The text on the page returns to normal color and can be edited, but at this time the watermark on the page has disappeared. 7.
 How to draw a company organization chart using wps
Mar 27, 2024 am 11:21 AM
How to draw a company organization chart using wps
Mar 27, 2024 am 11:21 AM
1. Open wps and create a new document. 2. Click [Insert] in the main menu and click [SmartArt]. 3. Select the organization chart in [Select SmartArt Graphic] and click OK. 4. After inserting the organization chart into the document, you can add items according to your needs. Click [Add Item] in the [Design] menu to add it. 5. After adding projects, the organization chart framework is completed. 6. Then add text in the picture box, and the organization chart is completed.
 Detailed explanation of Word document operation: merge two pages into one
Mar 26, 2024 am 08:18 AM
Detailed explanation of Word document operation: merge two pages into one
Mar 26, 2024 am 08:18 AM
Word documents are one of the most frequently used applications in our daily work and study. When working with documents, you may sometimes encounter a situation where you need to merge two pages into one. This article will introduce in detail how to merge two pages into one page in a Word document to help readers handle document layout more efficiently. In Word documents, the operation of merging two pages into one is usually used to save paper and printing costs, or to make the document more compact and neat. The following are the specific steps to merge two pages into one: Step 1: Open the Word that needs to be operated
 Practical methods to solve the problem of cross-page display of Word tables
Mar 25, 2024 pm 07:27 PM
Practical methods to solve the problem of cross-page display of Word tables
Mar 25, 2024 pm 07:27 PM
In daily work and study, we often use Word to write documents and create tables. However, when dealing with long tables, it is very common to encounter the situation where the table content is displayed across pages. At this time, some practical methods need to be adopted to solve this problem. The first method is to adjust the row height and column width. In Word, you can try to make the table content display completely on one page by adjusting the row height and column width. First, select the row or column that needs to be adjusted, then right-click and select "Row Height" or "Column Width" to adjust it to the appropriate size. if
