This article introduces the method of using ThinkPHP to access QQ Internet to realize third-party login. It is explained as a small case for you. I hope it will be helpful to you.

Case analysis of ThinkPHP connecting to QQ Internet to realize login
I want to connect to a second-level domain name project QQ third-party login function, this project is developed using the thinkphp5 framework. I searched some access cases on the Internet. I personally feel that a mixed bag of good and bad is not suitable for me. Now I am re-developing this function on the thinkphp5 framework. The following is the detailed development step.
(Recommended tutorial:thinkphp tutorial)
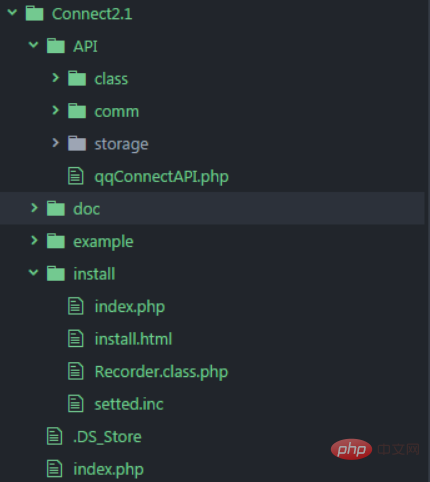
The first step is to download the QQ Internet SDK. We are based on the thinkphp5 framework. Of course, we need to use PHP version of the SDK, the file directory after downloading is as follows.

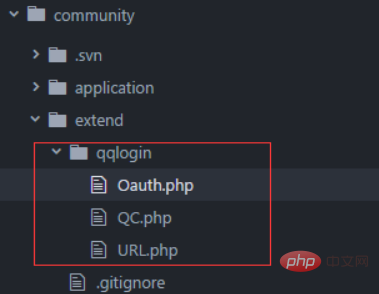
The second step is to upload the main directory of the SDK to the appropriate directory on the server. First, let’s talk about the main directory of the SDK being the class directory in the API folder. Originally, for To test the configuration settings, I uploaded the install folder, and then configured the APP ID, APP Key and callback_url in the development environment. After configuration, there will be an inc.php configuration file in the API/comm folder, and finally recorder This configuration file will be referenced in the class. However, during the subsequent development process, I found that this error would be reported: The state does not match. You may be a victim of CSRF. Later, I put the state in the qqlogin method into the session. I had completely lost confidence in the DEMO SDK on the official website. Instead of using QQ to connect all the files, I selected a few important class files for development. Thinking later, the official SDK is just a common PHP code format. Many things I applied to thinkphp have changed. Finally, I chose the last class file, QC.php, URL.php, and Oauth.php, and uploaded them to extend/qqlogin Under contents. In thinkphp5 projects, extension classes are generally uploaded to the extend folder, as shown in the figure below my last directory location.

The third step is to transform the above three class files. Because QC.php inherits Oauth.php, we change it from the latter, remove require_once, and add naming For a space such as namespace qqlogin, first look at the member attributes. The class constant is the address of the Tencent platform. Don't worry about it. There are three attributes originally. Recorder and error are not needed. Comment them out or delete them directly. The same is true below, because out of 5 class files we only use 3 class files, one is the error reporting class and the other is the reading configuration related class. Let’s look at the Oauth.php member attributes, qqlogin jump method, and qqcallback callback method. The other two class files have not changed much. Just change them according to the above rules.
recorder = new Recorder(); $this->urlUtils = new URL(); // $this->error = new ErrorCase(); } public function qq_login(){ // $appid = $this->recorder->readInc("appid"); // $callback = $this->recorder->readInc("callback"); // $scope = $this->recorder->readInc("scope"); $appid = $this->appid; $callback = $this->callback; $scope = $this->scope; //-------生成唯一随机串防CSRF攻击 $state = md5(uniqid(rand(), TRUE)); // $this->recorder->write('state',$state); session('state',$state); //-------构造请求参数列表 $keysArr = array( "response_type" => "code", "client_id" => $appid, "redirect_uri" => $callback, "state" => $state, "scope" => $scope ); $login_url = $this->urlUtils->combineURL(self::GET_AUTH_CODE_URL, $keysArr); return $login_url; } public function qq_callback(){ // $state = $this->recorder->read("state"); //--------验证state防止CSRF攻击 if(input('state') != session('state')){ // $this->error->showError("30001"); exit('30001'); } //-------请求参数列表 $keysArr = array( "grant_type" => "authorization_code", "client_id" => $this->appid, "redirect_uri" => urlencode($this->callback), "client_secret" => $this->appkey, "code" => $_GET['code'] ); //------构造请求access_token的url $token_url = $this->urlUtils->combineURL(self::GET_ACCESS_TOKEN_URL, $keysArr); $response = $this->urlUtils->get_contents($token_url); if(strpos($response, "callback") !== false){ $lpos = strpos($response, "("); $rpos = strrpos($response, ")"); $response = substr($response, $lpos + 1, $rpos - $lpos -1); $msg = json_decode($response); // if(isset($msg->error)){ // $this->error->showError($msg->error, $msg->error_description); // } } $params = array(); parse_str($response, $params); // $this->recorder->write("access_token", $params["access_token"]); // return $params["access_token"]; session('access_token',$params["access_token"]); } }
The fourth step is to write the controller. Call the function and callback function, and check whether the callback address is correct (the callback address is the jump address returned when you add a QQ third-party login to QQ Internet. This address carries important parameters and can obtain the last user's data). Sometimes if you are The callback address filled in by QQ Internet is different from that of your controller, then it will end up stuck at the callback address filled in by QQ Internet, such as www.100txy.com/index.php?code=65B7668A4F1BBB71DD0DF52B55AC1FC1&state=804e921e18e3545ecdf690316639c067. The following is the controller method
use qqlogin\QC; // 处理qq登录 public function qqlogin(){ $qq = new QC(); $url = $qq->qq_login(); $this->redirect($url); } // qq登录回调函数 public function qqcallback(){ $qq = new QC(); $qq->qq_callback(); $qq->get_openid(); $qq = new QC(); $datas = $qq->get_user_info(); die(var_dump($datas));//为用户数据 }
It is worth noting that QC needs to be instantiated twice in the callback function to get the user information. Only the second time it is instantiated has the two parameters openid and access_token.
For more Thinkphp tutorials, please pay attention toPHP Chinese website!
The above is the detailed content of Case analysis of ThinkPHP connecting to QQ Internet to realize login. For more information, please follow other related articles on the PHP Chinese website!
 Which one is easier, thinkphp or laravel?
 How is the performance of thinkphp?
 What are the search sites?
 What are private clouds?
 Can Microsoft Visual C++ be uninstalled?
 How to solve errors encountered in geforce experience
 After the computer is turned on, the monitor shows no signal
 How to become a close friend on TikTok