

Background:
1. VS Code is just a code editor. Compiling and running these tasks require other programs to complete.
2. Selection of C/C compiler, GCC/G (MinFGW-w64)
3. MinGW and MinGW-w64 are two different projects. MinGW itself has not been updated for a long time, so it is not recommended. For convenience, MinGW in this article actually refers to MinGW-w64.
4. Use of command line and adding system variables.
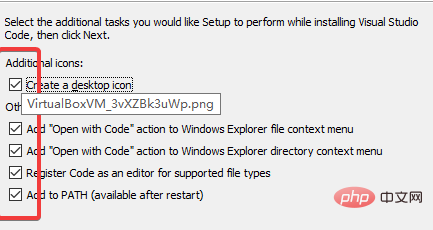
Install vs code
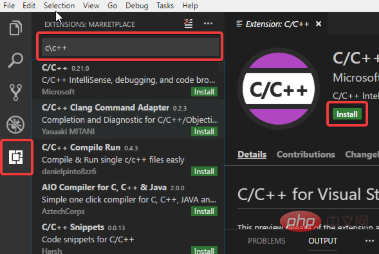
Plug-in installation
1. Necessary plug-in
C/C (ms-vscode. cpptools, officially produced by Microsoft): The most complete C/C plug-in, and it is an official plug-in from Microsoft. You can download it with confidence
Code Runner (formulahendry.code-runner): quickly compile and run a single file, which is convenient.
2. Recommended plugin
Bracket Pair Colorizer: Rainbow brackets, matching brackets will be marked with the same color.
Material Icon Theme: Icon pack plug-in, "fancy", recommended.
One Dark Pro: theme plug-in, recommended Chinese Language Pack: Chinese language pack.
Configuration environment:
One-click configuration:
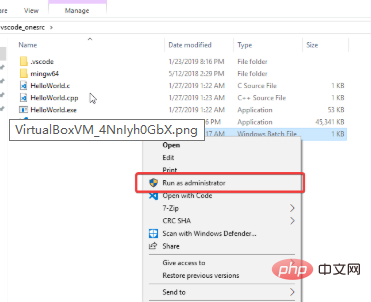
Valid for win7/10: If you don’t want to bother, download the one-click configuration compressed package. After decompression, open vscode_onesrc/ and find start Right click on .bat ->Run as administrator
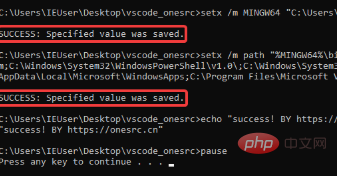
The installation is successful and the display is as follows:
Manual configuration:
Configure the compiler:
Before running C/C with VS Code, you need to be able to compile C/C on the command line.
Here we need to use GCC to compile.
下载地址:https://sourceforge.net/projects/mingw-w64/
MinGW-W64 GCC-8.1.0
x86_64-win32-seh
i686-win32-dwarf
64位电脑选择x86_64,32位选择i686。
下载解压完成后,添加系统变量 当前路径\mingw64\bin 到path里面。设置好变量后,重启电脑。在命令行中输入gcc 或者g++
如果显示如下界面:

配置成功,进行下一步。
配置Json:
以下配置文件需要放在.vscode文件夹里面(注意有个点),如果工作目录为workSpace.需要将.vscode放在workSpace目录里面。
下面的C:\Users\15591\MyFile\Develop\mingw64\include(一共四个),需要换成你自己的gcc编译器安装路径,如果你的路径为C:mingw64\你可以换成C:mingw64include
c_cpp_properties.json
{ "configurations": [{ "name": "Win32", "defines": [ "_DEBUG", "UNICODE", "_UNICODE" ], "includePath": [ "${workspaceFolder}", "C:\\Users\\15591\\MyFile\\Develop\\mingw64\\include" ], "browse": { "path": [ "${workspaceFolder}", "C:\\Users\\15591\\MyFile\\Develop\\mingw64\\include" ], "limitSymbolsToIncludedHeaders": true, "databaseFilename": "" }, "windowsSdkVersion": "10.0.17134.0", "compilerPath": "C:\\Users\\15591\\MyFile\\Develop\\mingw64\\bin\\gcc.exe", "cStandard": "c11", "cppStandard": "c++17" }], "version": 4 }
launch.json
{ "version": "0.2.0", "configurations": [ { "name": "(gdb) Launch", //配置名称;在启动配置下拉菜单中显示 "type": "cppdbg", "request": "launch", "program": "${fileDirname}/${fileBasenameNoExtension}.exe", // 将要进行调试的程序的路径 "args": [], //传入的参数 "stopAtEntry": false, "cwd": "${workspaceFolder}", "environment": [], "externalConsole": true, "internalConsoleOptions": "neverOpen", // 如果不设为neverOpen,调试时会跳到“调试控制台”选项卡,你应该不需要对gdb手动输命令吧? "MIMode": "gdb", "miDebuggerPath": "C:\\Users\\15591\\MyFile\\Develop\\mingw64\\bin\\gdb.exe", "setupCommands": [{ "description": "Enable pretty-printing for gdb", "text": "-enable-pretty-printing", "ignoreFailures": true }], "preLaunchTask": "CppCompile" // 调试会话开始前执行的任务,一般为编译程序。与tasks.json的label相对应 } ] }
tasks.json
{ "version": "2.0.0", "tasks": [{ "label": "CppCompile", // 任务名称,与launch.json的preLaunchTask相对应 "command": "g++", // 要使用的编译器,我们主要针对cpp文件调试,亦可以改成其他的 "args": [ "${file}", "-o", // 指定输出文件名,不加该参数则默认输出a.exe,Linux下默认a.out "${fileDirname}/${fileBasenameNoExtension}.exe", "-g", // 生成和调试有关的信息 "-Wall", // 开启额外警告 "-static-libgcc", // 静态链接 "-std=c++17" // C语言最新标准为c11,或根据自己的需要进行修改 ], // 编译命令参数 "type": "shell", // 可以为shell或process,前者相当于先打开shell再输入命令,后者是直接运行命令 "group": { "kind": "build", "isDefault": true // 设为false可做到一个tasks.json配置多个编译指令,需要自己修改本文件,我这里不多提 }, "presentation": { "echo": false, "reveal": "always", // 在“终端”中显示编译信息的策略,可以为always,silent,never。具体参见VSC的文档 "focus": false, // 设为true后可以使执行task时焦点聚集在终端,但对编译c和c++来说,设为true没有意义 "panel": "shared" // 不同的文件的编译信息共享一个终端面板 }, "problemMatcher": "$gcc" }] }
settings.json
{ "workbench.colorTheme": "One Dark Pro",//主题One Dark Pro,如不需要删除本行 "git.enabled": false,//关闭git "git.ignoreMissingGitWarning": true,//忽略git缺失警告 "terminal.integrated.rendererType": "dom", "breadcrumbs.enabled": true, "workbench.iconTheme": "material-icon-theme",//图标主题,如不需要删除本行 "files.defaultLanguage": "cpp", // ctrl+N新建文件后默认的语言 "editor.formatOnType": true, // 输入时就进行格式化,默认触发字符较少,分号可以触发 "editor.snippetSuggestions": "top", // snippets代码优先显示补全 "code-runner.runInTerminal": true, // 设置成false会在“输出”面板中输出,无法输入,建议设true "code-runner.executorMap": { "c": "cd $dir && gcc $fileName -o $fileNameWithoutExt.exe -Wall -g -Og -static-libgcc -std=c11 && $dir$fileNameWithoutExt", "cpp": "cd $dir && g++ $fileName -o $fileNameWithoutExt.exe -Wall -g -Og -static-libgcc -std=c++17 && $dir$fileNameWithoutExt" }, "code-runner.saveFileBeforeRun": true, // run code前保存 "code-runner.preserveFocus": false, // 若为false,run code后光标会聚焦到终端上。如果需要频繁输入数据可设为false "code-runner.clearPreviousOutput": true, // 每次run code前清空属于code runner的终端消息 "code-runner.ignoreSelection": true, }
HelloWorld:
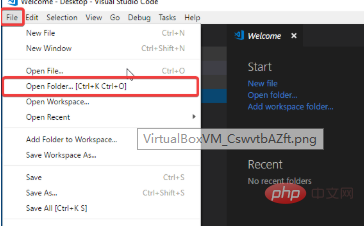
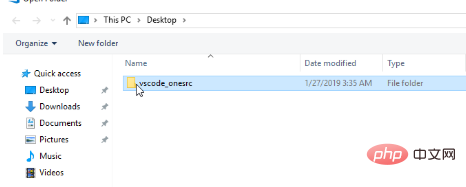
file->open folder->vscode_onesrc
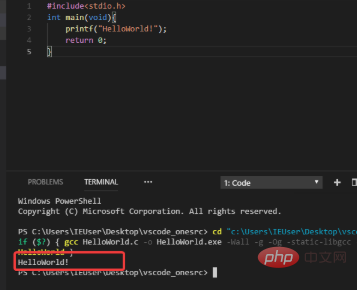
找到并打开我们的文件夹vscode_onesrc,打开HelloWorld.c点击右上角的三角形,编译运行!
Hello World!
相关文章教程推荐:vscode教程
The above is the detailed content of vscode configures the environment for compiling and running c programs. For more information, please follow other related articles on the PHP Chinese website!


