

Recommended tutorial:High-performance Linux server building video tutorial
How to make yourself write Can the web page be accessed by others online? Then start building your own server so that your cool web pages can be seen by more people.
This article mainly explainsStart from scratchBuild your own server,Purchase==>Configuration==>Publish, such a series of detailed processes allow the web pages you create to be published on the Internet, and let’s start the server journey together! This article mainly explains the Tencent Cloud student package. The operations of other cloud servers are similar. If it helps you, I hope you can keep doing it.
Purchasing a server
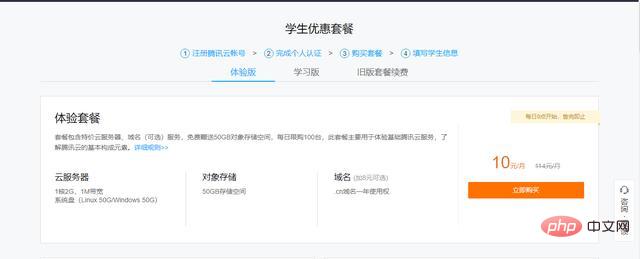
Currently the most commonly used servers are Alibaba Cloud and Tencent Cloud, which are relatively stable to use. What is explained here is Tencent Cloud. In fact, the configuration and use of many browsers are similar. What is demonstrated here is the student package of Tencent Cloud. As a student dog, you can use it for free during school. Enter the Tencent Cloud Campus Service Plan and select the [Trial Version] (PS: Grabbing starts at 0:00 every day, 100 places per day, limited grab, grab! grab!) package, 10 yuan/month.
Select configuration
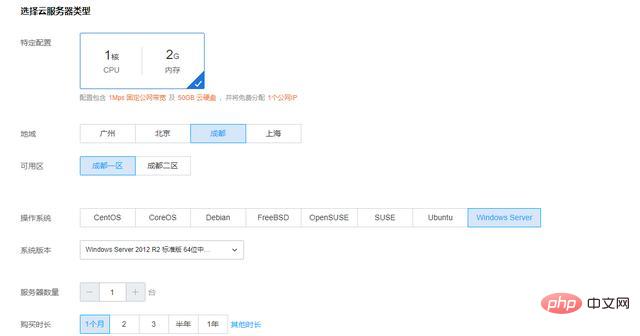
Tencent Cloud Free Student Package [1 core 2G, 1M bandwidth 50G cloud hard disk 】, this is the default configuration of Tencent Cloud student package and cannot be selected.
Next, select other configuration options for the server:
Region: the location of the server. Just choose the area of the server that is closer to the visitor. The closer it is, the faster the access speed will be. [For example: Chengdu] Availability Zone: Just choose according to the region, it’s not a big problem. [For example: Chengdu District 1] Operating systems: There are Linux, Windows and other systems, and Linux includes different versions: CentOS, Debian, Ubuntu, etc. Just choose a system you are familiar with. [For example: Windows Server] System version: Choose the version that suits you according to the operating system you choose. [For example: Windows Server 2012 R2 Standard Edition 64-bit Chinese Edition] Purchase duration: Select one month. Because the coupons for Tencent Cloud’s student package are collected every month, you can only purchase them one month at a time. Object storage: Just use the default 50G. Domain name service: Use the .cn domain name for free in the first year. If you have a domain name, you can select [No], if not, you can select [Yes], and then enter a domain name you want, but this domain name must be globally unique, so the domain name you want may have been registered, then You can only register other domain names.

Check the information
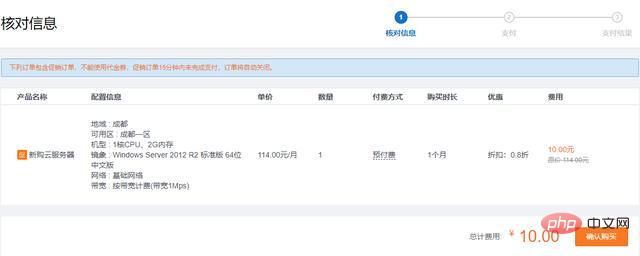
Check the information and check your own Check whether the purchased configuration is what you need. After paying the order, you have already obtained the server, and you can start playing with your own server.
View Server
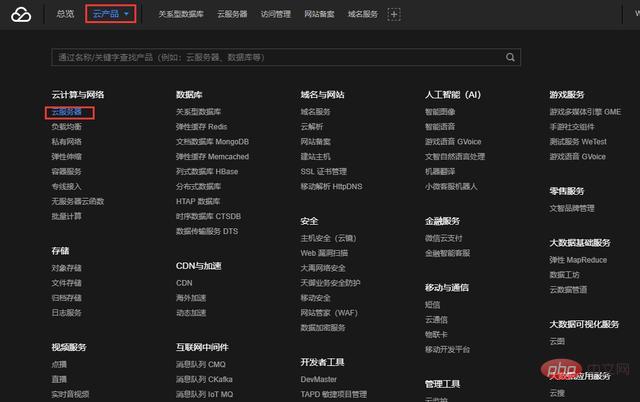
So how do you check the server you have purchased? Log in to Tencent Cloud, enter the console management, click [Cloud Products] ==> [Cloud Server] ==> [Cloud Host] in the navigation bar, and you can view your cloud host.
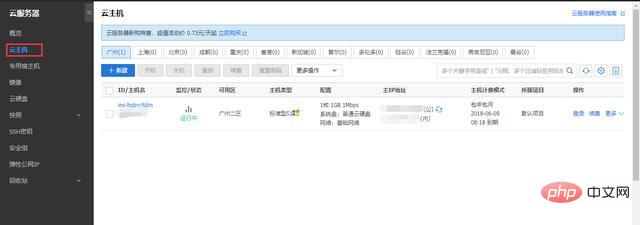
Here you can view the various statuses of the cloud host and some operations, including your own public IP and intranet IP .
Server registration and domain name resolution
Strictly speaking, the purpose of domain name registration is to prevent illegal website business activities on the Internet and combat the spread of bad Internet information. If the website is not registered, the server will be shut down after 7 days, resulting in the inability to use it normally. Currently, all servers in the country need to be registered.
Here, I directly quote the official registration document provided by Tencent Cloud. It is very detailed. Just refer to the registration. The time from the beginning of the registration to the completion may be about 20 days.
Domain name resolution is to bind the domain name to the IP. Through DNS resolution, the website corresponding to the IP can be accessed through the domain name.
PS: You can skip the "Server Registration and Domain Name Resolution" step first. You can also deal with this module after completing all the subsequent steps.
Log in to the cloud host
Log in to the cloud host to operate the entire cloud service and configure it as you want.
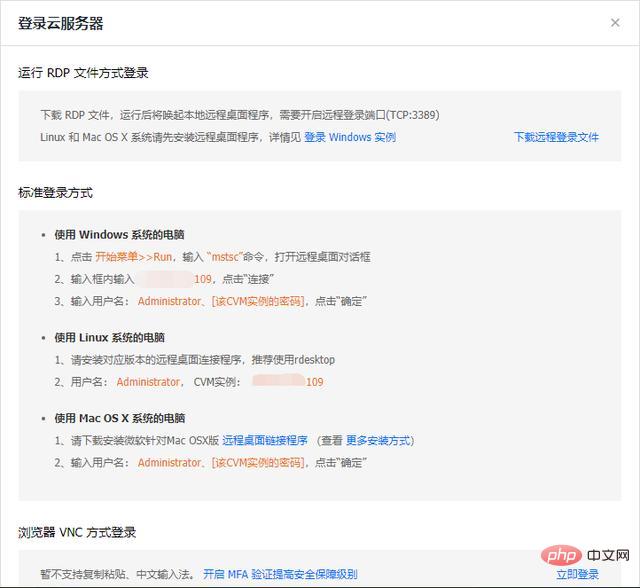
Click [Login] to see how to log in, and choose different login methods according to different systems.
Login steps (Windows):
Shortcut key [win R], enter the "mstsc" command to open the remote desktop dialog box. Enter the public IP address of the cloud host in the input box and click Connect. Enter the default username [Administrator], enter the password you set when you purchased the server, and click OK to connect to the remote desktop. Note: When connecting, remember to connect when the network speed is good, otherwise it may not be able to carry the device and cause the connection to fail.
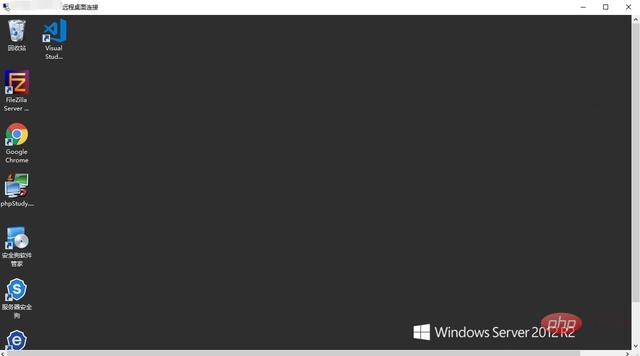
After entering the cloud host, you will find that it is no different from the Windows we usually use, and the operation is much simpler.
Open the server
Okay, at this point we are very close to success. How can we make our server run and run the web pages or websites we write ourselves? Then you need to prepare the following software - PHPStudy. In fact, there are many servers that can be opened, such as Tomcat, but here we use PHPStudy for demonstration.
After downloading PHPStudy, you can install it in a fool-proof way.
After installation, the effect of starting the server normally is as shown in the figure below (that is, there is a green dot in front of it instead of a red dot).
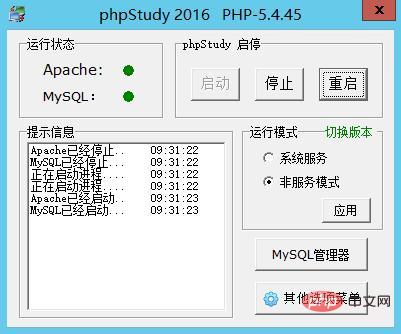
Here we only need to manage Apache, not Mysql. Of course, if your project requires a database, then related configurations are definitely required. The default port of Apache is 80. If port 80 is not used, you need to add the port number after it when accessing using the IP address or domain name. MySQL default port is 3306.
If it cannot start normally, it means that the port is occupied, and you need to terminate other processes occupying the port.
After startup, you need to simply configure the port and directory.
Operation steps:Click [Other options menu]==>[Open configuration file]==>[vhosts-conf]
At this time, the opening should be Empty, just add the following configuration.
DocumentRoot 'C:\phpstudy\WWW' Options Indexes FollowSymLinks ExecCGI AllowOverride All Order allow,deny Allow from all Require all granted
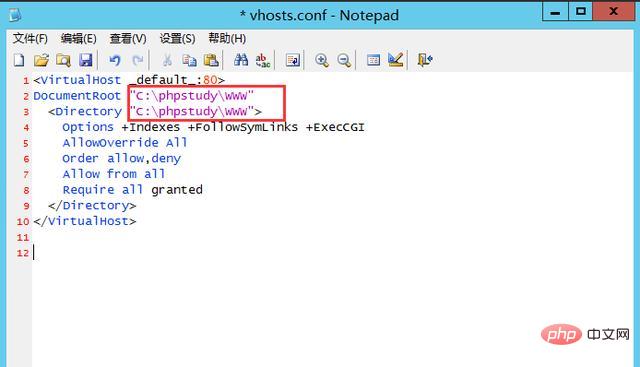
PS: Remember to modify The location of your own root directory.
If you need to publish your website online, you only need to upload all the files of the website to the server directory. Just access it through a domain name.
The above is the detailed content of How to build your own cloud server. For more information, please follow other related articles on the PHP Chinese website!