


I heard from a netizen that he recently had a Laravel development project and needed to move it to a CentOS server for testing. I asked him about the relocation process by the way and shared it with everyone. If you are interested, you can learn more.
Let’s talk about the project configuration first:
Laravel version 5.5 - determined to be php7.0 or above;
CentOS 7.0 or above.
lnmp version 1.5
The following is the relocation process:
1. Install lnmp1.5 on the server:
The lnmp installation package is the most convenient installation for lazy people Tools for deploying web servers. If you are more concerned, you can compile and install it yourself.
The installation process is clearly written on the official website. Consider using unmanned automated installation: https://lnmp.org/faq/v1-5-auto-install.html. It is best to use screen before installation to prevent ssh from automatically disconnecting during the installation process.
I installed lnmp, using nginx instead of apache.
2. Add a virtual host:
How to add it, the official website has an introduction: https://lnmp.org/faq/lnmp-vhost-add-howto.html
Parameters written when adding:
(1) Domain name: the domain name pointed to (or customize a fake domain name)
(2) Website directory: press Enter without inputting, then the default is / home/wwwroot/domain name
(3) rewrite rules: y, required. Then enter laravel and press Enter.
(4) Open the access log: y, press Enter
Access log name: press Enter directly, default; No, build it yourself.
(7) SSL function: n, not required.
3. Move the project files to the website directory:
You can use sftp method, or you can install the ftp server through lnmp and upload it through ftp. After uploading, create the database and user account through http://serverip/phpmyadmin. After completion, modify the database configuration under the .env file under the project.
4. Modify the website directory pointing:
The website directory of the Laravel project should be the public directory under the project, so the vhost file needs to be modified: /usr/local/nginx/conf/vhost/domain name .conf
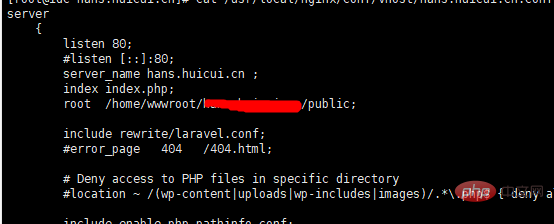 Point the directory pointed by root to the public directory under the project. Then reload nginx.
5. Website directory permission settings:
(1) Change the entire website directory to www:www: chown www:www -R /home/wwwroot/Website directory
(2) Set the storage directory under the project to be writable: chmod -R 775 /home/wwwroot/website directory/storage/
(3) Since the actual upload directory of the Laravel project is storage/app/ public, so you need to make a soft link to this directory to the public directory. Here we enter the project directory and execute: php artisan storage:link.
An error occurred when executing this command. The reason is that php.ini blocks certain php functions. Modify the disable_functions configuration of the php.ini file, remove the functions that need to be used, modify and save, and then reload php- fpm. Just re-execute the above command.
6. Clear the cache: php artisan cache:clear
7. Install redis: You can install it using lnmp. There are instructions on the official website, so I will skip it here.
8. Composer updates third-party vendor components: When executing composer update in the project directory, it prompts that the PHP extension of fileinfo is missing. At this time, you need to manually compile and install the fileinfo extension.
We used wget to automatically download the lnmp installation package in the first step. The command line decompresses this installation package, which contains the source code of php. We can compile and install the fileinfo extension through the source code.
Related tutorials:
PHP video tutorialThe above is the detailed content of How to move Laravel project to server. For more information, please follow other related articles on the PHP Chinese website!


![[Web front-end] Node.js quick start](https://img.php.cn/upload/course/000/000/067/662b5d34ba7c0227.png)


