
This article brings you an example of how TP5 implements Alipay computer website payment. It has certain reference value. Friends in need can refer to it. I hope it will be helpful to you.
I have been working on a small WEB project in the company for the past two days, and I need a payment function. It was my first time to pay with Alipay, and I encountered a few pitfalls, but it was pretty smooth. Excited, I quickly wrote down the implementation process.
The first step is of course to apply for the public key private key APPID, etc. on the Alipay open platform. Alipay official documents have detailed introductions, which will be omitted here.
After the application is completed, the developer implementation process begins. First, download the official DEMO of Alipay. The website is https://docs.open.alipay.com/... It is recommended to download the official DEMO instead of the SDK, because for novices, there are encapsulated functions in the DEMO that can be used directly. Just use it if you want to change it, it's more friendly. In the future, when the technology improves, I can play with the SDK again.
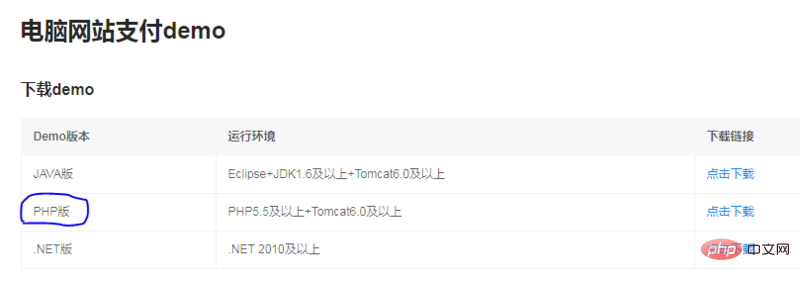
#Because I am a PHPer, of course I choose the PHP version. After downloading, the default name is alipay.trade.page.pay-PHP-UTF-8. It is recommended to change the name to alipay.
Because I am developing using TP5, I put it in the external resource package vendor directory under the project root directory.
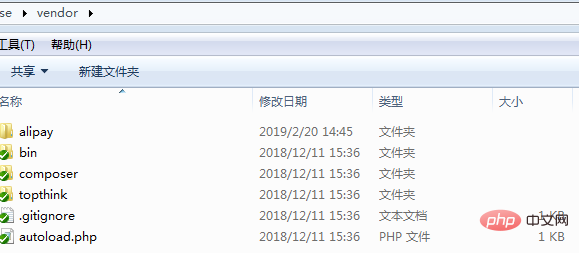
After putting it in, find the pagepay.php file in the pagepay directory under the alipay directory. This is the payment method example provided by Ali officially,
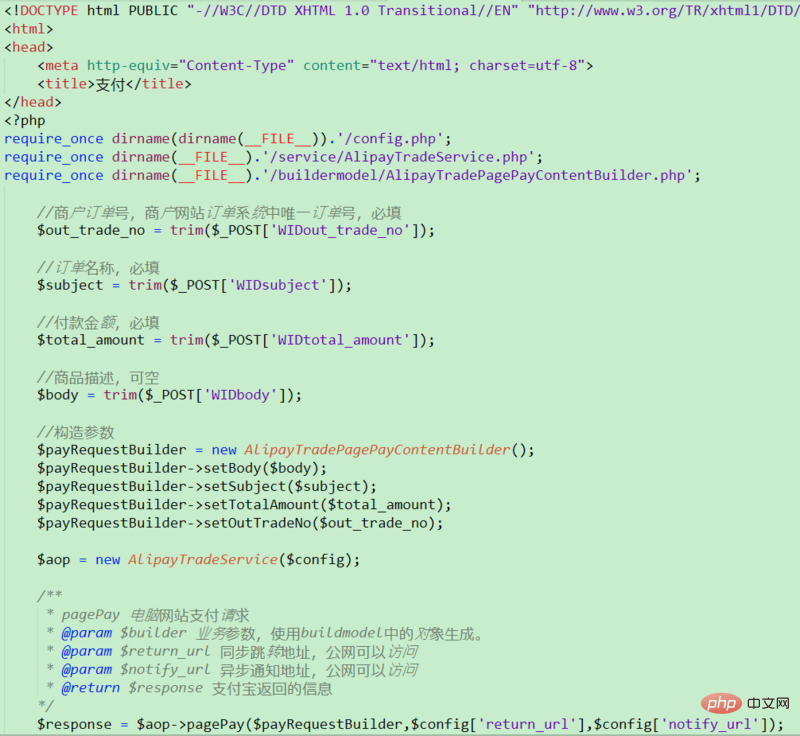
I followed the writing method of a senior online and changed it into the TP5 method, as shown in the picture below:
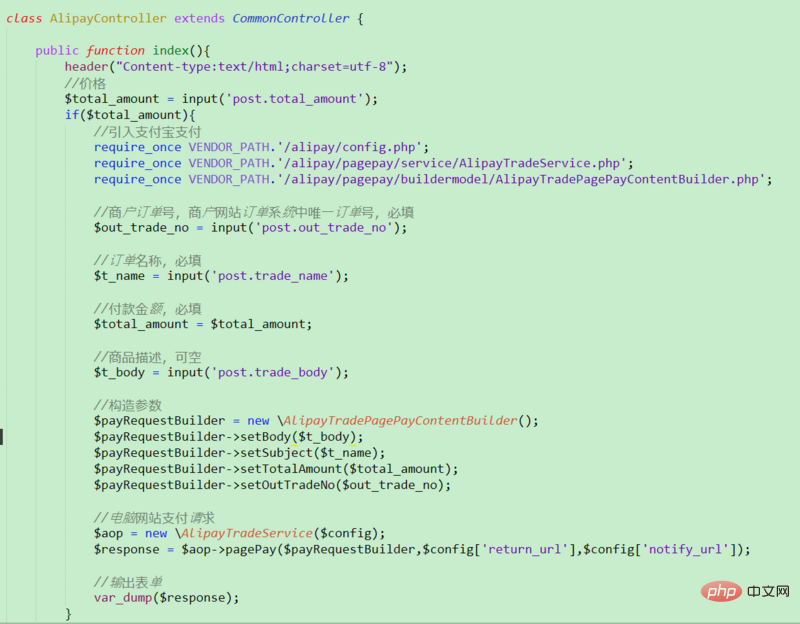
If you go here successfully, the Alipay QR code page will appear. I can't take screenshots here because the customer reapplied for permission. It’s the Alipay QR code page. Scan the QR code to pay, and you will jump to the payment success page, and finally jump to your customized synchronization jump address.
The price can be passed in from the front desk form. Here we emphasize that there are three required items:Order number, order name, payment amount. Which of these three are missing? Either one will report an error. My head was spinning at first, so I removed the order name and got an error...
After finishing writing here, I went to config.php to configure various parameters. config.php is in the root directory of alipay. Configure this item is crucial. If it is wrong, the merchant will not be able to receive the payment...
Here is how to fill in the form for fools, using ID, private key, asynchronous address, synchronous address, and public key. These 6 items must be filled in correctly. Because I use TP5, I changed the notification address to TP5, module/controller/method.
Do not change the Alipay gateway. If it is a sandbox environment, you need to change it to "https://openapi" .alipaydev.com/gateway.do" has an additional "dev". Because I am using a real environment, there is no need to change it.
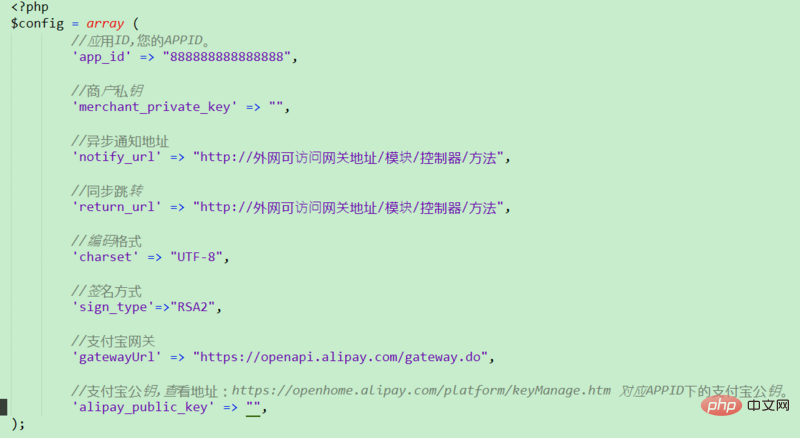
Let’s talk about asynchronous and synchronous addresses again. Newbies definitely don’t know what they are used for. Bosses can just skip them. These two methods will be executed after Alipay payment is successful, and the system will asynchronously transmit your payment information to your method using POST method. Because it is asynchronous, the page does not change. As the saying goes, "Don't be a gunman, enter the village quietly..." You can write your own business logic in the asynchronous method. For example, receiving values and storing them in the database. There is a big pitfall here, which troubled me for two days, That is, the session cannot be used to get the value in the asynchronous method, I originally wanted to use the session to get the user login ID and store it in the database Later, I asked the master and found out that asynchronous is the interaction between server and server, so there is no cookieId, and of course there is no session value without cookieId. For those who don't understand here, you can review the basic knowledge of session. I'm ashamed that I forgot such a basic thing... From this we can see that the synchronization method can take the session, because it is the interaction between the server and the client. If you have no idea about this, you can convert the parameters into JSON format after receiving the parameters in the asynchronous method, and then use the file_put_contents() function to write it into Notepad and take a look.
Example:
{
"gmt_create":"xxxxxxxx",//订单创建时间
"charset":"UTF-8",
"gmt_payment":"xxxxxxxx", //付款时间
"notify_time":"xxxxx",   //异步回调时间
"subject":"XXXXX",     //订单名称
"sign":"xxxxxxxxxxxxxxxxxxx",
"buyer_id":"xxxxxxxx",
"invoice_amount":"xxxxx",
"version":"1.0",
"notify_id":"xxxxxxxxx",
"fund_bill_list":"[{"amount":"0.01","fundChannel":"ALIPAYACCOUNT"}]",
"notify_type":"trade_status_sync",
"out_trade_no":"xxxxxxxx", //订单号
"total_amount":"0.01",
"trade_status":"TRADE_SUCCESS", //success代表支付成功,商家会收到钱
"trade_no":"xxxxxx", //支付宝流水号
"auth_app_id":"xxxxxxxx",
"receipt_amount":"0.01",
"point_amount":"0.00",
"app_id":"xxxxxxxxx",
"buyer_pay_amount":"0.01",
"sign_type":"RSA2",
"seller_id":"xxxxxxxxxxxxx"
}I have commented out all the important ones. For other parameters you don’t understand, you can check them in the official documentation.
The synchronization method, as the name suggests, is the address of the page synchronous jump, that is, the page that customers can see. You can customize it here, such as text prompting the user that payment is successful.
The following is an example of how to write asynchronous and synchronous methods:
/**
异步同步示例
*/
class alipay extends Controller {
/**
 * 异步方法
 * @return [void]
 */
public function notify(){
    $post = input();
    if($post['trade_status'] == "TRADE_SUCCESS"){
        //操作数据库 修改状态
        echo "SUCCESS";//返回给支付宝成功 ,不返回这个  字符 ,支付宝定时 回调这个方法 时间 5   10   30/m  1小时 成功为止
    }
    //写在文本里看一下参数
    $data = json_encode($post);
    file_put_contents("alipaytext.txt",$data);
}

/**
 * 同步方法
 * @return [type] [description]
 */
public function returnfy(){
    //同步跳转地址
    return $this->fetch();
}
}这里面重要的是需要在异步方法里判断trade_status字段,如果等于"TRADE_SUCCESS"即支付成功,后面必须echo返回一个"SUCCESS",否则支付宝会认为你没有付款成功,而在24小时内定时回调这个方法。实际业务逻辑根据你的需求来比如存入订单表等等,当然不会这么简单,最好加一些验证。为了安全。下面是前台代码示例:
{include file="public/header"}
{include file="public/right"}
{include file="public/tail"}最后补上一句:日志文件一定要开启写权限,否则无法自动写入。即在alipay文件夹下右键log.txt属性设置。出了问题可以在日志里查看。
走到这里,流程就基本介绍完了。欢迎各位大佬拍砖指导。做完支付,会感觉自己又上了一个台阶!
The above is the detailed content of An example introduction of TP5 to implement Alipay computer website payment. For more information, please follow other related articles on the PHP Chinese website!