The content of this article is about how to connect Java to the MySQL database in the ubuntu environment. It has certain reference value. Friends in need can refer to it. I hope it will be helpful to you.
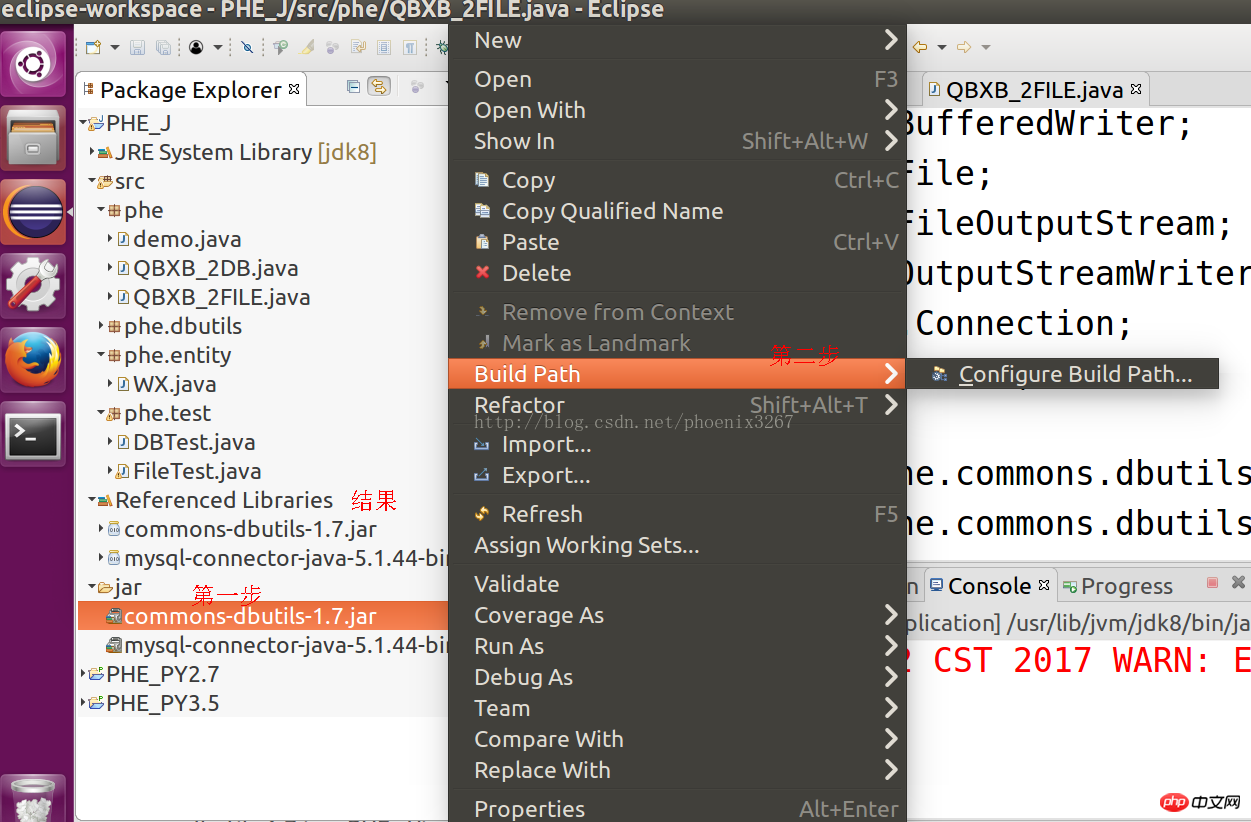
For the jar package, we need to configure it into the development tool. As shown in the figure,
The first step is to create a directory in the project, usually called jar. You can call it whatever you want. Then put the jar package ctrl C V into it.
The second step is to right-click and select build path. There will be a milk bottle logo in it. I don’t remember what it’s called, just remember the shape of the bottle. I may have configured it here, but it’s gone.
If you see the jar package as shown in the picture in Referenced Libraries, you will be successful. Very simple.

#After the jar package is completed, we start coding.
The code I wrote is really ugly, but it still works. Let me break it down for you a little bit.
Based on the object-oriented principle, a separate package and a class are used for the purpose of returning a Connection object.
The first is initialization, driver, URL, user, password, you can just change it to your own.
The purpose of adding ?useUnicode=true&characterEncoding=UTF-8 to the url is to prevent garbled Chinese characters from being written into the database.
After initialization, the driver is loaded, then the Connection object is obtained, and finally a method is provided to return the object.
public class DBHelp {

	private static Connection conn;
	static {
		String driver = "com.mysql.jdbc.Driver";
		String url = "jdbc:mysql://localhost:3306/qbxbf?useUnicode=true&characterEncoding=UTF-8";
		String user = "root";
		String password = "123";

		try {
			Class.forName(driver);
			conn = DriverManager.getConnection(url,user,password);
		} catch (Exception e) {
			e.printStackTrace();
		}
	}

	public static Connection getCoon() {
		return conn;
	}
}About dbutils, this is an Apache open source database processing package. The function is very powerful, everyone can learn it by themselves, hehe.
QueryRunner is an object of dbutils. This object can be used to add, delete, modify and check.
	private static void write2DB(WX wx) throws SQLException {
		Connection conn = DBHelp.getCoon();
		QueryRunner qr = new QueryRunner();
		String sql = "insert into wx(title,author,institution,keywords,abstracts,journal,period) values(?,?,?,?,?,?,?)";
		Object[] params = {wx.getTitle(),wx.getAuthor(),wx.getInstitution(),wx.getKeywords(),wx.getAbstracts(),wx.getJournal(),wx.getPeriod()};
		qr.update(conn, sql, params);
}The data can be written to the database through the above method. Next, convert the text from the database to txt.
There is a very powerful function of dbutils, which is BeanListHandler. Of course, if it is just an entity object, you can use BeanHandler.
	public static void main(String[] args) throws Exception {
		Connection conn = DBHelp.getCoon();
		QueryRunner qr = new QueryRunner();
		String sql = "select * from wx order by period desc";
		List<WX> wx_list = qr.query(conn, sql, new BeanListHandler<WX>(WX.class));

		File file = new File("/home/phe/桌面/情报学报2015_Y.txt");
		if (!file.exists()) {
		    file.createNewFile();
		}
		BufferedWriter bw = new BufferedWriter(new OutputStreamWriter(new FileOutputStream(file,true)));
		for(WX wx: wx_list) {
			bw.write(wx.getJournal());bw.newLine();bw.flush();
			bw.write("第"+wx.getPeriod()+"期");bw.newLine();bw.flush();
			bw.write("Title:"+wx.getTitle());bw.newLine();bw.flush();
			bw.write("Author:"+wx.getAuthor());bw.newLine();bw.flush();
			bw.write("Institution:"+wx.getInstitution());bw.newLine();bw.flush();
			bw.write("Keywords:"+wx.getKeywords());bw.newLine();bw.flush();
			bw.write("Abstract:"+wx.getAbstracts());bw.newLine();bw.flush();
			bw.newLine();
		}
		bw.close();
}The above is the detailed content of How to connect Java to MySQL database in ubuntu environment. For more information, please follow other related articles on the PHP Chinese website!