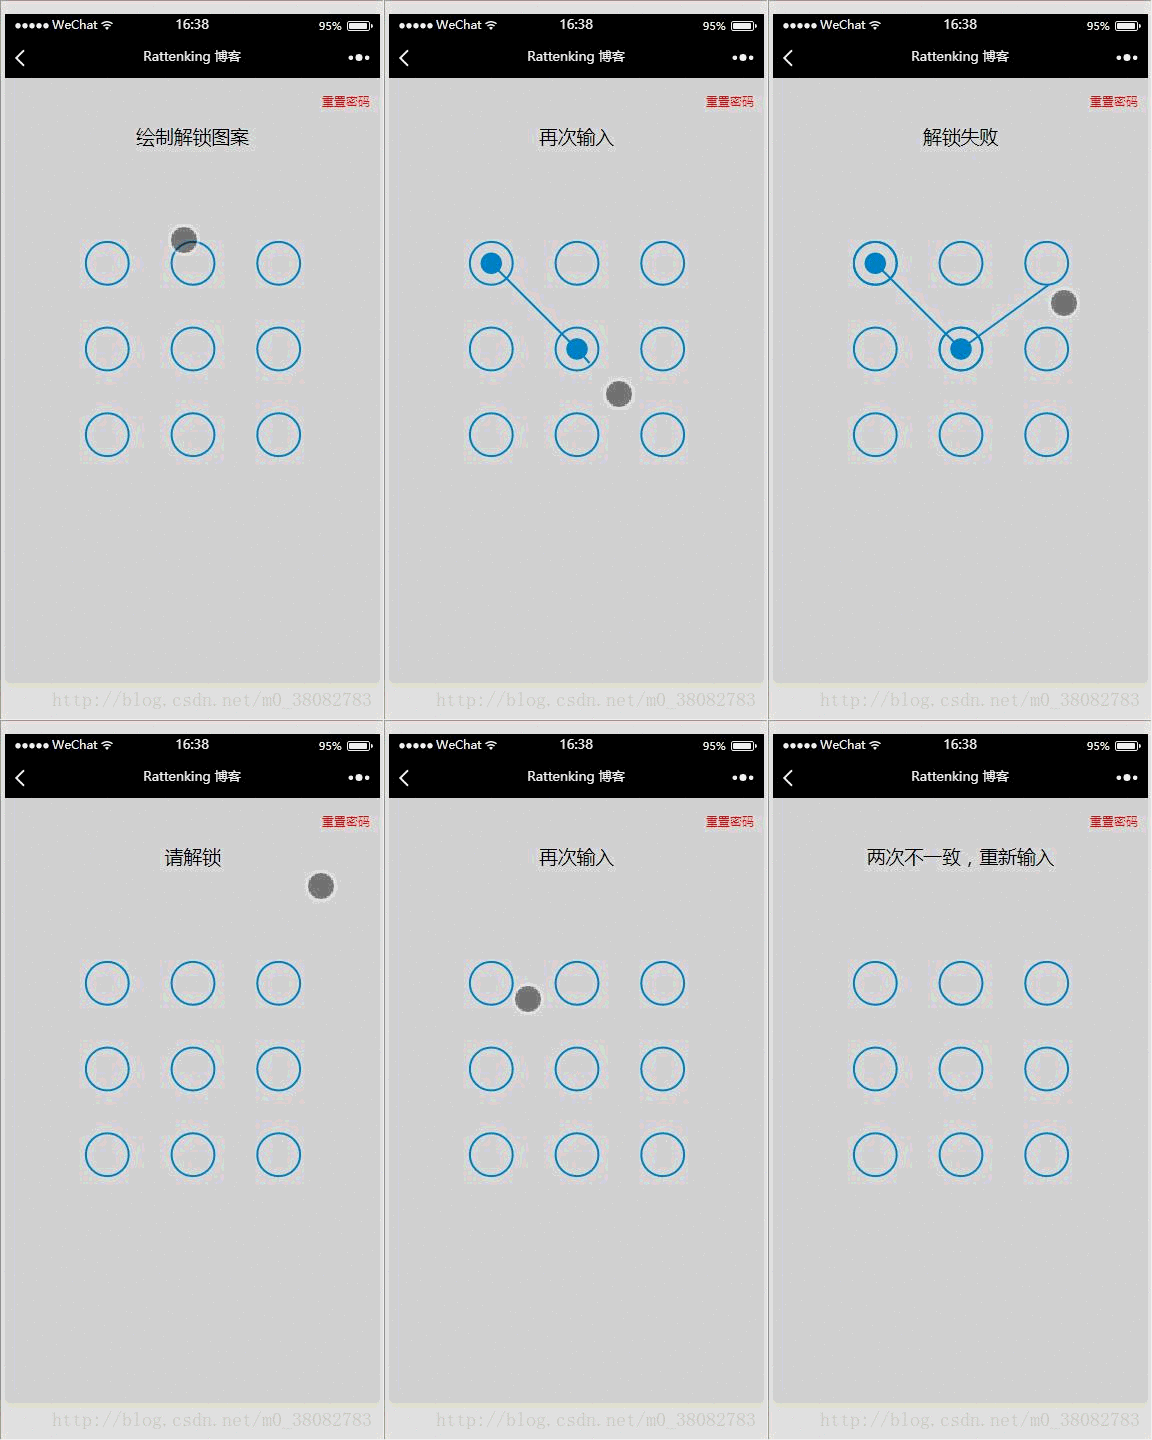
This article mainly introduces the WeChat applet to implement the gesture pattern lock screen function in detail. It has a certain reference value. Interested friends can refer to it.
The example in this article is shared with everyone on WeChat. The specific code of the small program gesture pattern lock screen is for your reference. The specific content is as follows
Reference
H5lock
Rendering

WXML
<view class="container">
  <view class="reset" bindtap="resetPwd">重置密码</view>
  <view class="title">{{title}}</view>
  <canvas canvas-id="canvas" class="canvas" bindtouchend="onTouchEnd"
   bindtouchstart="onTouchStart" bindtouchmove="onTouchMove"></canvas>
</view>JS
var Locker = class {
constructor(page,opt){
var obj = opt || {};
this.page = page;
this.width = obj.width || 300;
this.height = obj.height || 300;
this.canvasId = obj.id || 'canvas';
this.cleColor = obj.cleColor || '#CFE6FF';
this.cleCenterColor = obj.cleCenterColor || '#CFE6FF';
var chooseType = obj.chooseType || 3;
// 判断是否缓存有chooseType,有就用缓存,没有就用传入的值
this.chooseType = Number(wx.getStorageSync('chooseType')) || chooseType;
this.init();
}
init(){
this.pswObj = wx.getStorageSync('passwordxx') ? {
step: 2,
spassword: JSON.parse(wx.getStorageSync('passwordxx'))
} : {};
this.makeState();
// 创建 canvas 绘图上下文(指定 canvasId)
this.ctx = wx.createCanvasContext(this.canvasId,this);
this.touchFlag = false;
this.lastPoint = [];
// 绘制圆
this.createCircle();
// canvas绑定事件
this.bindEvent();
}
makeState() {
if (this.pswObj.step == 2) {
this.page.setData({ title:'请解锁'});
} else if (this.pswObj.step == 1) {
// pass
} else {
// pass
}
}
// 画圆方法
drawCle(x,y){
// 设置边框颜色。
this.ctx.setStrokeStyle(this.cleColor); // 注意用set
// 设置线条的宽度。
this.ctx.setLineWidth(2); // 注意用set
// 开始创建一个路径,需要调用fill或者stroke才会使用路径进行填充或描边。
this.ctx.beginPath();
// 画一条弧线。
this.ctx.arc(x, y, this.r, 0, Math.PI * 2, true);
// 关闭一个路径
this.ctx.closePath();
// 画出当前路径的边框。默认颜色色为黑色。
this.ctx.stroke();
// 将之前在绘图上下文中的描述(路径、变形、样式)画到 canvas 中。
this.ctx.draw(true);
}
// 计算两点之间的距离的方法
getDis(a, b) {
return Math.sqrt(Math.pow(a.x - b.x, 2) + Math.pow(a.y - b.y, 2));
}
// 创建解锁点的坐标,根据canvas的大小(默认300px)来平均分配半径
createCircle() {
var n = this.chooseType;
var count = 0;
// 计算圆半径
this.r = this.width / (2 + 4 * n);
this.arr = [];
this.restPoint = [];
var r = this.r;
// 获取圆心坐标,以及当前圆所代表的数
for (var i = 0; i < n; i++) {
for (var j = 0; j < n; j++) {
count++;
var obj = {
x: j * 4 * r + 3 * r,
y: i * 4 * r + 3 * r,
index: count
};
this.arr.push(obj);
this.restPoint.push(obj);
}
}
// 清空画布
this.ctx.clearRect(0, 0, this.width, this.height);
// 绘制所有的圆
this.arr.forEach(current => {this.drawCle(current.x, current.y);});
}
// 设置密码绘制
getPosition(e) { // 获取touch点相对于canvas的坐标
var po = {
x: e.touches[0].x,
y: e.touches[0].y
};
return po;
}
precisePosition(po){
var arr = this.restPoint.filter(current => Math.abs(po.x - current.x) < this.r && Math.abs(po.y - current.y) < this.r);
return arr[0];
}
drawPoint(obj) { // 初始化圆心
for (var i = 0; i < this.lastPoint.length; i++) {
this.ctx.setFillStyle(this.cleCenterColor); // 注意用set方法
this.ctx.beginPath();
this.ctx.arc(this.lastPoint[i].x, this.lastPoint[i].y, this.r / 2, 0, Math.PI * 2, true);
this.ctx.closePath();
this.ctx.fill();
this.ctx.draw(true);
}
}
drawLine(po) {// 解锁轨迹
this.ctx.beginPath();
this.ctx.lineWidth = 3;
this.ctx.moveTo(this.lastPoint[0].x,this.lastPoint[0].y);
for (var i = 1; i < this.lastPoint.length; i++) {
this.ctx.lineTo(this.lastPoint[i].x, this.lastPoint[i].y);
}
this.ctx.lineTo(po.x, po.y);
this.ctx.stroke();
this.ctx.closePath();
this.ctx.draw(true);
}
pickPoints(fromPt, toPt) {
var lineLength = this.getDis(fromPt, toPt);
var dir = toPt.index > fromPt.index ? 1 : -1;
var len = this.restPoint.length;
var i = dir === 1 ? 0 : (len - 1);
var limit = dir === 1 ? len : -1;
while (i !== limit) {
var pt = this.restPoint[i];
if (this.getDis(pt, fromPt) + this.getDis(pt, toPt) === lineLength) {
this.drawPoint(pt.x, pt.y);
this.lastPoint.push(pt);
this.restPoint.splice(i, 1);
if (limit > 0) {
i--;
limit--;
}
}
i += dir;
}
}
update(po) {// 核心变换方法在touchmove时候调用
this.ctx.clearRect(0, 0, this.width, this.height);
for (var i = 0; i < this.arr.length; i++) { // 每帧先把面板画出来
this.drawCle(this.arr[i].x, this.arr[i].y);
}
this.drawPoint(this.lastPoint);// 每帧花轨迹
this.drawLine(po, this.lastPoint);// 每帧画圆心
for (var i = 0; i < this.restPoint.length; i++) {
var pt = this.restPoint[i];
if (Math.abs(po.x - pt.x) < this.r && Math.abs(po.y - pt.y) < this.r) {
this.drawPoint(pt.x, pt.y);
this.pickPoints(this.lastPoint[this.lastPoint.length - 1], pt);
break;
}
}
}
checkPass(psw1, psw2) {// 检测密码
var p1 = '',
p2 = '';
for (var i = 0; i < psw1.length; i++) {
p1 += psw1[i].index + psw1[i].index;
}
for (var i = 0; i < psw2.length; i++) {
p2 += psw2[i].index + psw2[i].index;
}
return p1 === p2;
}
storePass(psw) {// touchend结束之后对密码和状态的处理
if (this.pswObj.step == 1) {
if (this.checkPass(this.pswObj.fpassword, psw)) {
this.pswObj.step = 2;
this.pswObj.spassword = psw;
this.page.setData({title:'密码保存成功'});
this.drawStatusPoint('#2CFF26');
wx.setStorageSync('passwordxx', JSON.stringify(this.pswObj.spassword));
wx.setStorageSync('chooseType', this.chooseType);
} else {
this.page.setData({ title: '两次不一致,重新输入' });
this.drawStatusPoint('red');
delete this.pswObj.step;
}
} else if (this.pswObj.step == 2) {
if (this.checkPass(this.pswObj.spassword, psw)) {
this.page.setData({ title: '解锁成功' });
this.drawStatusPoint('#2CFF26');
} else {
this.drawStatusPoint('red');
this.page.setData({ title: '解锁失败' });
}
} else {
this.pswObj.step = 1;
this.pswObj.fpassword = psw;
this.page.setData({ title: '再次输入' });
}
}
drawStatusPoint(type) { // 初始化状态线条
for (var i = 0; i < this.lastPoint.length; i++) {
this.ctx.strokeStyle = type;
this.ctx.beginPath();
this.ctx.arc(this.lastPoint[i].x, this.lastPoint[i].y, this.r, 0, Math.PI * 2, true);
this.ctx.closePath();
this.ctx.stroke();
this.ctx.draw(true);
}
}
updatePassword() {
wx.removeStorageSync('passwordxx');
wx.removeStorageSync('chooseType');
this.pswObj = {};
this.page.setData({ title: '绘制解锁图案' });
this.reset();
}
reset() {
this.makeState();
this.createCircle();
}
bindEvent(){
var self = this;
this.page.onTouchStart = function(e){
var po = self.getPosition(e);
self.lastPoint = [];
for (var i = 0; i < self.arr.length; i++) {
if (Math.abs(po.x - self.arr[i].x) < self.r && Math.abs(po.y - self.arr[i].y) < self.r) {
self.touchFlag = true;
self.drawPoint(self.arr[i].x, self.arr[i].y);
self.lastPoint.push(self.arr[i]);
self.restPoint.splice(i, 1);
break;
}
}
}
this.page.onTouchMove = function(e){
if (self.touchFlag) {
self.update(self.getPosition(e));
}
}
this.page.onTouchEnd = function(e){
if (self.touchFlag) {
self.touchFlag = false;
self.storePass(self.lastPoint);
setTimeout(function () {
self.reset();
}, 300);
}
}
}
}
module.exports = Locker;The above is what I compiled for everyone. I hope it will be helpful to everyone in the future.
Related articles:
The problem of adding quotes or not adding quotes to attribute names in JS
How to judge NaN# in JavaScript
##How to use jQuery to implement mouse-responsive transparency gradient animation effect
The above is the detailed content of How to implement gesture pattern lock screen through WeChat applet. For more information, please follow other related articles on the PHP Chinese website!


