

This article mainly introduces the function of online image cropping component based on cropper.js encapsulating vue. It is very good and has reference value. Friends in need can refer to it.
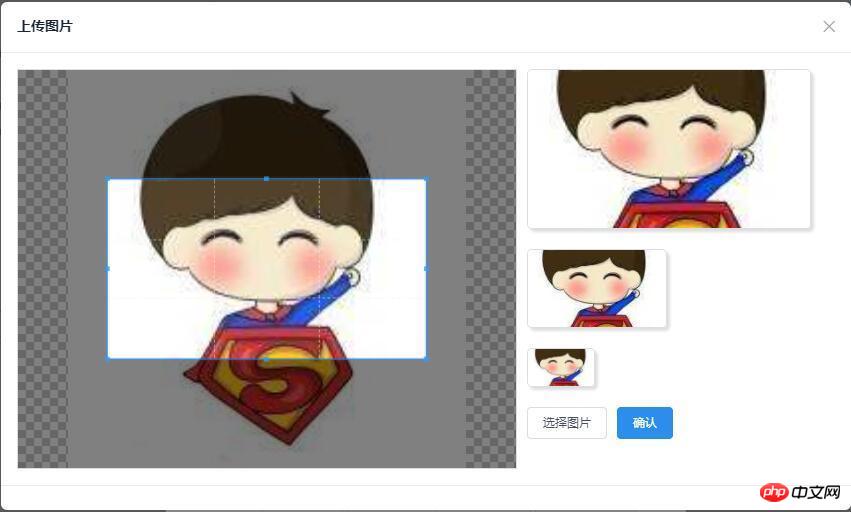
The rendering is as shown below,
github:demo download
cropper.js
github:cropper.js
Official website (demo)
cropper.js installation
npm or bower installation
npm install cropper # or bower install cropper
clone download :Download address
git clone https://github.com/fengyuanchen/cropper.git
Reference cropper.js
Mainly reference cropper. js and cropper.css files
Note: The jquery file must be introduced first before the cropper.js plug-in can be used
Simple use
Build the p container used for screenshots

Add the style of the container and let the img fill the entire container (very important)
/* Limit image width to avoid overflow the container */ img { max-width: 100%; /* This rule is very important, please do not ignore this! */ }
Call the cropper.js method to initialize the screenshot Control
$('#image').cropper({ aspectRatio: 16 / 9, crop: function(e) { // Output the result data for cropping image. console.log(e.x); console.log(e.y); console.log(e.width); console.log(e.height); console.log(e.rotate); console.log(e.scaleX); console.log(e.scaleY); } });
For other detailed APIs, please refer to: github:cropper.js
Encapsulated into a vue component
Required for encapsulation into a vue component Problems solved
cropper.js related
Simulate input box click to select pictures and impose format and size restrictions on the selected pictures
Reselect image cropping
Confirm cropping and obtain image information in base64 format
vue related
Communication issues between non-parent and child components
Simulate the input box to click on the selected image and restrict the format and size of the selected image
Build a hidden input tag, Then simulate clicking on this input to achieve the function of selecting pictures
//模拟点击 document.getElementById('myCropper-input').click();
Bind a method for monitoring content changes to the input, get the uploaded file, and perform format and size verification
// imgCropperData: { // accept: 'image/gif, image/jpeg, image/png, image/bmp', // } handleFile (e) { let _this = this; let inputDOM = this.$refs.inputer; // 通过DOM取文件数据 _this.file = inputDOM.files[0]; // 判断文件格式 if (_this.imgCropperData.accept.indexOf(_this.file.type) == -1) { _this.$Modal.error({ title: '格式错误', content: '您选择的图片格式不正确!' }); return; } // 判断文件大小限制 if (_this.file.size > 5242880) { _this.$Modal.error({ title: '超出限制', content: '您选择的图片过大,请选择5MB以内的图片!' }); return; } var reader = new FileReader(); // 将图片将转成 base64 格式 reader.readAsDataURL(_this.file); reader.onload = function () { _this.imgCropperData.imgSrc = this.result; _this.initCropper(); } }
Reselect the picture for cropping
When you select the picture for the first time, you will definitely face the problem of needing to reselect the picture, then you will face the problem of how to replace the cropping frame For the picture in the above step, after selecting the picture, we got the main information of the picture through the FileRender() method. Now we need to rebuild the cropping box to solve the problem. Check the official demo given by cropper.js and find that the official method is to use The method of dynamically adding a cropping container is used for operation. Here we follow the official implementation.
// 初始化剪切 initCropper () { let _this = this; // 初始化裁剪区域 _this.imgObj = $(''); let $avatarPreview = $('.avatar-preview'); $('#myCropper-workspace').empty().html(_this.imgObj); _this.imgObj.cropper({ aspectRatio: _this.proportionX / _this.proportionY, preview: $avatarPreview, crop: function(e) { } }); }
Confirm cropping and obtain image information in base64 format
let $imgData = _this.imgObj.cropper('getCroppedCanvas') imgBase64Data = $imgData.toDataURL('image/png');
Construct data for upload
// 构造上传图片的数据 let formData = new FormData(); // 截取字符串 let photoType = imgBase64Data.substring(imgBase64Data.indexOf(",") + 1); //进制转换 const b64toBlob = (b64Data, contentType = '', sliceSize = 512) => { const byteCharacters = atob(b64Data); const byteArrays = []; for(let offset = 0; offset < byteCharacters.length; offset += sliceSize) { const slice = byteCharacters.slice(offset, offset + sliceSize); const byteNumbers = new Array(slice.length); for(let i = 0; i < slice.length; i++) { byteNumbers[i] = slice.charCodeAt(i); } const byteArray = new Uint8Array(byteNumbers); byteArrays.push(byteArray); } const blob = new Blob(byteArrays, { type: contentType }); return blob; } const contentType = 'image/jepg'; const b64Data2 = photoType; const blob = b64toBlob(b64Data2, contentType); formData.append("file", blob, "client-camera-photo.png") formData.append("type", _this.imgType)
Communication issues between non-parent and child components
In previous projects, communication parameters between parent and child components were commonly used, generally using two methods
Place parameters in the router, and then obtain them by calling route.params.xxx or route.query.xxx
Communicate through props
Here we use eventBus for components Communication between
Steps
1. Declare a bus component for B component to pass parameters to A component
//bus.js import Vue from 'vue'; export default new Vue();
2. Reference the bus component in component A and monitor its parameter changes in real time
// A.vue import Bus from '../../components/bus/bus.js' export default { components: { Bus }, data () {}, created: function () { Bus.$on('getTarget', imgToken => { var _this = this; console.log(imgToken); ... }); } }
3. Component B also references the bus component to pass the parameters to component A
// B.vue // 传参 Bus.$emit('getTarget', imgToken);
Reference:
vue-$on
vue-$emit
vue.js road (4) - eventBus in vue2.0s implements sibling component communication
Complete code of vue picture selection and screenshot plug-in
请点击按钮选择图片进行裁剪


BY-LucaLJX
github: lucaljx
The above is what I compiled for you. I hope it will be helpful to everyone in the future.
Related articles:
JavaScript Gypsophila navigation bar implementation method
layui select example of dynamically adding option
The above is the detailed content of How to use cropper.js to encapsulate vue to implement the online image cropping component function (detailed tutorial). For more information, please follow other related articles on the PHP Chinese website!


![[Web front-end] Node.js quick start](https://img.php.cn/upload/course/000/000/067/662b5d34ba7c0227.png)


