


How to communicate using WebSocket
This time I will show you how to use WebSocket communication and what are the precautions for using WebSocket communication. The following is a practical case, let's take a look.
What is WebSocket?
WebSocket is a standard protocol for bidirectional data transmission between client and server. But it has nothing to do with HTTP. It is an independent implementation based on TCP. In the past, if the client wanted to know the processing progress of the server, it had to constantly use Ajax to poll, and let the browser send a request to the server every few seconds, which put great pressure on the server. Another kind of polling is to use long poll, which is similar to making a phone call. It will not hang up until a message is received. In other words, after the client initiates a connection, if there is no message, the Response will not be returned to the client. , the connection phase is always blocked. And WebSocket solves these problems of HTTP. After the server completes the protocol upgrade (HTTP -> WebSocket), the server can actively push information to the client, solving the synchronization delay problem caused by polling. Since WebSocket only requires one HTTP handshake, the server can keep communicating with the client until the connection is closed. This eliminates the need for the server to repeatedly parse the HTTP protocol and reduces resource overhead.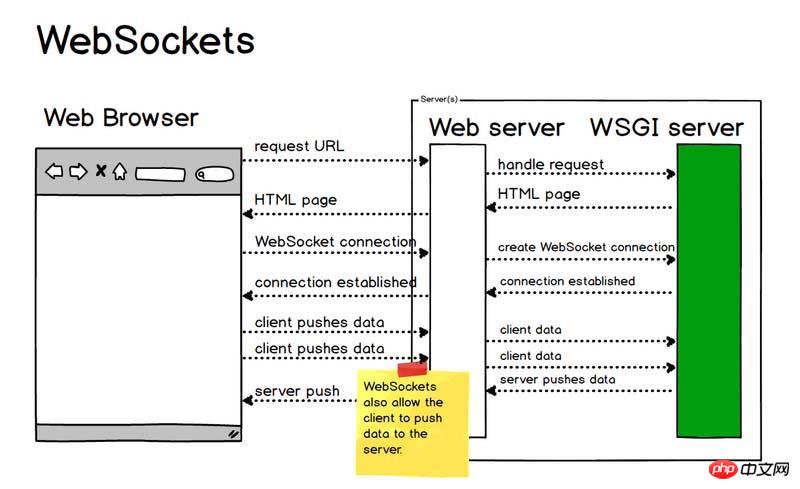
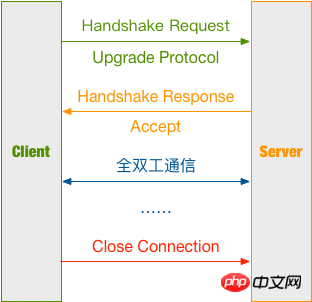
Establish connection
Client request message HeaderClient request message:GET / HTTP/1.1 Upgrade: websocket Connection: Upgrade Host: example.com Origin: http://example.com Sec-WebSocket-Key: sN9cRrP/n9NdMgdcy2VJFQ== Sec-WebSocket-Version: 13
Upgrade: websocket
Connection: Upgrade
Sec-WebSocket-Key: sN9cRrP/n9NdMgdcy2VJFQ==
Sec-WebSocket-Version: 13
var ws = new websocket("ws://127.0.0.1:8001");<script type="text/javascript">
var ws;
var box = document.getElementById('box');
function startWS() {
ws = new WebSocket('ws://127.0.0.1:8001');
ws.onopen = function (msg) {
console.log('WebSocket opened!');
};
ws.onmessage = function (message) {
console.log('receive message: ' + message.data);
box.insertAdjacentHTML('beforeend', '<p>' + message.data + '</p>');
};
ws.onerror = function (error) {
console.log('Error: ' + error.name + error.number);
};
ws.onclose = function () {
console.log('WebSocket closed!');
};
}
function sendMessage() {
console.log('Sending a message...');
var text = document.getElementById('text');
ws.send(text.value);
}
window.onbeforeunload = function () {
ws.onclose = function () {}; // 首先关闭 WebSocket
ws.close()
};
</script>Server response message Header
First let’s take a look at the server response message:HTTP/1.1 101 Switching Protocols Upgrade: websocket Connection: Upgrade Sec-WebSocket-Accept: HSmrc0sMlYUkAGmm5OPpG2HaGWk= Sec-WebSocket-Protocol: chat
- First, 101
- Then, Sec-WebSocket-Accept is the Sec-WebSocket-Key that has been confirmed by the server and encrypted;
- Finally, Sec-WebSocket-Protocol is is the protocol that represents the end use.
- Splice Sec-WebSocket-Key with 258EAFA5-E914-47DA-95CA-C5AB0DC85B11 ;
- Calculate the digest through SHA1 and convert it into a base64 string.
注意:Sec-WebSocket-Key/Sec-WebSocket-Accept 的换算,只能带来基本的保障,但连接是否安全、数据是否安全、客户端 / 服务端是否合法的 ws 客户端、ws 服务端,其实并没有实际性的保证。
创建主线程,用于实现接受 WebSocket 建立请求:
def create_socket():
 # 启动 Socket 并监听连接
 sock = socket.socket(socket.AF_INET, socket.SOCK_STREAM)
 try:
 sock.bind(('127.0.0.1', 8001))
 # 操作系统会在服务器 Socket 被关闭或服务器进程终止后马上释放该服务器的端口,否则操作系统会保留几分钟该端口。
 sock.setsockopt(socket.SOL_SOCKET, socket.SO_REUSEADDR, 1)
 sock.listen(5)
 except Exception as e:
 logging.error(e)
 return
 else:
 logging.info('Server running...')
 # 等待访问
 while True:
 conn, addr = sock.accept() # 此时会进入 waiting 状态
 data = str(conn.recv(1024))
 logging.debug(data)
 header_dict = {}
 header, _ = data.split(r'\r\n\r\n', 1)
 for line in header.split(r'\r\n')[1:]:
 key, val = line.split(': ', 1)
 header_dict[key] = val
 if 'Sec-WebSocket-Key' not in header_dict:
 logging.error('This socket is not websocket, client close.')
 conn.close()
 return
 magic_key = '258EAFA5-E914-47DA-95CA-C5AB0DC85B11'
 sec_key = header_dict['Sec-WebSocket-Key'] + magic_key
 key = base64.b64encode(hashlib.sha1(bytes(sec_key, encoding='utf-8')).digest())
 key_str = str(key)[2:30]
 logging.debug(key_str)
 response = 'HTTP/1.1 101 Switching Protocols\r\n' \
  'Connection: Upgrade\r\n' \
  'Upgrade: websocket\r\n' \
  'Sec-WebSocket-Accept: {0}\r\n' \
  'WebSocket-Protocol: chat\r\n\r\n'.format(key_str)
 conn.send(bytes(response, encoding='utf-8'))
 logging.debug('Send the handshake data')
WebSocketThread(conn).start()进行通信
服务端解析 WebSocket 报文
Server 端接收到 Client 发来的报文需要进行解析
Client 包格式
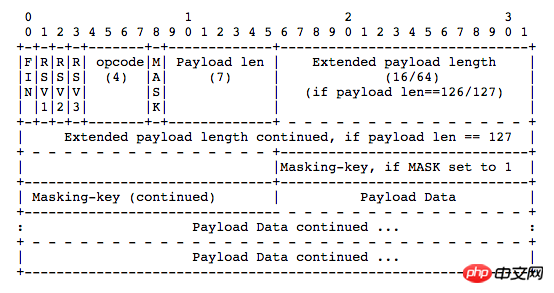
FIN: 占 1bit
0:不是消息的最后一个分片
1:是消息的最后一个分片
RSV1, RSV2, RSV3:各占 1bit
一般情况下全为 0。当客户端、服务端协商采用 WebSocket 扩展时,这三个标志位可以非
0,且值的含义由扩展进行定义。如果出现非零的值,且并没有采用 WebSocket 扩展,连接出错。
Opcode: 4bit
%x0:表示一个延续帧。当 Opcode 为 0 时,表示本次数据传输采用了数据分片,当前收到的数据帧为其中一个数据分片;
%x1:表示这是一个文本帧(text frame);
%x2:表示这是一个二进制帧(binary frame);
%x3-7:保留的操作代码,用于后续定义的非控制帧;
%x8:表示连接断开;
%x9:表示这是一个心跳请求(ping);
%xA:表示这是一个心跳响应(pong);
%xB-F:保留的操作代码,用于后续定义的控制帧。
Mask: 1bit
表示是否要对数据载荷进行掩码异或操作。
0:否
1:是
Payload length: 7bit or (7 + 16)bit or (7 + 64)bit
表示数据载荷的长度
0~126:数据的长度等于该值;
126:后续 2 个字节代表一个 16 位的无符号整数,该无符号整数的值为数据的长度;
127:后续 8 个字节代表一个 64 位的无符号整数(最高位为 0),该无符号整数的值为数据的长度。
Masking-key: 0 or 4bytes
当 Mask 为 1,则携带了 4 字节的 Masking-key;
当 Mask 为 0,则没有 Masking-key。
掩码算法:按位做循环异或运算,先对该位的索引取模来获得 Masking-key 中对应的值 x,然后对该位与 x 做异或,从而得到真实的 byte 数据。
注意:掩码的作用并不是为了防止数据泄密,而是为了防止早期版本的协议中存在的代理缓存污染攻击(proxy cache poisoning attacks)等问题。
Payload Data: 载荷数据
解析 WebSocket 报文代码如下:
def read_msg(data):
 logging.debug(data)
 msg_len = data[1] & 127 # 数据载荷的长度
 if msg_len == 126:
 mask = data[4:8] # Mask 掩码
 content = data[8:] # 消息内容
 elif msg_len == 127:
 mask = data[10:14]
 content = data[14:]
 else:
 mask = data[2:6]
 content = data[6:]
 raw_str = '' # 解码后的内容
 for i, d in enumerate(content):
 raw_str += chr(d ^ mask[i % 4])
 return raw_str
服务端发送 WebSocket 报文
返回时不携带掩码,所以 Mask 位为 0,再按载荷数据的大小写入长度,最后写入载荷数据。
struct 模块解析
struct.pack(fmt, v1, v2, ...)
按照给定的格式 fmt,把数据封装成字符串 ( 实际上是类似于 C 结构体的字节流 )
struct 中支持的格式如下表:
| Format | C Type | Python type | Standard size |
|---|---|---|---|
| x | pad byte | no value | |
| c | char | bytes of length 1 | 1 |
| b | signed char | integer | 1 |
| B | unsigned char | integer | 1 |
| ? | _Bool | bool | 1 |
| h | short | integer | 2 |
| H | unsigned short | integer | 2 |
| i | int | integer | 4 |
| I | unsigned int | integer | 4 |
| l | long | integer | 4 |
| L | unsigned long | integer | 4 |
| q | long long | integer | 8 |
| Q | unsigned long long | integer | 8 |
| n | ssize_t | integer | |
| N | size_t | integer | |
| e | -7 | float | 2 |
| f | float | float | 4 |
| d | double | float | 8 |
| s | char[] | bytes | |
| p | char[] | bytes | |
| P | void * | integer |
为了同 C 语言中的结构体交换数据,还要考虑有的 C 或 C++ 编译器使用了字节对齐,通常是以 4 个字节为单位的 32 位系统,故而 struct 根据本地机器字节顺序转换。可以用格式中的第一个字符来改变对齐方式,定义如下:
| Character | Byte order | Size | Alignment |
|---|---|---|---|
| @ | native | native | native |
| = | native | standard | none |
| < | little-endian | standard | none |
| > | big-endian | standard | none |
| ! | network (= big-endian) | standard | none |
发送 WebSocket 报文代码如下:
def write_msg(message):
 data = struct.pack('B', 129) # 写入第一个字节,10000001
 # 写入包长度
 msg_len = len(message)
 if msg_len <= 125:
  data += struct.pack('B', msg_len)
 elif msg_len <= (2 ** 16 - 1):
  data += struct.pack('!BH', 126, msg_len)
 elif msg_len <= (2 ** 64 - 1):
  data += struct.pack('!BQ', 127, msg_len)
 else:
  logging.error('Message is too long!')
  return
 data += bytes(message, encoding='utf-8') # 写入消息内容
 logging.debug(data)
return data总结
没有其他能像 WebSocket 一样实现全双工传输的技术了,迄今为止,大部分开发者还是使用 Ajax 轮询来实现,但这是个不太优雅的解决办法,WebSocket 虽然用的人不多,可能是因为协议刚出来的时候有安全性的问题以及兼容的浏览器比较少,但现在都有解决。如果你有这些需求可以考虑使用 WebSocket:
多个用户之间进行交互;
需要频繁地向服务端请求更新数据。
比如弹幕、消息订阅、多玩家游戏、协同编辑、股票基金实时报价、视频会议、在线教育等需要高实时的场景。
相信看了本文案例你已经掌握了方法,更多精彩请关注php中文网其它相关文章!
推荐阅读:
The above is the detailed content of How to communicate using WebSocket. For more information, please follow other related articles on the PHP Chinese website!

Hot AI Tools

Undresser.AI Undress
AI-powered app for creating realistic nude photos

AI Clothes Remover
Online AI tool for removing clothes from photos.

Undress AI Tool
Undress images for free

Clothoff.io
AI clothes remover

AI Hentai Generator
Generate AI Hentai for free.

Hot Article
Hot Tools

Notepad++7.3.1
Easy-to-use and free code editor

SublimeText3 Chinese version
Chinese version, very easy to use

Zend Studio 13.0.1
Powerful PHP integrated development environment

Dreamweaver CS6
Visual web development tools

SublimeText3 Mac version
God-level code editing software (SublimeText3)
Hot Topics
 1378
1378
 52
52

 New generation of optical fiber broadband technology - 50G PON
Apr 20, 2024 pm 09:22 PM
New generation of optical fiber broadband technology - 50G PON
Apr 20, 2024 pm 09:22 PM
In the previous article (link), Xiao Zaojun introduced the development history of broadband technology from ISDN, xDSL to 10GPON. Today, let’s talk about the upcoming new generation of optical fiber broadband technology-50GPON. █F5G and F5G-A Before introducing 50GPON, let’s talk about F5G and F5G-A. In February 2020, ETSI (European Telecommunications Standards Institute) promoted a fixed communication network technology system based on 10GPON+FTTR, Wi-Fi6, 200G optical transmission/aggregation, OXC and other technologies, and named it F5G. That is, the fifth generation fixed network communication technology (The5thgenerationFixednetworks). F5G is a fixed network
 PHP and WebSocket: Best practices for real-time data transfer
Dec 18, 2023 pm 02:10 PM
PHP and WebSocket: Best practices for real-time data transfer
Dec 18, 2023 pm 02:10 PM
PHP and WebSocket: Best Practice Methods for Real-Time Data Transfer Introduction: In web application development, real-time data transfer is a very important technical requirement. The traditional HTTP protocol is a request-response model protocol and cannot effectively achieve real-time data transmission. In order to meet the needs of real-time data transmission, the WebSocket protocol came into being. WebSocket is a full-duplex communication protocol that provides a way to communicate full-duplex over a single TCP connection. Compared to H
 SSE and WebSocket
Apr 17, 2024 pm 02:18 PM
SSE and WebSocket
Apr 17, 2024 pm 02:18 PM
In this article, we will compare Server Sent Events (SSE) and WebSockets, both of which are reliable methods for delivering data. We will analyze them in eight aspects, including communication direction, underlying protocol, security, ease of use, performance, message structure, ease of use, and testing tools. A comparison of these aspects is summarized as follows: Category Server Sent Event (SSE) WebSocket Communication Direction Unidirectional Bidirectional Underlying Protocol HTTP WebSocket Protocol Security Same as HTTP Existing security vulnerabilities Ease of use Setup Simple setup Complex performance Fast message sending speed Affected by message processing and connection management Message structure Plain text or binary Ease of use Widely available Helpful for WebSocket integration
 golang WebSocket programming tips: handling concurrent connections
Dec 18, 2023 am 10:54 AM
golang WebSocket programming tips: handling concurrent connections
Dec 18, 2023 am 10:54 AM
Golang is a powerful programming language, and its use in WebSocket programming is increasingly valued by developers. WebSocket is a TCP-based protocol that allows two-way communication between client and server. In this article, we will introduce how to use Golang to write an efficient WebSocket server that handles multiple concurrent connections at the same time. Before introducing the techniques, let's first learn what WebSocket is. Introduction to WebSocketWeb
 PHP Websocket development guide to implement real-time translation function
Dec 18, 2023 pm 05:52 PM
PHP Websocket development guide to implement real-time translation function
Dec 18, 2023 pm 05:52 PM
PHP Websocket Development Guide: Implementing Real-time Translation Function Introduction: With the development of the Internet, real-time communication is becoming more and more important in various application scenarios. As an emerging communication protocol, Websocket provides good support for real-time communication. This article will take you through a detailed understanding of how to use PHP to develop Websocket applications, and combine the real-time translation function to demonstrate its specific application. 1. What is the Websocket protocol? The Websocket protocol is a
 The development history of wireless mice
Jun 12, 2024 pm 08:52 PM
The development history of wireless mice
Jun 12, 2024 pm 08:52 PM
Original title: "How does a wireless mouse become wireless?" 》Wireless mice have gradually become a standard feature of today’s office computers. From now on, we no longer have to drag long cords around. But, how does a wireless mouse work? Today we will learn about the development history of the No.1 wireless mouse. Did you know that the wireless mouse is now 40 years old? In 1984, Logitech developed the world's first wireless mouse, but this wireless mouse used infrared as a The signal carrier is said to look like the picture below, but later failed due to performance reasons. It was not until ten years later in 1994 that Logitech finally successfully developed a wireless mouse that works at 27MHz. This 27MHz frequency also became the wireless mouse for a long time.
 A brief history of broadband Internet technology
Apr 16, 2024 am 09:00 AM
A brief history of broadband Internet technology
Apr 16, 2024 am 09:00 AM
In today's digital age, broadband has become a necessity for each of us and every family. Without it, we would be restless and restless. So, do you know the technical principles behind broadband? From the earliest 56k "cat" dial-up to the current Gigabit cities and Gigabit homes, what kind of changes has our broadband technology experienced? In today’s article, let’s take a closer look at the “Broadband Story”. Have you seen this interface between █xDSL and ISDN? I believe that many friends born in the 70s and 80s must have seen it and are very familiar with it. That's right, this was the interface for "dial-up" when we first came into contact with the Internet. That was more than 20 years ago, when Xiao Zaojun was still in college. In order to surf the Internet, I
 How to enable administrative access from the cockpit web UI
Mar 20, 2024 pm 06:56 PM
How to enable administrative access from the cockpit web UI
Mar 20, 2024 pm 06:56 PM
Cockpit is a web-based graphical interface for Linux servers. It is mainly intended to make managing Linux servers easier for new/expert users. In this article, we will discuss Cockpit access modes and how to switch administrative access to Cockpit from CockpitWebUI. Content Topics: Cockpit Entry Modes Finding the Current Cockpit Access Mode Enable Administrative Access for Cockpit from CockpitWebUI Disabling Administrative Access for Cockpit from CockpitWebUI Conclusion Cockpit Entry Modes The cockpit has two access modes: Restricted Access: This is the default for the cockpit access mode. In this access mode you cannot access the web user from the cockpit
