

Directly use Vue to build a front-end single-page application. The page source code only has a few simple lines of HTML, which is not conducive to the SEO of the website. At this time, server-side rendering is required. This article mainly introduces the detailed explanation of Vue based on Nuxt.js Implementing server-side rendering (SSR) has certain reference value. Interested friends can refer to
Directly use Vue to build a front-end single-page application. The page source code only has a few simple lines of HTML. This does not It is not conducive to the SEO of the website, so server-side rendering is required at this time.
On October 25, 2016, the team behind zeit.co released a React server-side rendering application framework Next.js
A few hours later, a server-side rendering application framework based on Vue.js came into being, which is similar to Next.js. This is Nuxt.js
1. Quick template
On the premise that vue-cli has been installed, you can quickly create a nuxt project template
vue init nuxt-community/starter-template MyProject
MyProject Is the name of the project folder, which can be customized
Through npm install (it seems to be smoother with yarn install) After installing the dependencies, you can directly npm run dev in the development environment Start the project
The default startup address is http://localhost:3000/, you can add the following configuration in package.json to modify the host port number
 "config": {
  "nuxt": {
   "host": "0.0.0.0",
   "port": "7788"
  }
},After the development is completed, execute npm run build to package the code, and finally npm start to start the service
2. Important directories
The generated project directory is as follows

Most folder namesare reserved by nuxt by default and cannot be modified
Among them, there are three directories that are critical for price comparison:
1. components component directory

is generally used to store non-pages Components at level , such as header, footer and other public components
The components in this directory have the methods and characteristics of regular vue components and will not be extended by nuxt.js
2. layouts layout directory
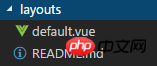
<template>
 <p>
  <my-header></my-header>
  <nuxt/>
  <my-footer></my-footer>
 </p>
</template>
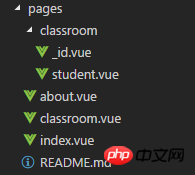
3. pages Page directory
router: {
 routes: [
  {
   name: 'index',
   path: '/',
   component: 'pages/index.vue'
  },
  {
   name: 'about',
   path: '/about',
   component: 'pages/about.vue'
  },
  {
   name: 'classroom',
   path: '/classroom',
   component: 'pages/classroom.vue',
   children: [
    {
     path: 'student',
     component: 'pages/classroom/student.vue',
     name: 'student'
    },
    { //定义带参数的动态路由,需要创建对应的以下划线作为前缀的 Vue 文件或目录
     path: ':id',
     component: 'pages/classroom/_id.vue',
     name: 'classroom-id'
    }
   ]
  }
 ]
}asyncData method is more commonly used and supports asynchronous data processing.
This method will be called before each load of thepage component, then obtains the data and returns it to the current component
asyncData ({ params, error }) {
  return axios.get(`api/posts/${params.id}`)
  .then((res) => {
   return { name: res.data.name}
  })
  .catch((e) => {
   error({ statusCode: 404, message: 'not found' })
  })
}3. Using plug-ins
If you need to introduce other third-party plug-ins into the project, you can introduce them directly into the page, so When packaging, the plug-in will be packaged into the js corresponding to the pageBut if other pages also introduce the same plug-in, it will be packaged repeatedly. If there is no need for paging packaging, you can configure plugins at this timeTake element-ui as an example. After installing element-ui, create elementUI.js in the plugins directory
 build: {
  vendor: ['~/plugins/elementUI.js']
 },
 plugins: [
  {src: '~/plugins/elementUI.js'},
]You can use the Vue.user() method of the plug-in
By default, only the src attribute is required. In addition, you can also configure ssr: false to make the file only available in The client is packaged and introducedIf it is a third-party (cannot be used) plug-in like axios, you only need to create axios.js in the plugins directory// axios.js
import Vue from 'vue'
import axios from 'axios'
const service = axios.create({
baseURL: '/api'
})
Vue.prototype.$ajax = axios
export default service然后在 build.vendor 中添加配置 (不需要配置 plugins)
build: {
 vendor: ['~/plugins/axios.js']
}这样在打包的时候,就会把 axios 打包到 vendor.js 中
四、Vuex 状态树
如果在 store 目录下创建了 index.js,nuxt.js 会根据该目录下的文件创建 Vuex 状态树
// store/index.js

import Vue from 'vue'
import Vuex from 'vuex'
import Axios from '~/plugins/axios.js';

Vue.use(Vuex)

const store = () => new Vuex.Store({
 state: {
  author: 'WiseWrong',
  info: ''
 },
 mutations: {
  setInfo (state, val) {
   state.info = val
  }
 },
 actions: {
  loadAboutMeInfo ({commit, state}) {
   return Axios.get(`/about`)
    .then(res => {
     console.log('ajax is success')
     console.log(res.data.info)
     commit('setInfo', res.data.info)
    })
    .catch(err => {
     console.log('error')
    })
  }
 }
})

export default storeNuxt.js 内置引用了 vuex 模块,不需要额外安装
上面的代码中,我在 actions 中写了一个 loadAboutMeInfo() 方法,用来请求 /api/about 接口
然后在 about.vue 页面中调用
// about.vue
<template>
<section class="container">
<p>
<img src="~/assets/about.png" alt="">
</p>
<h1>{{$store.state.info}}</h1>
</section>
</template>
<script>
export default {
fetch({ store }) {
return store.dispatch('loadAboutMeInfo')
},
name: 'about',
data () {
return {}
}
}
</script>成果演示:
上面是我整理给大家的,希望今后会对大家有帮助。
相关文章:
The above is the detailed content of Detailed explanation of Vue's server-side rendering based on Nuxt.js. For more information, please follow other related articles on the PHP Chinese website!


![[Web front-end] Node.js quick start](https://img.php.cn/upload/course/000/000/067/662b5d34ba7c0227.png)


