This time I will bring you YuanshengNode.jsDetailed explanation of registration email activation instructions, what are the precautions for Yuansheng Node.js registration email activation, the following is a practical case, Let’s take a look.
When doing geek tutorials on your own node project, you need to develop a function for registration email activation. This function is very common. When we register an account, there will definitely be this step. Let’s see how to implement this. Function.
1. Register an email address
First register an email address that supports sending verification emails. The one I registered here is NetEase’s 163 email address, so the 163 email address is used below. Log in after successfully registering the sending email address
, then click Settings in the Navigation column, select POP3/SMTP/IMAP, enable the POP3/SMTP/IMAP service, and set the authorization code.
2. Download the nodemailer plug-in
Enter on the command line: npm install --save nodemailer
3. Write the code to send the email
3.1 Encapsulate the code for sending the activation email, and then export it:
//email.js
// 引入 nodemailer
const nodemailer = require('nodemailer');
// 创建一个SMTP客户端配置
const config = {
    host: 'smtp.163.com',
    port: 465,
    auth: {
      user: 'xxxx@163.com', //刚才注册的邮箱账号
      pass: 'xxxxxx' //邮箱的授权码,不是注册时的密码
    }
  };
// 创建一个SMTP客户端对象
const transporter = nodemailer.createTransport(config);
// 发送邮件
module.exports = function (mail){
  transporter.sendMail(mail, function(error, info){
    if(error) {
      return console.log(error);
    }
    console.log('mail sent:', info.response);
  });
};3.2 Test:
//sendtest.js
var send = require('./email.js');
// 创建一个邮件对象
var mail = {
  // 发件人
  from: '极客教程 <xxxx@163.com>',
  // 主题
  subject: '[极客教程]激活邮箱账号',
  // 收件人
  to: 'xxxx@qq.com',
  // 邮件内容,HTML格式
  text: `尊敬的${user.name},您好!点击链接即可激活您的极客教程
      网账号,http://localhost:3000/checkCode?name=${user.name}&code=${user.code}为保障您的帐号安全,请在24小时内点击该链接,您也可以将链接复制到浏览器地址栏访问。 若如果您并未尝试修改密码,请忽略本邮件,由此给您带来的不便请谅解。本邮件由系统自动发出,请勿直接回复!` //接收激活请求的链接
};
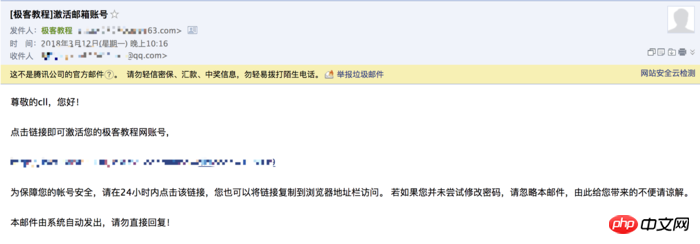
send(mail);If successful, you can see the email sent in the test mailbox information.

4. Verification steps
Let’s briefly talk about how to implement email verification.
1. In the database user data structure you define, there must be fields such as activation code, expiration time, and whether it has been activated, which are used to judge when activation;
{
  code: String, //激活码,格式自己定义
  date: Number, //过期日期,过期后不能激活
  islive: Boolean //判断是否激活
}2. Send Activation link, which contains user name and activation code, as follows:
// 创建一个邮件对象
var mail = {
  // 发件人
  from: '极客教程 <xxxx@163.com>',
  // 主题
  subject: '[极客教程]激活邮箱账号',
  // 收件人
  to: 'xxxx@qq.com',
  // 邮件内容,HTML格式
  text: `尊敬的${user.name},您好!点击链接即可激活您的极客教程
      网账号,http://localhost:3000/checkCode?name=${user.name}&code=${user.code}为保障您的帐号安全,请在24小时内点击该链接,您也可以将链接复制到浏览器地址栏访问。 若如果您并未尝试修改密码,请忽略本邮件,由此给您带来的不便请谅解。本邮件由系统自动发出,请勿直接回复!` //接收激活请求的链接
};
send(mail);3. Respond to the activation request and search according to the user name of the activation link. If the user exists, determine whether the activation code is consistent and determine whether the activation code is consistent. Whether it has expired, and if everything is correct, the activation status will be changed. At this time, the activation is successful, as shown in the following code:
// check email code
exports.checkCode = function (req, res){
  var username = req.query.name;
  var code = req.query.code;
  User.findOne({name: username}, function (err, user){
      if (user.code === code && (user.date - Date.now()) > 0){
          User.update({name: username}, {islive: true}, function (err){
              if (err){
                  res.json({error: true})
              }else{
                  console.log(user)
                  res.json({ok: true})
              }
          });
      }else{
        res.json({
          email: user.mail,
          failure: true
        })
      }
  });
}5. Problems encountered
The following problems were encountered during development:
{ [AuthError: Invalid login - 535 Error: authentication failed]
name: 'AuthError',
data: '535 Error: authentication failed',
stage: ' auth' }
smtp server verification failed because NetEase's email has authorization restrictions. Be sure to check the account number and authorization code when you registered your email.
I believe you have mastered the method after reading the case in this article. For more exciting information, please pay attention to other related articles on the php Chinese website!
Recommended reading:
Angular CLI operation blueprint analysis code
Detailed explanation of unit and E2E testing steps of Angular CLI
The above is the detailed content of Detailed explanation of Yuansheng Node.js registration email activation instructions. For more information, please follow other related articles on the PHP Chinese website!


