This time I will bring you a detailed analysis of using Ajax, what are the precautions when using Ajax, the following is a practical case, let's take a look.
Ajax Introduction
Ajax is considered to be (the abbreviation of Asynchronous JavaScript And Xml). Now, the technology that allows the browser to communicate with the server without refreshing the current page is called Ajax.
Synchronization means: after the sender sends the data, it waits for the receiver to send back a response before sending the next data packet. communication method.
Asynchronous means: after the sender sends the data, it does not wait for the receiver to send back a response, and then sends the next data packet.
Usually the method of communicating with the server without refreshing the web page:
Flash frame
Frameset: If using a set of frames Constructing a web page, you can update only one of the frames without disturbing the entire page
XMLHttpRequest: This object is an extension to JavaScript that enables the web page to communicate with the server. It is the best choice for creating Ajax applications. In fact, Ajax is usually regarded as a synonym for the XMLHttpRequest (XHR) object
ajaxBasic use
Ajax is a technology that must be used in our development. Ajax is asynchronous javascript and xml. But now we usually use json to complete data interaction. Ajax has a single responsibility, which is the interaction of data. It is responsible for sending data and receiving data. Core functionality is also the only functionality.
The implementation of ajax relies on XMLHttpRequest. Its basic usage is as follows:
var xhr;
window.XMLHttpRequest?xhr = new XMLHttpRequest():xhr = new ActiveXObject("Microsoft.XMLHTTP");
xhr.open("get","demo!register.action?name=zt&age=23",true);
xhr.send(null);
xhr.onreadystatechange = function(){
  if(xhr.readyState==4&&xhr.status==200){
   alert(JSON.parse(xhr.responseText));
  }
}The responsibility of ajax is to send data and receive data. Our basic usage process is:
1. Obtain an XMLHttpRequest object
2.Send data
3.Receive and process the data returned by the server
Follow the above steps to implement an asynchronous data request process , first obtain an xhr object. In modern browsers, we can obtain an xhr object directly through instantiation: var xhr = new XMLHttpRequest(); in IE5 and IE6, we must use ActiveXObject to obtain the xhr object: var xhr = new ActiveXObject("Microsoft.XMLHTTP").
At this point we have obtained the xhr object. The next step is to send data. The method of sending data is executed through the xhr.open() method. xhr.open() can receive 5 parameters. What we often use is The first three:
xhr.open(arg1,arg2,arg3)
arg1 indicates that the method of requesting data is generally get or post
arg2 indicates the requested server address
arg3 indicates whether this request is synchronous or asynchronous, The outstanding feature of ajax is asynchronous, so we generally use the asynchronous method. The third parameter is set to true (true means making an asynchronous request, false means making a synchronous request)
The xhr.open() method only prepares a request , it will not communicate with the server after calling open, but will start communicating with the server after calling the send() function. The parameters of the send() function will be sent to the server as the request body. If we specify the request mode in the open() function as get, usually we set send() to xhr.send(null). If we want to send data through the request body, we must set the request mode of the open() function to post. At the same time, use the data we need to send as the parameter of the send() function: xhr.send(param). After calling the send() function, communication with the server begins.
All settings for xhr should be set before the send() function:
 xhr.open(...);
 xhr.setRequestHeader(...);
 xhr.overrideMimeType(...);
 xhr.onreadystatechange = function(){...};
xhr.send(...);But since xhr.onreadystatechange is an event, it can also be executed after send() Yes, for the sake of readability, we generally put the xhr settings before the send() function.
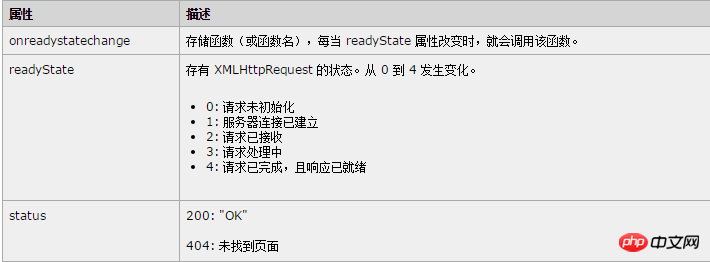
After send(), you can monitor the status of this request through xhr.readyState and xhr.status. If xhr.readyState==4&&xhr.status==200 is met, the request is successful:
When the request is successful, we can obtain the data returned by the server through xhr.responseText. It should be noted that xhr.responseText is a string.

ajax commonly used API
上面的请求过程是一个最基本的请求过程xhr对象还有几个经常使用的方法分别为xhr.abort()、xhr.setRequestHeader()、xhr.overrideMimeType()。
xhr.abort():终止一个请求,直接调用即可不需要设置参数
xhr.abort()
xhr.setRequestHeader():设置发送的请求头:
xhr.setRequestHeader("Content-Type","application/json; charset=utf-8")第一个参数表示要设置的header,第二个参数表示要设置的header的值。xhr.setRequestHeader()必须在xhr.open()和xhr.send()之间,否则会抛出异常,同时xhr.setRequestHeader()的第一个参数是对大小写不敏感的只要我们字母写的对就能够设置成功,但是出于易读性我们要设置为正确的格式。
xhr.overrideMimeType():重写响应头的Content-Type:
xhr.overrideMimeType('text/plain; charset=utf-8')xhr.overrideMimeType()同样要设置在xhr.send()之前。
JSON.parse()和JSON.stringify()使用
JSON.parse()用来将一个对象转换为字符串,JSON.stringify()用来将一个字符串转换为对象。在利用ajax进行数据交互的过程中返回的数据多数的时候是一个JSON格式的字符串,如果服务器给我们返回了数据此时我们就需要利用JSON.parse()来解析返回的数据(xhr.responseText即为服务器返回的数据):
xhr.onreadystatechange = function(){
  if(xhr.readyState==4&&xhr.status==200){
 var data = JSON.parse(xhr.responseText);
  }
}在使用post方式发送数据的过程中,如果不是文件上传一般情况下传输的也是一个JSON数据,要想能够成功的发送到后台就需要用JSON.stringify()来将JSON对象来转换为一个字符串,同时Content-Type要设置为application/json:
var sendData = {name:"zt",age:23};
...
xhr.setRequestHeader("Content-Type","application/json; charset=utf-8");
xhr.send(JSON.stringify(sendData));另外利用JSON.parse()和JSON.stringify()可以实现一个对象的深拷贝功能:
var sendData = {name:"zt",age:23};
var copyData = JSON.parse(JSON.stringify(sendData));$.ajax基本使用
为了方便使用JQ为我们封装好了一个ajax来方便我们的使用:
$.ajax({
 type:"post",//请求方式
 url:"url",//请求地址
 data:"...",//发送至服务端的数据
 contentType:"...",//设置发送数据的类型如果data是一个json字符串这里要设置为application/json
 success:function(data){...},//请求成功的回调函数data可看做是服务器返回的数据
 error:function(){...}//请求失败的回调函数
});或者:
$.ajax({
 type:"post",
 url:"url",
 data:"...",
 contentType:"...",
 })
 .done(function(data){...})
.fail(function(){...});回调函数中的data即为服务器返回的数据的一个代理,直接使用即可。
为了简化我们的开发JQ提供了一些全局设置函数包括$.ajaxSetup()、$.()ajaxStart()、$().ajaxStop()、$().ajaxComplete()、$().ajaxError()、$().ajaxSuccess()、$().ajaxSend()。
$.ajaxSetup()用来设置基本的参数例如:
$.ajaxSetup({
 type:"post",
 contentType:"application/json; charset=utf-8"
});我们在使用$.ajax时可以直接这样设置:
 $.ajax({
 url:"",
 success:function(){...},
 error:function(){...}
})最终等价于:
 $.ajax({
 type:"post",
 contentType:"application/json; charset=utf-8",
 url:"",
 success:function(){...},
 error:function(){...}
})$().ajaxStart()、$().ajaxStop()、$().ajaxComplete()、$().ajaxError()、$().ajaxSuccess()、$().ajaxSend()都是用来设置一些全局回调函数的。例如我们在提交数据时为了防止多次提交我们需要在发送请求时产生一个loading遮罩在数据发送完成后取消遮罩,如果在每一次ajax请求时我们都设置一次就会很麻烦,此时我们就可以用全局回调函数来简化我们的操作:
利用全局事件在请求开始时产生一个遮罩在请求完成时取消遮罩:
$(document).ajaxStart(function(){
 loadingMask.show();
 });
 $(document).ajaxComplete(function(){
 loadingMask.hide();
});相信看了本文案例你已经掌握了方法,更多精彩请关注php中文网其它相关文章!
推荐阅读:
The above is the detailed content of Detailed analysis using Ajax. For more information, please follow other related articles on the PHP Chinese website!
 ajax tutorial
 Ajax Chinese garbled code solution
 What to do if ajax transmits Chinese garbled characters
 oracle insert usage
 How to check the ftp server address
 How to adjust computer screen brightness
 How to unlock the password lock on your Apple phone if you forget it
 How to delete blank pages in word without affecting other formats


