

This time I will bring you a detailed explanation of how to create a dynamic particle grid animation using Canvas. What are theprecautions for creating a dynamic particle grid animation using Canvas? Here are some practical cases, let’s take a look.
I recently saw a very cool particle grid animation, so I made one myself. It works well as a background. CSDN cannot upload images exceeding 2M, so I simply cut a static image: Let’s start with how to achieve this effect: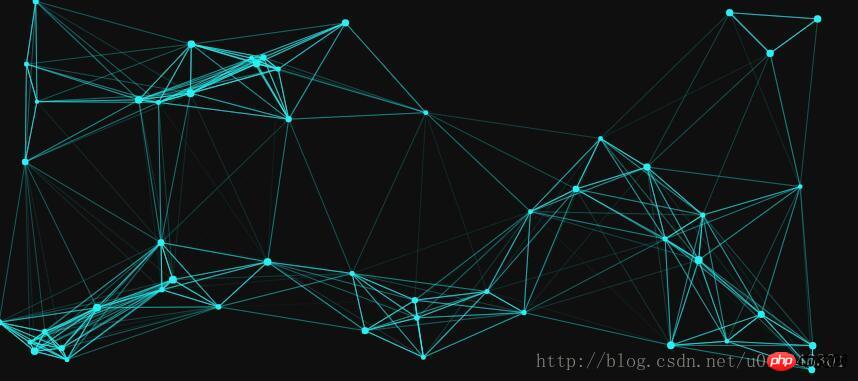
function getSize(){ w = canvas.width = window.innerWidth; h = canvas.height = window.innerHeight; }
var opt = { particleAmount: 50, //粒子个数 defaultSpeed: 1, //粒子运动速度 variantSpeed: 1, //粒子运动速度的变量 particleColor: "rgb(32,245,245)", //粒子的颜色 lineColor:"rgb(32,245,245)", //网格连线的颜色 defaultRadius: 2, //粒子半径 variantRadius: 2, //粒子半径的变量 minDistance: 200 //粒子之间连线的最小距离 };
function Partical(){ this.x = Math.random()*w; //粒子的x轴坐标 this.y = Math.random()*h; //粒子的y轴坐标 this.speed = opt.defaultSpeed + opt.variantSpeed*Math.random(); //粒子的运动速度 this.directionAngle = Math.floor(Math.random()*360); //粒子运动的方向 this.color = opt.particleColor ; //粒子的颜色 this.radius = opt.defaultRadius+Math.random()*opt.variantRadius; //粒子的半径大小 this.vector = { x:this.speed * Math.cos(this.directionAngle), //粒子在x轴的速度 y:this.speed * Math.sin(this.directionAngle) //粒子在y轴的速度 } this.update = function(){ //粒子的更新函数 this.border(); //判断粒子是否到了边界 this.x += this.vector.x; //粒子下一时刻在x轴的坐标 this.y += this.vector.y; //粒子下一时刻在y轴的坐标 } this.border = function(){ //判断粒子是都到达边界 if(this.x >= w || this.x= h || this.y w){ //下面是改变浏览器窗口大小时的操作,改变窗口大小后有的粒子会被隐藏,让他显示出来即可 this.x = w; } if(this.y > h){ this.y = h; } if(this.x 1. The initial speed and angle of each particle are randomly generated. The color is determined by the relevant setting options. 2. This.vector is used to store the movement direction of particles: if this.vector.x is 1, the particles move to the right; if it is -1, the particles move to the left. Likewise, if this.vector.y is negative, the particle moves upward, and if it is positive, the particle moves downward. This.update is used to update the coordinates of the next position of each particle. First, edge detection is performed; if the movement of the particle exceeds the size of the canvas, the direction vector is multiplied by -1 to produce the reverse direction of motion. 3. Window scaling may cause particles to go beyond the boundary. In this case, the edge detection function cannot capture it, so a series of if statements are needed to detect this situation and reset the particle position to the current The border of the canvas. 4. The last step is to draw these points onto the canvas. The particle class has been written, let’s draw it: function init(){ getSize(); for(let i = 0;iThe above initialized opt.particleAmount particle objects, the object was initialized but not drawn, the following is the loop Function: function loop(){ ctx.clearRect(0,0,w,h); for(let i = 0;iEvery time the loop() function is executed, the content on the canvas will be cleared, and then the coordinates of the particles will be recalculated through the update() function of the particle object, and finally drawn through the draw() function of the particle object. particle. The following is the effect at this time: 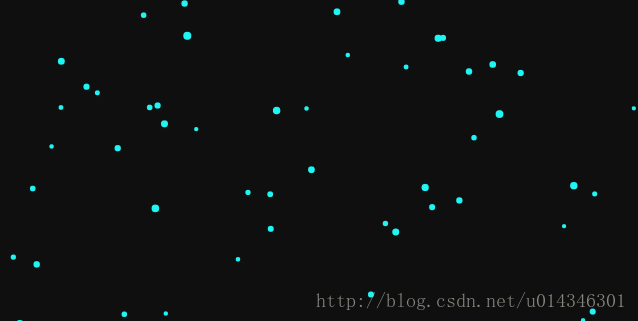
But some particles will disappear after the browser window size changes. At this time, you need to add an event to monitor whether the browser size changes. : window.addEventListener("resize",function(){ winResize() },false);
Copy after login
var particle = [], w,h; //粒子数组,浏览器宽高 var delay = 200,tid; //延缓执行事件和setTimeout事件引用 function winResize(){ clearTimeout(tid); tid = setTimeout(function(){ getSize(); //获取浏览器宽高,在文章最上面有介绍 },delay) }
我们现在知道每个粒子的x轴和y轴的坐标,那么我们就可以计算出两个点之间的距离了,写一个函数,传入两个点,如下:
function getDistance(point1,point2){ return Math.sqrt(Math.pow(point1.x-point2.x,2) + Math.pow(point1.y - point2.y ,2)); }
现在我们可以计算出两个点的距离,那么我们就计算出所有每个粒子同其他所有粒子的距离,来确定它们之间是否需要连线,当然如果所有粒子的颜色深度都一模一样,那就有点丑了,所以我们这里可以根据两个粒子之间的距离来决定连线的透明度,两个粒子距离越近,越不透明,距离越远,越透明,超过一定距离就不显示了。
function linePoint(point,hub){ for(let i = 0;i 0){ ctx.lineWidth = 0.5; ctx.strokeStyle = "rgba("+line[0]+","+line[1]+","+line[2]+","+opacity+")"; ctx.beginPath(); ctx.moveTo(point.x,point.y); ctx.lineTo(hub[i].x,hub[i].y); ctx.closePath(); ctx.stroke(); } } }
上面传入的两个参数分别是一个点和整个点的数组,let opacity = 1 -distance/opt.minDistance;用于判断连线之间的透明度同时也判断了距离,距离大于opt.minDistance时,opacity为负,下面判断时就过滤掉了,上面的颜色用到了正则表达式,需要先解析最上面opt对象里给出的颜色,然后再加上透明度,这段代码如下:
var line = opt.lineColor.match(/\d+/g);
最后在loop()函数里面不断循环计算距离就可以了,在loop()中加入代码后如下:
function loop(){ ctx.clearRect(0,0,w,h); for(let i = 0;i
需要指出的是:如果添加过多的点和/或过多的连接距离(连接距离会创建过多的线条),动画也会扛不住。当视口变窄时最好降低粒子的运动速度:粒子的尺寸越小,在愈加狭窄空间内的移动速度貌似会越快。
显示整段代码:
nbsp;html>
canvasDetailed explanation of creating dynamic particle grid animation with Canvas
Copy after login
相信看了本文案例你已经掌握了方法,更多精彩请关注php中文网其它相关文章!
推荐阅读:
The above is the detailed content of Detailed explanation of creating dynamic particle grid animation with Canvas. For more information, please follow other related articles on the PHP Chinese website!


![[Web front-end] Node.js quick start](https://img.php.cn/upload/course/000/000/067/662b5d34ba7c0227.png)


