The generator is a function introduced only in PHP 5.5. Maybe you think the function of the generator is not very obvious. However, the generator function is really useful. This article mainly shares with you the detailed explanation of PHP generator, I hope it can help you.
I guess you will still be confused after listening to the concept directly, so let’s talk about the advantages first, maybe it can arouse your interest. So what are the advantages of generators, as follows:
Generators will have a very large impact on the performance of PHP applications
PHP code runtime Save a lot of memory
More suitable for calculating large amounts of data
So, how are these magical functions achieved? Let's give an example first.
First of all, let’s put aside the concept of generator and look directly at a simple PHP function:
function createRange($number){
    $data = [];
    for($i=0;$i<$number;$i++){
        $data[] = time();
    }
    return $data;
}This is a very common PHP function, we It is often used when dealing with some arrays. The code here is also very simple:
We create a function.
The function contains a for loop. We loop the current time into $data.
After the for loop is executed, $data Go back out.
It’s not over yet, let’s continue. Let’s write another function and print out the return value of this function in a loop:
$result = createRange(10); // 这里调用上面我们创建的函数foreach($result as $value){ sleep(1);//这里停顿1秒,我们后续有用
echo $value.'<br />';
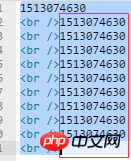
}Let’s take a look at the running results in the browser:

There is nothing question. (Of course the effect of sleep(1) cannot be seen)
We noticed that when calling the function createRange, the value passed to $number is 10, a very small number. . Suppose, now pass a value of 10000000 (10 million).
Then, in the function createRange, the for loop needs to be executed 10 million times. And 10 million values are placed in $data, and the $data array is placed in memory. Therefore, a lot of memory will be occupied when calling functions.
Here, the generator can show its talents.
We modify the code directly, please pay attention:
function createRange($number){
    for($i=0;$i<$number;$i++){
        yield time();
    }
}Look at this code that is very similar to just now, we deleted the array $data, and Nothing is returned, but a keyword yield is used before time()
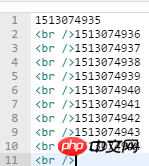
Let’s run the second piece of code again:
$result = createRange(10); // 这里调用上面我们创建的函数
foreach($result as $value){
sleep(1);
echo $value.'<br />';
} 
We miraculously discovered that the output value is different from the first time without using the generator. The values (timestamps) here are separated by 1 second.
The one second interval here is actually the consequence of sleep(1). But why is there no gap the first time? That's because:
When the generator is not used: the for loop result in the createRange function is quickly placed in $data and returned immediately. Therefore, the foreach loop is a fixed array.
When using a generator: the value of createRange is not generated quickly at once, but depends on the foreach loop. foreach loops once and for is executed once.
At this point, you should have some idea about the generator.
Let’s analyze the code just now.
function createRange($number){
for($i=0;$i<$number;$i++){
yield time();
}
}
$result = createRange(10); // 这里调用上面我们创建的函数
foreach($result as $value){
sleep(1);
echo $value.'<br />';
} Let’s restore the code execution process.
First call the createRange function, passing in parameter 10, but the for value is executed once and then stops, and tells foreach the value that can be used for the first loop.
foreach starts to loop over $result. It first sleeps (1), and then starts to use a value given by for to perform output.
foreach prepares for the second loop. Before starting the second loop, it requests the for loop again.
The for loop is executed again, and the generated timestamp is told to foreach.
foreach gets the second value and outputs it . Due to sleep(1) in foreach, the for loop is delayed by 1 second to generate the current time
Therefore, during the entire code execution, there is always only one record value participating in the loop, and there is only one record value in the memory. A message.
无论开始传入的$number有多大,由于并不会立即生成所有结果集,所以内存始终是一条循环的值。
到这里,你应该已经大概理解什么是生成器了。下面我们来说下生成器原理。
首先明确一个概念:生成器yield关键字不是返回值,他的专业术语叫产出值,只是生成一个值
那么代码中foreach循环的是什么?其实是PHP在使用生成器的时候,会返回一个Generator类的对象。foreach可以对该对象进行迭代,每一次迭代,PHP会通过Generator实例计算出下一次需要迭代的值。这样foreach就知道下一次需要迭代的值了。
而且,在运行中for循环执行后,会立即停止。等待foreach下次循环时候再次和for索要下次的值的时候,for循环才会再执行一次,然后立即再次停止。直到不满足条件不执行结束。
很多PHP开发者不了解生成器,其实主要是不了解应用领域。那么,生成器在实际开发中有哪些应用?
PHP开发很多时候都要读取大文件,比如csv文件、text文件,或者一些日志文件。这些文件如果很大,比如5个G。这时,直接一次性把所有的内容读取到内存中计算不太现实。
这里生成器就可以派上用场啦。简单看个例子:读取text文件
我们创建一个text文本文档,并在其中随便输入几行文字,示范读取。完整代码如下:
<?phpheader("content-type:text/html;charset=utf-8");function readTxt()
{
$handle = fopen("test.txt", 'rb'); while (feof($handle)===false) {
yield fgets($handle);
} fclose($handle);
}foreach (readTxt() as $key => $value) {
echo $value.'<br />';
}
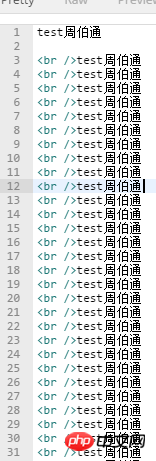
通过上图的输出结果我们可以看出代码完全正常。
但是,背后的代码执行规则却一点儿也不一样。使用生成器读取文件,第一次读取了第一行,第二次读取了第二行,以此类推,每次被加载到内存中的文字只有一行,大大的减小了内存的使用。
这样,即使读取上G的文本也不用担心,完全可以像读取很小文件一样编写代码。
相关推荐:
The above is the detailed content of Detailed explanation of PHP generator. For more information, please follow other related articles on the PHP Chinese website!


