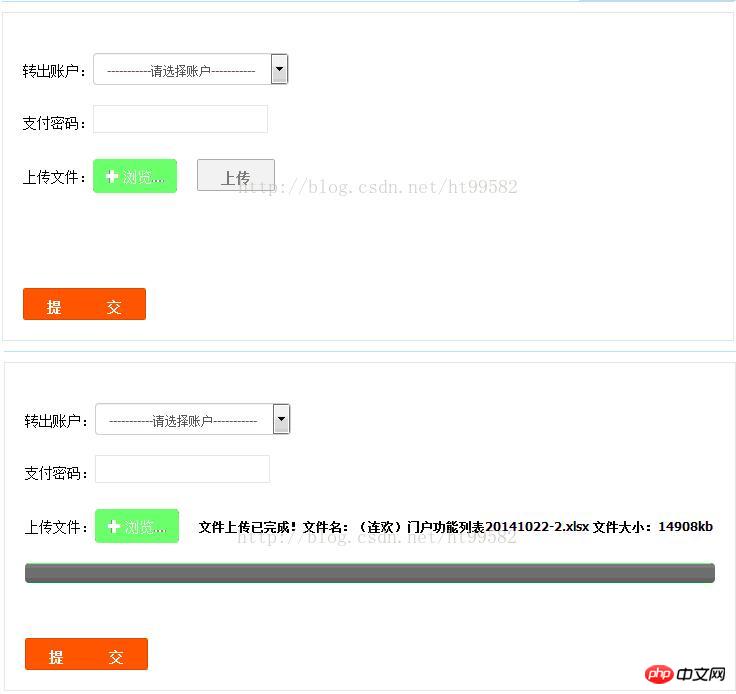
这次给大家带来怎样实现文件上传带进度条动画,实现文件上传带进度条动画的注意事项有哪些,下面就是实战案例,一起来看一下。
jQuery File Upload 是一个Jquery图片上传组件,支持多文件上传、取消、删除,上传前缩略图预览、列表显示图片大小,支持上传进度条显示;支持各种动态语言开发的服务器端。
效果图如下所示:

html 部分
<p style="line-height:34px;margin-top:20px;">
    <label style="float: left;font-size:14px">上传文件:</label>
    <span class="btn btn-success fileinput-button fn-left">
   <i class="glyphicon glyphicon-plus"></i>
   <span>浏览...</span>
   <input type="file" name="file" id="file_upload">
  </span>
    <p style="float: left;margin-left: 20px;font-weight: bold" id="uploadText"></p>
    </p>
    <p class="fn-clear"></p>
    <p id="progress">
    <p class="bar" style="width: 0%;"></p>
    </p>
css 部分
<link rel="stylesheet" href="/admin/assets/plugins/jquery-file-upload/css/jquery.fileupload-ui.css" rel="external nofollow" >
<link rel="stylesheet" href="/admin/assets/plugins/jquery-file-upload/css/jquery.fileupload.css" rel="external nofollow" >
/*文件上传控件*/
.bar {
 background-image: -webkit-linear-gradient(top,#5cb85c 0,#449d44 100%);
 background-image: -o-linear-gradient(top,#5cb85c 0,#449d44 100%);
 background-image: -webkit-gradient(linear,left top,left bottom,from(#5cb85c),to(#449d44));
 background-image: linear-gradient(to bottom,#5cb85c 0,#449d44 100%);
 filter: progid:DXImageTransform.Microsoft.gradient(startColorstr='#ff5cb85c', endColorstr='#ff449d44', GradientType=0);
 background-repeat: repeat-x;
 height: 20px;
 font-size: 12px;
 line-height: 20px;
 color: #fff;
 text-align: center;
 background-color: #428bca;
 -webkit-box-shadow: inset 0 -1px 0 rgba(0,0,0,.15);
 box-shadow: inset 0 -1px 0 rgba(0,0,0,.15);
 -webkit-transition: width .6s ease;
 -o-transition: width .6s ease;
 transition: width .6s ease;
}
#progress {
 background-image: -webkit-linear-gradient(top,#ebebeb 0,#f5f5f5 100%);
 background-image: -o-linear-gradient(top,#ebebeb 0,#f5f5f5 100%);
 background-image: -webkit-gradient(linear,left top,left bottom,from(#ebebeb),to(#f5f5f5));
 background-image: linear-gradient(to bottom,#ebebeb 0,#f5f5f5 100%);
 filter: progid:DXImageTransform.Microsoft.gradient(startColorstr='#ffebebeb', endColorstr='#fff5f5f5', GradientType=0);
 background-repeat: repeat-x;
 height: 20px;
 width: 0%;
 margin-bottom: 20px;
 overflow: hidden;
 background-color: #f5f5f5;
 border-radius: 4px;
 -webkit-box-shadow: inset 0 1px 2px rgba(0,0,0,.1);
 box-shadow: inset 0 1px 2px rgba(0,0,0,.1);
 margin-top: 20px;
}
.glyphicon {
 position: relative;
 top: 1px;
 display: inline-block;
 font-family: 'Glyphicons Halflings';
 font-style: normal;
 font-weight: 400;
 line-height: 1;
 -webkit-font-smoothing: antialiased;
 -moz-osx-font-smoothing: grayscale;
}
.glyphicon-plus:before {
 content: "\2b";
}
.btn-success {
 color: #fff;
 background-color: #5cb85c;
 border-color: #4cae4c;
}
.btn {
 display: inline-block;
 padding: 6px 12px;
 margin-bottom: 0;
 font-size: 14px;
 font-weight: 400;
 line-height: 1.42857143;
 text-align: center;
 white-space: nowrap;
 vertical-align: middle;
 cursor: pointer;
 -webkit-user-select: none;
 -moz-user-select: none;
 -ms-user-select: none;
 user-select: none;
 background-image: none;
 border: 1px solid transparent;
 border-radius: 4px;
}js 部分
<script src="/admin/assets/plugins/jquery-file-upload/js/vendor/jquery.ui.widget.js"></script>
<script src="/admin/assets/plugins/jquery-file-upload/js/jquery.fileupload.js"></script>
<script type="text/javascript" src="${pageContext.request.contextPath}/admin/assets/plugins/jquery-1.10.2.min.js"></script><span style="font-family:monospace;font-size:14px;"> <span id="_xhe_cursor"></span>$('#file_upload').fileupload({
dataType: 'json',
url:'${pageContext.request.contextPath}/excel/upload',
autoUpload:false,
add: function (e, data) {
$('#progress').css(
'width','0%'
);
$('#progress .bar').css(
'width', '0%'
);
$("#uploadText").empty();
var fileType = data.files[0].name.split('.').pop();
// console.log(data);
var acceptFileTypes = /xls|xlsx$/i;
var size = data.files[0].size;
size = (size/1024).toFixed(2);//文件大小单位kb
var maxFileSize = 5*1024;//最大允许文件大小单位kb
if (!acceptFileTypes.test(fileType)) {
new Message({message:"不支持的文件类型,仅支持EXCEL文件"});
return ;
}
if(size>maxFileSize){
new Message({message:"文件大小:"+size+"KB,超过最大限制:"+maxFileSize+"KB"});
return ;
}
data.context = $("<button class=' ui-button ui-button-lwhite'/>").text("上传")
.appendTo("#uploadText")
.click(function () {
data.context = $("<p/>").text("正在上传...").replaceAll($(this));
data.submit();
});
},
progressall: function (e, data) {
var progress = parseInt(data.loaded / data.total * 100, 10);
$('#progress').css(
'width','100%'
);
$('#progress .bar').css(
'width',progress + '%'
);
},
fail:function (e, data) {
new Message({message:"上传失败"});
},
done: function (e, data) {
console.log(data.files[0]);
var fileName = data.files[0].name;
var size = data.files[0].size;
var obj = data.result;
if(obj.success == true){
$("#filePath").val(obj.result.fileId+"&"+obj.result.opLogId);
data.context.text("文件上传已完成!文件名:"+fileName+" 文件大小:"+size+"kb");
}else{
alert(obj.errorMsg);
}
}
});</span>XHR响应为Json时IE的下载BUG
这里需要特别注意的是,由于jQuery File Upload都是采用XHR在传递数据,服务器端返回的通常是JSON格式的响应,但是IE会将这些JSON响应误认为是文件传输,然后直接弹出下载框询问是否需要下载。
解决这个问题的方法是必须将相应的Http Head从
Content-Type: application/json
更改为
Content-Type: text/
相信看了本文案例你已经掌握了方法,更多精彩请关注php中文网其它相关文章!
推荐阅读:
The above is the detailed content of How to implement file upload with progress bar animation. For more information, please follow other related articles on the PHP Chinese website!


