Isomorphic rendering of front and rear ends: When the client requests a page containing React components, the server first responds and outputs the page, and the client and server have their first interaction. Then, if the process of loading components requires making an Ajax request to the server, the client and server interact again, which takes a relatively long time. Front-end and back-end isomorphic rendering can render all places and respond to the client in one go when the page is first loaded.
This article mainly shares with you the isomorphic rendering of react front-end and back-end. The editor thinks it is quite good. Now I will share it with you and give you a reference. Let’s follow the editor to take a look, I hope it can help everyone.
Implementation method: Ensure that the package management tool and module dependency are consistent
Package management tool-npm management ensures that both the front and back ends use the same compatible package
Module dependency method - webpack, ensure that both the front and back ends adopt the commonjs dependency method, ensuring that the codes can depend on each other
How to render on the server side:
react Family Bucket: react, react-router, redux
react and reactDOM
The support provided by reactDOM here is reactDOM.render and reactDOM. The renderToString function will generate a DOM structure in the browser, which will generate the corresponding HTML string template on the server. React will add a data-react-checksum attribute to the generated DOM structure, which is a checksum of the adler32 algorithm to ensure the consistency of the two templates.

At the same time, the life cycle of react is also different during the front-end and back-end rendering processes. Front-end rendering components have a complete life cycle, while back-end rendering only has the life cycle of componentWillMount. This means that if we want to perform joint operation logic on the front and back ends, such as sending data requests, etc., we can place it in the life cycle of componentWillMount; if we want to handle the client logic separately, we can place it in other life cycles, such as componentDidMount.
react-router
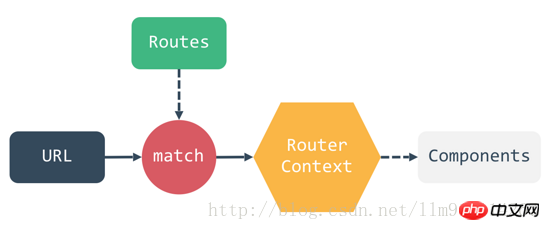
react-router is a react routing-view control library that can write boundary declarative routing to control the rendering of different pages. react-router itself is a state machine. According to the configured routing rules and the input url path, the corresponding component is found and rendered through the match method.

This mechanism is connected to both the front-end and the back-end. For example, in the back-end, the following implementation form is used for rendering:
app.use(async (ctx, next) => {
match({
location: ctx.originalUrl,
routes
}, callback)
// 渲染完成之后,调用 callback 回调
// 将 组件 renderToString 返回前端即可
})For the front end, the above logic is actually processed, but it is well encapsulated in the component. We only need to write declarative routing, and all this is Can happen automatically as the url changes.
redux
redux is react's data flow management library. Its support for server-side rendering is very simple, that is, a single store and state can be initialized. The backend will build a single store when rendering, and write the built initial state to the generated HTML string template in json format and through global variables.
By obtaining the initial state and generating a store that is exactly the same as the back-end after completion, the front-end can ensure the consistency of the front-end and back-end rendering data and ensure that the DOM structures generated by the front-end and back-end are consistent.
Optimization results:
The problem of low development efficiency: isomorphic applications only have one project and a set of technology stacks. As long as you have react development experience, you can Quickly invest in front-end and back-end development;
The problem of poor maintainability: Isomorphic applications can share a large amount of code, including tool methods, constants, page components and most of the logic of redux, etc., greatly improving reusability; First screen performance, SEO, etc.
Processing process:
The client makes a request-the server renders the component-returns to the client
1. Place the placeholder
<p id="root">@@@</p>
###
on the page that needs to be isomorphic (such as index.html). When the client makes the first request , the server renders the html content of the component and puts it at the @@@ position, and then the server renders a js code segment similar to this to finally render the component to the DOM. In other words, the renderApp method actually renders the component.
2. In order to directly call the renderApp method, the renderApp method must become a method under window
window.renderApp = function(){ReactDOM.render(...)}3. The server takes out index.html and renders it. Extract the content of the placeholder, replace the placeholder, and respond to the client in one go
Case
File structure
##
browser.js(在这里把渲染组件的过程赋值给window.renderApp)

bundle.js(把browser.js内容bundle到这里)

Component.js(组件在这里定义)

express.js(服务端)

index.html(同构直出的页面)

package.json
<!doctype html>
<html>
<head>
 <meta charset="UTF-8">
 <title>Untitled Document</title>
</head>
<body>

 <p id="root">@@@</p>
 <script src="bundle.js"></script>
 ###
</body>
</html>
var React = require('react');
var ReactDOM = require('react-dom');

var Component = React.createClass({
 clickHandler: function(){
  alert(this.props.msg)
 },

 render: function(){
  return React.createElement('button', {onClick: this.clickHandler}, this.props.msg)
 }

})

module.exports = Component;var React = require('react');
var ReactDOM = require('react-dom');
var Component = React.createFactory(require('./Component'));
window.renderApp = function(msg){
ReactDOM.render(Component({msg: msg}), document.getElementById('root'));
}可以通过来触发组件的渲染。稍后,在服务端会把这段代码渲染出来。
express.js,服务端
以上,需要直出的页面有了占位符,定义了组件,并把渲染组件的过程赋值给了window对象,服务端现在要做的工作就是:生成组件的html和渲染组件的js,放到直出页面index.html的占位符位置。
var express = require('express');
var React = require('react');
var ReactDOMServer = require('react-dom/server');
var fs = require('fs');
var Component = React.createFactory(require('./Component'));
//原先把文件读出来
var BUNDLE = fs.readFileSync('./bundle.js',{encoding:'utf8'});
var TEMPLATE = fs.readFileSync('./index.html',{encoding:'utf8'});
var app = express();
function home(req, res){
var msg = req.params.msg || 'Hello';
var comp = Component({msg: msg});
//@@@占位符的地方放组件
var page = TEMPLATE.replace('@@@', ReactDOMServer.renderToString(comp));
//###占位符的地方放js
page = page.replace('###', '<script>renderApp("'+msg+'")</script>')
res.send(page);
}
//路由
app.get('', home);
app.get('/bundle.js', function(req, res){
res.send(BUNDLE);
})
app.get('/:msg', home);
app.listen(4000);package.json中的配置
"scripts": {
"start": "watchify ./browser.js -o ./bundle.js"
},启动方式
运行:npm start
运行:node express.js
浏览:localhost:4000
相关推荐:
The above is the detailed content of React front-end and back-end isomorphic rendering example sharing. For more information, please follow other related articles on the PHP Chinese website!


