This article mainly brings you a graphic tutorial on how to build a Vue.js project template. Let me give you a reference, I hope it can help you.
Preface
Starting from the beginning of this year (2017), our team began to introduce "Vue.js" to develop mobile products. As the leader of the team, my first task is to design the overall architecture. A good architecture must be built with rich development experience. Although I have many years of front-end development experience, I am still new to "Vue.js". Fortunately, "Vue.js" has a supporting tool "Vue-CLI", which provides some relatively mature project templates, which greatly reduces the difficulty of getting started. However, many specific problems still need to be thought about and solved by yourself.
Project Division
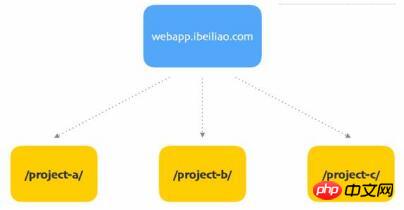
Most of our company's H5 products are pages nested in the mobile client. The functions of each project are relatively independent and small in scale. In this way, these small projects can be managed independently, or they can be centralized and managed in one large project. The advantages and disadvantages of each are as follows:

Project Template Considering that our team has just started using "Vue.js", we need to gradually figure out a suitable architecture. If it becomes a large project, once the structure needs to be adjusted, it is likely to be strained. So the final choice is to divide it into multiple small projects.
Although it is divided into multiple small projects, these small projects must also maintain a consistent architecture and common code. To put it bluntly, you need to build your own project template based on business conditions, and all specific projects are developed on the basis of this template. Let’s introduce the process of building our team’s project template.
Initialization
The project template itself is also a project, so it is also initialized through "Vue-CLI" (the project name is "webapp-public"):
vue init webpack webapp-public
Selected here The one is the "webpack" template because it has more complete functions. During the initialization process, please note:
Install "Vue-Router" to support single-page applications;
Install "ESLint" to unify coding standards.
SASS
Installing "SASS" support is relatively simple. First install the relevant dependencies through the command line:
npm install node-sass --save-devnpm install sass-loader --save-dev
After installation, just specify the "lang" attribute of the style tag If it is "scss", you can use this language to write style code:
<style lang="scss" scoped></style><style src="style.scss" lang="scss"></style>
REM layout
Today, most mobile pages are used in style code in order to adapt to different sizes of mobile phone screens. rem as the unit of size. However, the design draft given by the designer is still in px. This requires converting px to rem. This conversion can be done in the head or through tools, such as the "PostCSS" plug-in "postcss-px2rem".
When initializing the project, "PostCSS" has already been installed, so just install "postcss-px2rem" directly:
npm install postcss-px2rem --save-dev
After installation, you need to modify the "PostCSS" in the root directory of the project .postcssrc.js", add the configuration of "postcss-px2rem":
"plugins": {
 "autoprefixer": {},
 "postcss-px2rem": { "remUnit": 100 }
}"px value/remUnit" is the converted rem value, you can modify the value of "remUnit" according to your own needs.
However, some special px values do not need to be converted into rem values. At this time, special comments can be used to prohibit "postcss-px2rem" from processing this value. For example:
/* 不同dpr下的细线 */
.g-dpr-1 .g-border-1px {
 border-width: 1px !important; /*no*/
 }
 .g-dpr-2 .g-border-1px {
 border-width: 0.5px !important; /*no*/
}Vuex
In single-page application development, "Vuex", which is responsible for managing state, is also necessary. The installation is also very simple:
npm install vuex --save
However, when actually used, in some browsers with lower version systems, such an exception may appear:
Error: [vuex] vuex requires a Promise polyfill in this browser.
This is because the browser does not support "Promise", so a "polyfill" is needed. We can use "babel-polyfill" directly:
npm install babel-polyfill --save
"babel-polyfill" will add ES6 new objects and methods to the global scope, and other code in the project does not need to be explicitly introduced (import Or require) it, which means "Webpack" will not recognize it as a dependency of the project. Therefore, we also need to modify "/build/webpack.base.conf.js" and add "babel-polyfill" at the packaging entrance:
entry: {
 app: ['babel-polyfill', './src/main.js']
}Another thing to mention is to use "Vue-CLI" to initialize the project "babel-plugin-transform-runtime" is installed by default, and its function is the same as "babel-polyfill", so the former can be removed. Modify ".babelrc" in the root directory and remove this line:
"plugins": ["transform-runtime"]
Then delete the dependencies:
npm uninstall babel-plugin-transform-runtime --save-dev
Access path
Each small project is actually on the server (Whether it is a test, pre-release or production environment server), when running on a server, it is distinguished by a first-level subdirectory.

This means that all paths in the project must be added with a directory (for example, the original access path is "http://localhost:8080/home", Now you have to change it to "http://localhost:8080/project-a/home"). Don't think that this is a very simple thing. In fact, there are many things that need to be changed.
The first thing to change is the base path configuration of "Vue-Router":
new Router({
 base: '/project-a/', // 基路径
 mode: 'history',
 routes: [
 { path: '/', component: Home }
]
});After setting the base path, all paths related to routing are relative base paths, not the root directory.
然后是开发服务器的 资源发布路径 (/config/index.js):
dev: { assetsPublicPath: '/project-a/' }对应地还要修改「/build/dev-server.js」的两处地方,不然访问的时候就会404:
require('connect-history-api-fallback')({
 // 默认为"/index.html",因为资源发布路径改了,所以这里也要对应上
 index: '/project-a/index.html'
 })
// 运行项目后默认打开的页面地址
var uri = 'http://localhost:' + port + '/project-a/'最后还要修改 Webpack热更新的检测路径 。先修改「/build/dev-server.js」:
require('webpack-hot-middleware')(compiler, {
 log: false,
 path: '/project-a/__webpack_hmr'
})然后修改「/build/dev-client.js」:
require('webpack-hot-middleware/client?path=__webpack_hmr&dynamicPublicPath=true&noInfo=true&reload=true')顺带一提,上面的这堆参数完全是用源代码调试的结果,官网文档并没有详细说明。
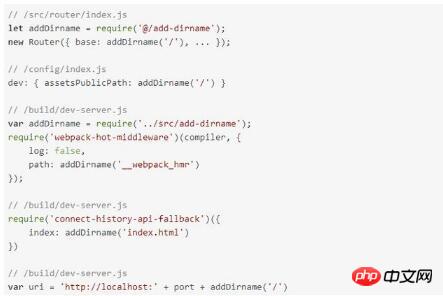
全部改完之后可以发现,跟目录有关的代码有5处,具体项目使用的时候岂不是要改5次?非常麻烦。这种情况下,把这部分逻辑写成一个公共函数去调用是最好的选择。新建文件「 /src/add-dirname.js 」:
const DIR_NAME = '/project-a/';
module.exports = function(path) {
 return (DIR_NAME + path).replace(/\/{2,}/g, '/');
};然后把刚才涉及添加一级子目录的代码全部改成调用该函数来实现:

这样一来,如果要修改一级子目录,只需要修改常量「DIR_NAME」的值就可以了。
公共代码
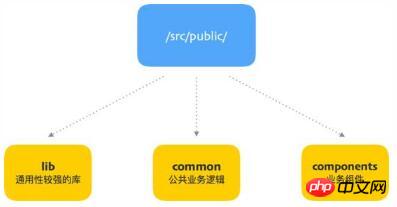
我们的公共代码分为三种:
通用性较强的库 :包括团队成员编写的一些通用库、无法通过npm安装的通用库等,跟业务无关;
业务逻辑库 :跟业务有关,但是跟表现层无关的公共代码;
业务组件库 :表现层的组件。
它们都位于「/src/public」:

在每一种公共代码的文件夹内,具体某一个库或者组件的目录结构如下:
/src/public/components/img-box
img-box.vue
1.1
这里要特别提一下的是 版本号 这一层文件夹。如果对库或者组件的修改会造成以前的调用代码不兼容,就不应该修改原文件,而是新建一个版本号文件夹,把新的代码以及其余的资源文件都放到这个新文件夹中。这样做的好处是,具体的项目要更新公共代码时,直接把项目模板的「/src/public」覆盖过去就行,不用担心不兼容。
构建
「webpack」这个项目模板已经配置好构建的逻辑。通过一个命令就可以执行构建:
npm run build
根据默认配置,代码会被发布到项目根目录下的「dist」文件夹内。然而,这样简单粗暴的发布方式并不能满足实际需求:
资源文件(图片、CSS、JS等)要发布到 CDN服务器 ;
HTML中要通过完整的URL引用资源文件(因为资源文件在CDN的域上);
不用的环境(测试、预发布、生产)使用不同的域访问。
先解决区分环境的问题,我们在构建命令中新增一个参数以表示环境:
npm run build <test|pre|prod>
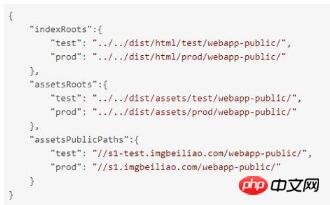
然后在根目录下新建一个配置文件「conf.json」(简单起见,只写了两种环境的配置):

文件内容表示的分别是不同环境下的HTML文件发布路径、资源发布路径以及资源访问路径。
接下来就要把这些配置接入到「Webpack」的打包配置中。修改「/config/index.js」,先在开头加上:
var env = process.argv[2]; // 环境参数(从0开始的第二个)
var conf = require('../conf');
// 找出对应环境的配置conf.indexRoot = conf.indexRoots[env];
conf.assetsRoot = conf.assetsRoots[env];
conf.assetsPublicPath = conf.assetsPublicPaths[env];然后修改构建部分的代码:
build: {
 index: path.resolve(__dirname, conf.indexRoot + 'index.html'),
 assetsRoot: path.resolve(__dirname, conf.assetsRoot),
 assetsPublicPath: conf.assetsPublicPath
}此时运行构建命令,就可以把项目发布到「conf.json」指定的路径中。
小结
至此,项目模板搭建完毕。其实最重要的一点就是 可配置化 ,否则,开发具体项目的人初始化一个项目还要改十几个地方,效率就很低了。
项目模板的使用
项目模板已经搭建好了,但是怎么用呢?有两种常用场景:
初始化新项目 :克隆或拉取项目模板项目,复制该项目的所有文件(除了「.git」文件夹)到新项目的文件夹,修改配置后进行后续开发。
更新公共代码 :克隆或拉取项目模板项目,复制要更新的代码到目标项目的对应路径。
两种场景都离不开「克隆或拉取」、「复制和粘贴」,这种做法一是麻烦,二是逼格太低。所以后来我用Node.js写了一个命令行工具「webapp-cli」来完成这两项工作。
初始化项目的命令为:
webapp init [projectPath]
例如:
webapp init test
更新特定文件的命令为:
webapp update <fileGlobs> [projectPath]
例如:
webapp update /src/public/** test
这个工具并没有改变操作方式,只是由人工操作变成程序代劳。
相关推荐:
The above is the detailed content of How to share Vue.js project template with pictures and texts. For more information, please follow other related articles on the PHP Chinese website!


