This article mainly introduces how vue encapsulates third-party plug-ins and publishes them to npm. It mainly explains how to encapsulate third-party plug-ins into vue plug-ins, simplify configuration, and install them with one click. It mainly provides ideas. The packaging methods are similar. The article is a bit long, so be patient. The editor thinks it’s pretty good, so I’d like to share it with you now and give it as a reference. Let’s follow the editor to take a look, I hope it can help everyone.
gitment
Gitment is a comment plug-in based on github issues packaging. We use this plug-in as a demonstration and encapsulate it into a vue plug-in. vue-gitment, the plug-in has been published to npm and installed in its own open source project vueblog using
project initialization
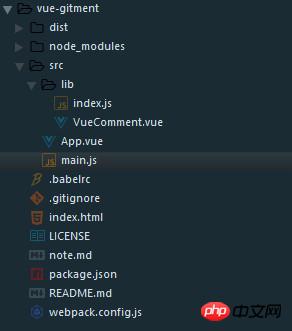
to encapsulate the vue plug-in with webpack -simple is very suitable, vue init webpack-simple vue-gitmentThis command creates the directory of our project, creates folders and files, and the final structure is like this

The lib directory is our plug-in directory, the other defaults are just fine
Modify the configuration items
The first is to modify the package.json
{
 "name": "vue-gitment",
 "version": "0.1.1",
 "description": "A comment plugin by gitment",
 "main": "dist/vue-gitment.js",
 "directories": {
  "dist": "dist"
 },
 "scripts": {
  "dev": "cross-env NODE_ENV=development webpack-dev-server --open --hot",
  "build": "cross-env NODE_ENV=production webpack --progress --hide-modules"
 },
 "repository": {
  "type": "git",
  "url": "git+https://github.com/vue-blog/vue-gitment.git"
 },
 "dependencies": {
  "gitment": "^0.0.3",
  "vue": "^2.3.3"
 },
 "devDependencies": {
 },
 "author": "wmui",
 "license": "MIT",
 "bugs": {
  "url": "https://github.com/vue-blog/vue-gitment/issues"
 },
 "homepage": "https://github.com/vue-blog/vue-gitment#readme"
}Add dependency gitment to dependencies. Main is the file entry after we package it. You can use the npm init command to generate a package.json
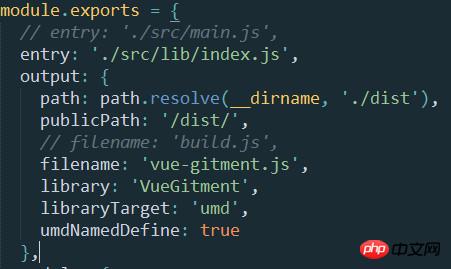
Modify webpack.config.js

We only need to configure the entrance and exit. Do not delete the default configuration, because we need to check the plug-in developed later. Working effect
Modify index.html

Because we have modified the webpack configuration, we naturally need to modify the src of the script
Encapsulation plug-in
VueComment.vue content is as follows
##
<template>
<p v-comment="options"></p>
</template>
<script>
// 引入依赖项
import Gitment from 'gitment'
export default {
name: 'vue-comment',
props: ['options'],
directives: {
// 自定义指令
comment: {
bind: function (el, binding) {
const gitment = new Gitment({
id: binding.value.id + '',
owner: binding.value.owner,
repo: binding.value.repo,
oauth: {
client_id: binding.value.oauth.client_id,
client_secret: binding.value.oauth.client_secret
}
})
gitment.render(el)
}
}
}
}
</script>
import VueComment from './VueComment.vue'
const comment = {
 install: function(Vue) {
  Vue.component(VueComment.name, VueComment)
 }
}
// 这里的判断很重要
if (typeof window !== 'undefined' && window.Vue) {
  window.Vue.use(comment)
}
export default commentTest Plug-in
npm run builddistThe directory will generate the following files

import VueComment from './lib/index.js'
Vue.use(VueComment)
<template>
<p id="app">
<vue-comment :options="options" v-if="options"></vue-comment>
</p>
</template>
<script>
export default {
name: 'App',
data() {
return {
options: {
id: 'article id',
owner: 'Your GitHub ID',
repo: 'The repo to store comments',
oauth: {
client_id: 'Your client ID',
client_secret: 'Your client secret',
}
}
}
}
}
</script>
<style>
@import '~gitment/style/default.css';
</style>npm run dev

Publish plug-in
Conclusion
Summary of ThinkPHP using Smarty third-party plug-in method
Batch encryption of php files without third-party plug-in
What should I do if the Vue reference datepicker plug-in cannot monitor the value of the datepicker input box
The above is the detailed content of vue encapsulates third-party plug-ins and publishes them to npm instances. For more information, please follow other related articles on the PHP Chinese website!


