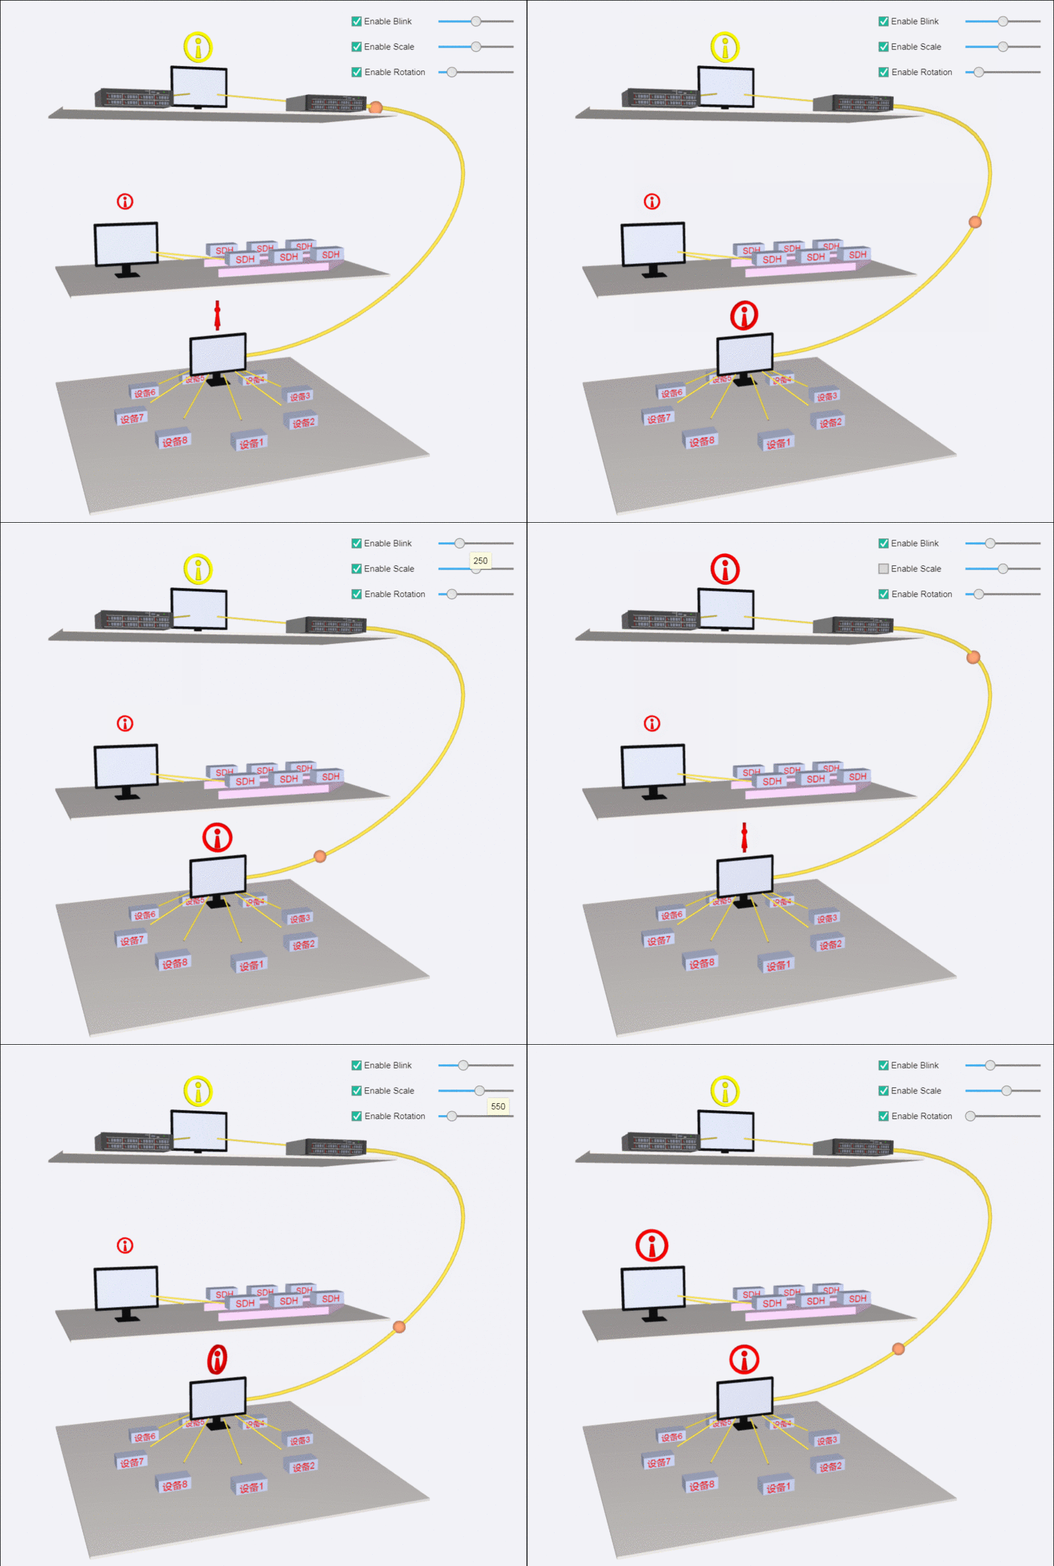
This article mainly shares with you the 3D network topology structure diagram of HTML5 WebG. We will introduce the 3D network topology structure in detail with pictures and texts, hoping to help everyone.
Nowadays, 3D models are used in a variety of different fields. They are used in the medical industry to make accurate models of organs; in the film industry they are used in animated figures, objects, and realistic films; in the video game industry they are used as assets in computers and video games; and in science they are used as accurate models of chemical compounds. ; The architecture industry uses them to demonstrate proposed buildings or landscape representations; the engineering community uses them to design new equipment, vehicles, structures, and other applications; and in recent decades, the earth science field has begun to construct three-dimensional geological models, And 3D models are often animated, for example, in feature films and computer and video games. They can be used within a 3D modeling tool or alone. In order to easily form animations, some additional data is usually added to the model. For example, some 3D models of humans or animals have a complete skeletal system, so that the movement will look more realistic, and the movement can be controlled through joints and bones.
All these things make us front-end developers feel that it would be great if we could achieve 3D effects without learning unity3d or other game development tools, and could accurately control movement or direction with code. . . So I used the 3D component in HT For Web to implement a small example, using most of the functions of the 3D component in HT. The reason for doing this example is to have a good grasp of the 3D component and try to put it into an example so that others can You can refer to it if necessary.
Let’s first take a look at the renderings of the overall implementation:

ht.Default.loadObj('obj/机柜组件1.obj', 'obj/机柜组件1.mtl', {  //加载 obj 文件
    cube: true,  //是否将模型缩放到单位1的尺寸范围内,默认为false
    center: true,  //模型是否居中,默认为false,设置为true则会移动模型位置使其内容居中
    shape3d: 'box',  //如果指定了shape3d名称,则HT将自动将加载解析后的所有材质模型构建成数组的方式,以该名称进行注册
    finishFunc: function(modelMap, array, rawS3){  //用于加载后的回调处理
      if(modelMap){
        device2 = createNode('box', floor1);  //创建一个节点,在第一层“地板”上
    device2.p3([x1-120, y1+13, z1+60]);  //设置这个节点坐标
    device2.s3(rawS3);  //设置这个节点大小
    createEdge(device1, device2);  //创建连线
    device3 = createNode('box', floor1);
    device3.s3(rawS3);
    device3.p3([x1+120, y1+13, z1+60]);
    createEdge(device1, device3);
      }
    }
});function createAlarm(device, formPane) {
var ringModel = ht.Default.createRingModel([ 8, 1, 10, 1, 10, -1, 8, -1, 8, 1 ], null, null, false, false, 100);//根据xy平面的曲线,环绕一周形成3D模型。
var sphereModel = ht.Default.createSmoothSphereModel(8, 8, 0, Math.PI*2, 0, Math.PI, 2);//构建光滑球体模型
var cylinderModel = ht.Default.createSmoothCylinderModel(8, true, true, 1, 2, 0, Math.PI*2, 8);//构建光滑圆柱体模型
var alarmArr = [//组合模型 由三个模型ringModel、sphereModel、cylinderModel组合而成
{
shape3d: ringModel,//定义模型类型
r3: [Math.PI/2, 0, 0],//设置旋转角度
color: {//设置模型颜色
func: 'style@all.blend',//数据绑定style样式中的all.blend属性,可通过data.s()获取和设置这个属性
}
},{
shape3d: sphereModel,
t3: [0, 4, 0],
color: {
func: 'style@all.blend',
}
},{
shape3d: cylinderModel,
t3: [0, -3, 0],
color: {
func: 'style@all.blend',
}
}
];
ht.Default.setShape3dModel('alarm', {//注册自定义3D模型
shape3d: alarmArr
});
var alarmTip = createNode('alarm', device);//创建shape3d为alarm的节点
alarmTip.s3([2, 2, 2]);//设置节点大小
alarmTip.p3(device.p3()[0], device.p3()[1]+60, device.p3()[2]);
alarmTip.s('all.blend', 'red');//改变此属性可改变模型的颜色,因为模型创建的时候已经数据绑定了
return alarmTip;
}if(formPane){
alarmNode.scaleFunc = function() {//设置大小变化动画
var size = alarmNode.s3();//获取节点的大小
if (size[0] === 2 && size[1] === 2 && size[2] === 2) alarmNode.s3([1, 1, 1]);
else alarmNode.s3([2, 2, 2]);
alarmNode.scaleTimer = setTimeout(alarmNode.scaleFunc, formPane.v('scaleInterval'));//设置动画
}
alarmNode.blinkFunc = function(){//设置闪烁的动画
var color = alarmNode.s('all.blend');//获取节点的style样式
if (color === 'red') alarmNode.s({'all.blend': 'yellow'});//如果节点颜色为红色,那么设置为黄色
else alarmNode.s({'all.blend': 'red'});
alarmNode.blinkTimer = setTimeout(alarmNode.blinkFunc, formPane.v('blinkInterval'));
}
alarmNode.rotateFunc = function() {//设置旋转动画
alarmNode.setRotation(alarmNode.getRotation() + Math.PI/20);//获取节点当前的旋转角度,在这个旋转角度之上添加 Math.PI/20 个角度
alarmNode.rotateTimer = setTimeout(alarmNode.rotateFunc, formPane.v('rotInterval'));
}
}formPane.addRow([//向form表单面板上添加一行元素
{
checkBox: {//复选框
label: 'Enable Blink',//复选框对应的文本内容
selected: true,//设置选中复选框
onValueChanged: function(){//复选框值变化时回调的函数
var data = dataModel.getDataByTag('colorAlarm');//通过tag标签获取节点
if (this.getValue()) {//获取复选框当前值true/false
data.blinkTimer = setTimeout(data.blinkFunc, formPane.v('blinkInterval'));//直接通过设置节点的blinkTimer来设置动画
}
else {
clearTimeout(data.blinkTimer);//清除动画
}
}
}
},
{
id: 'blinkInterval',//form可以通过getValue(简写为v)来获取这个item的值
slider: {//设置了该属性后HT将根据属性值自动构建ht.widget.Slider对象,并保存在element属性上
min: 0,//滑动条最小值
max: 1000,//滑动条最大值
step: 50,//滑动条步进
value: 500,//当前滑动条的值
}
}
], [0.1, 0.1]);//设置这行的两个item元素的宽度小于1的值为比例首先,创建一条连线连接起始节点和结束节点并设置这个连线的样式,用 ht.Edge 可以将连线吸附在起始节点和结束节点上,这样移动这两个节点中的任意一个节点连线都会跟着节点移动的位置变化,非常方便:
var polyline = new ht.Edge(source, target);//创建连线
dataModel.add(polyline);//将连线添加进数据容器中
polyline.s({
    'edge.width': 5,//连线宽度
    'edge.type': 'points',//连线类型 为points时连线走向将由edge.points属性决定,用于绘制折线
    'edge.points': [//可设置类型为ht.List的{x:100, y:100}格式的点对象数组,当edge.type为points时起作用
        {x: source.getPosition3d()[0]+200, y: source.getPosition3d()[2], e: source.getPosition3d()[1]},
        {x: target.getPosition3d()[0]+400, y: target.getPosition3d()[2], e: target.getPosition3d()[1]}
    ],
    'edge.segments': [1, 4],//用于描述点连接样式,数组元素为整型值
    'shape3d': 'cylinder',//圆柱
    'shape3d.color': 'rgba(242, 200, 40, 0.4)',
    'shape3d.resolution': 30,//微分段数,可以决定曲线的平滑度
    'edge.source.t3': [20, 0, 0],//连线source端偏移,[tx, ty, tz]格式,默认为空
    'edge.target.t3': [20, 0, 0]//连线target端偏移,[tx, ty, tz]格式,默认为空
});因为我们在创建连线的时候设置的 points 仅为曲线上的两个点,所以如果要获取曲线目前形成的点,是缺少 source 和 target 两个点的,我们重新设置一个数组,将这两个点添加进去,后面获取曲线上所有点时会用上:
var list = new ht.List();
list.push({x: source.getPosition3d()[0], y: source.getPosition3d()[2], e: source.getPosition3d()[1]});//向数组中添加source点
polyline.s('edge.points').each(function(item){//添加style属性中已设置的两个点
    list.push(item);
});
list.push({x: target.getPosition3d()[0], y: target.getPosition3d()[2], e: target.getPosition3d()[1]});//添加target点然后创建一个在管线上滑动的小球节点,这是仅是设置节点,真正添加进数据容器 dataModel 中需要设置完小球的坐标时再添加,如果没有给节点设置位置就将节点添加进数据容器中,节点的初始位置就是 3D 场景的正中心 [0, 0, 0] 的位置。小球滑动的动画代码如下:
var ball = new ht.Node();//创建小球节点
ball.s({//设置小球节点的样式
    'shape3d': 'sphere',//设置小球的3d模型为球形
    'shape3d.color': 'rgba(40, 90, 240, 0.4)'//设置3d模型的颜色
});

var delta = 10, flag = 0;
setInterval(function(){
    flag++;
    var length = (polyline.a('total') || 0) % polyline.a('length') + delta;//小球当前走过的曲线长度
    var cache = ht.Default.getLineCacheInfo(list, polyline.s('edge.segments'));//获取曲线上的点的信息
    var lineLength = ht.Default.getLineLength(cache);//获取曲线的总长度
    polyline.a('length', lineLength - 50);//因为我设置了edge的t3(相当于2d中的offset),所以线段长度实际没有那么长
    var offset = ht.Default.getLineOffset(cache, length);//曲线根据曲线上点的信息的偏移量
    ball.setPosition3d(offset.point.x + 10, offset.point.y, offset.point.z);//设置节点的坐标
    polyline.a('total', length);
    if(flag === 1) dataModel.add(ball);//这时候节点已经有了坐标了,可以添加进数据容器中了
}, 10);我们还可以看到第二层上有两个特殊的多边形“平行四边形”和“梯形”,平行四边形是靠 createParallelogramModel 模型函数,这个函数比较简单,createExtrusionModel(array, segments, top, bottom, resolution, repeatUVLength, tall, elevation),array 是你要形成的图形的坐标点,这边只是针对于 xz 轴上画的平面图形,segments 指的是如何连接这几个坐标点,可参考 HT for Web 形状手册(http://hightopo.com/guide/gui...),top 和 bottom 就是让你选择是否有顶部或者底部,resolution 微分段数,我们描绘一段曲线的时候可能只要确认几个个别的点然后在每两个点之间的连线上把它分成多个段,这样这条线段就会变得平滑,ht 为了用户能够轻松操作这些线段,就封装了这一个参数,repeatUVLength 默认为空,设置值后顶部和底部的贴图将根据制定长度值进行重复,tall 模型的高度,默认为 5,elevation 模型中心的 y 轴位置,默认值为 0,设置这个值可以使 xz 上的平面绕着 y 轴旋转。
底层的一个环形的效果是通过一个算法来实现的,环形得确认这个环形上有多少个元素,然后算每两个之间的角度,在通过 sin、cos 来计算每一个元素的位置,得出了如下代码:
names = ['设备2', '设备3', '设备4', '设备5', '设备6', '设备7', '设备8', '设备9'];
names.forEach(function(name, index) {
    x = 400, y = 200, angle = 45, r = 120;
    x = x3 + Math.sin((2 * Math.PI / 360) * angle * index) * r;
    y = z3 + Math.cos((2 * Math.PI / 360) * angle * index) * r;
    device = createRect([x, y3 + 15, y], [w * 0.1, 15, h * 0.1], '', '', floor3);
    createEdge(device5, device);
});相关推荐:
The above is the detailed content of 3D network topology diagram of HTML5 WebG. For more information, please follow other related articles on the PHP Chinese website!


