


This article mainly introduces the method of Vue generating token and saving it in the client's localStorage. The editor thinks it is quite good. Now I will share it with you and give it as a reference. Let’s follow the editor to take a look, I hope it can help everyone.
We have already learned that data can be saved on the client (browser) through localStorage.
Our backend has such an interface:
http://localhost/yiiserver/web/index.php/token?client_appid=aaa&client_appkey=bbb
In fact, just Clients (understood as user table) generate a token
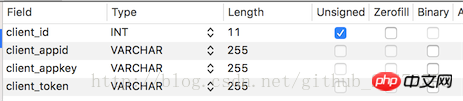

client_appid here is equivalent to the username, client_appkey is equivalent to the password.
In this way, a access-token will be generated after backend authentication. We need to save this access-token on the client.
Note: Our front-end is generally deployed on another server and will cross domains. The back-end needs to handle cross-domain issues. You can write the following code in PHP:
//指定允许其他域名访问
header("Access-Control-Allow-Origin: *");
header("Access-Control-Allow-Methods: GET,POST");
header('Access-Control-Allow-Headers: X-Requested-With,content-type,if-modified-since');Front-end routine
Note that since our project has already used VueX, then I will definitely use Store(Concept in vuex) to create a module.
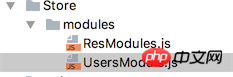
We have created a new UsersModule.js to handle the user login business. Be careful not to forget to add the entry file users-index Introduced in .js. If our "Member Backstage" also needs user-related data, it must also be introduced.
Modify in users-index.js:
//引入模块
import ResModule from './../Store/modules/ResModules';
import UsersModule from "./../Store/modules/UsersModule";
const vuex_config = new Vuex.Store({
 modules: {
  res:ResModule,
  users:UsersModule
 }
});1, UsersModule.js
import Vue from "vue";

export default {
 state:{
  currentUser:{
   get UserName(){
    return localStorage.getItem("currentUser_name");
   },
   get UserToken(){
    return localStorage.getItem("currentUser_token");
   }
  }
 },
 mutations:{
  setUser(state,{user_name,user_token}){
   // 在这里把用户名和token保存起来
   localStorage.setItem("currentUser_name",user_name);
   localStorage.setItem("currentUser_token",user_token);
  }
 },
 actions:{
  userLogin(context,{user_name,user_pass}){
   // 发送get请求做权限认证(真实开发建议用post的方式)
   let url = "http://localhost/yiiserver/web/index.php/token?client_appid="+user_name+"&client_appkey="+user_pass;
   console.log(url);

   Vue.http.get(url)
    .then((res)=>{
     if (res!=null && res.body!=undefined && "access-token" in res.body){
      var token = res.body["access-token"];
      if (token != ""){
       // 后端API验证通过
       // 调用上面mutations里定义的方法
       context.commit("setUser",{"user_name":user_name,"user_token":token});
      }
     }else{
      alert("用户名密码错误");
     }
    },(res)=>{
     alert("请求失败进入这里")
    });
  }
 }
}actions part: We wrote a userLogin() method to send an http request to the backend server. The data returned successfully by the request calls the ## defined in the mutations part. #setUser() method is saved to the client.
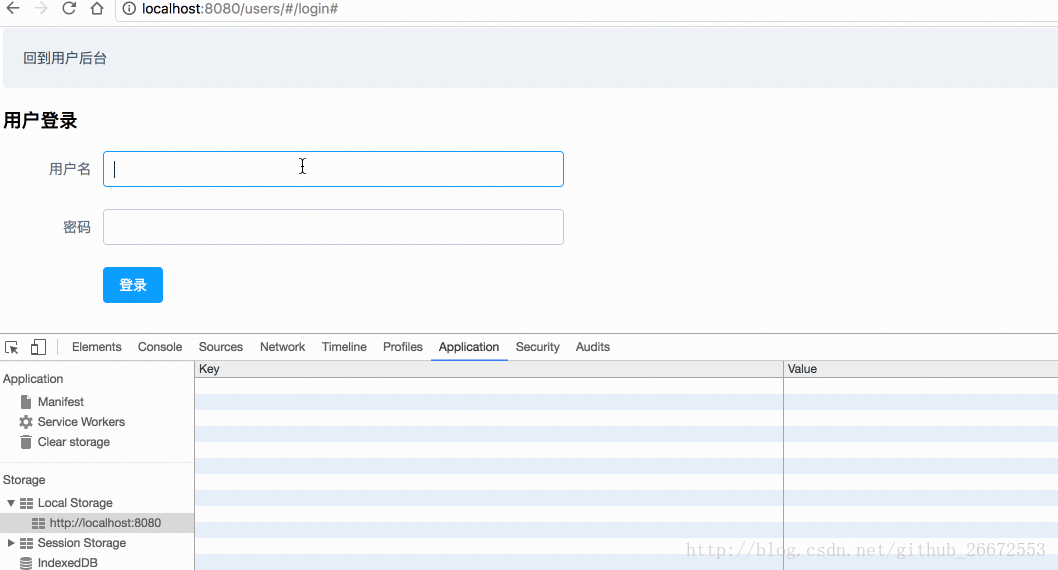
userLogin() method in actions is for calling on the user login page, that is, in userslogin.vue.
userlogin.vue and modify the following code:
localStorage中:
  methods:{
   login(){

    // 这个验证是element-ui框架提供的方法
    this.$refs["users"].validate(function (flag) {
     if(flag){
      /*localStorage.setItem("currentUser",this.UserModel.user_name);
      alert("用户登录成功");*/

      this.$store.dispatch("userLogin",{"user_name":this.UserModel.user_name,"user_pass":this.UserModel.user_pass})
     }else{
      alert("用户名密码必填");
     }
    }.bind(this));
   }
  }
member-index.js of the member backend module:
//引入Module
import ResModule from './../Store/modules/ResModules';
import UsersMoule from "./../Store/modules/UsersModule";
const vuex_config = new Vuex.Store({
 modules: {
  res:ResModule,
  users:UsersMoule
 }
});<a href="##" rel="external nofollow" >{{this.$store.state.users.currentUser.UserName}}</a>
Vue uses the token to jump to the login page after it expires
Vue-resource interceptor determines token failure and jumps
PHP's WeChat official account verification token, reply content, and push message method
The above is the detailed content of Vue generates a token and saves it in the client's localStorage instance.. For more information, please follow other related articles on the PHP Chinese website!


![[Web front-end] Node.js quick start](https://img.php.cn/upload/course/000/000/067/662b5d34ba7c0227.png)


