This article mainly introduces to you the relevant information on how Angular implements recursive display similar to blog comments and obtains data for replying to comments. The article introduces it in detail through sample code, which has certain reference learning value for everyone's study or work. , friends who need it, please follow the editor to learn together.
Preface
We often see a lot of recursive comments in some technology blogs, that is, we can reply to bloggers’ comments, and the interface is very beautiful and has a gradient display format. Recently, I write similar demos in my spare time, so recording them can provide some reference for those who need them.
Okay, stop talking nonsense and get to the point. . .
Thinking
When we write background programs, we often encounter data structures that generate tree-like data. Our intuition is to use recursive methods to achieve it. At first, I thought so too. , that is, write a recursive method in Angular4 to form a string, and then display it on the interface, similar to the code below
@Component({
 selector: "comment",
 template: '{{ comments }}'
})
export class CommentComponent {

 public comments: string = "";

 generateComment(Comment comment) {
 this.comments = this.comments + "<p>" + comment.content + "</p>";
 if (comment.pComment != null) {
  generateComment(comment.pComment);
 }
 }
}I naively thought it was ok, but when I tried it, the tag would not be parsed, and then I remembered that it had been passed Understand the process of parsing tags. . .
Later I thought about it, the current front-end frameworks all claim to be componentized, and Angular4 is no exception. So if a Component can be embedded in any Component, it can definitely embed itself, and there is a concept similar to recursion. Try it immediately as soon as you think of it. . .
Specific implementation
The idea is like this. I defined the format of the data. There is an array of child comments under each comment, instead of each comment having a parent comment. The data format is as follows :
"comments":
  [
  {
   "id": 1,
   "username": "James1",
   "time": "2017-07-09 21:02:21",
   "content": "哈哈哈1<h1>哈哈哈</h1>",
   "status": 1,
   "email": "1xxxx@xx.com",
   "cComments": [
    {
    "id": 2,
    "username": "James2",
    "time": "2017-07-09 21:02:22",
    "content": "哈哈哈2",
    "status": 1,
    "email": "2xxxx@xx.com",
    "cComments": null
   }
   ]
  }
]CommentComponent component implements the comment module, but recursive comments are not implemented in this component, but in the sub-component CommentViewComponent, because CommentComponent also includes a text box for entering comments one by one.
Comment total module ComponentComponent code:
comment.component.ts
@Component({
 selector: 'comment',
 templateUrl: './comment.component.html',
 styleUrls: ['./comment.component.css']
})
export class CommentComponent implements OnInit {

 @Input()
 public comments: Comment[];

 ngOnInit(): void {
 }
}comment.component.html
<p class="container font-small">
 <p class="row">
 <p class="col-lg-8 offset-lg-2 col-md-10 offset-md-1">

  <comment-view [comments]="comments"></comment-view>

  <p class="well" id="comment">
  <h4>{{ 'comment.leaveComment' | translate }}</h4>
  <form role="form">
   <p class="form-group">
   <input type="hidden" [(ngModel)]="id" name="id">
   <textarea [(ngModel)]="content" name="content" class="form-control" rows="5"></textarea>
   </p>
   <button type="submit" class="btn btn-primary">Submit</button>
  </form>
  </p>
 </p>
 </p>
</p>comment.component.css
.media {
 font-size: 14px;
}

.media-object {
 padding-left: 10px;
}Submodule ComponentViewComponent code:
component-view.component.ts
@Component({
 selector: 'comment-view',
 templateUrl: './comment-view.component.html',
 styleUrls: ['./comment-view.component.css']
})
export class CommentViewComponent implements OnInit {
 @Input()
 public comments: Comment[];

 constructor(private router: Router,
    private activateRoute: ActivatedRoute ) {
 }

 ngOnInit(): void {
 }
}component-view.component.html
<p *ngFor="let comment of comments">
 <p class="media">
 <p class="pull-left">
  <span class="media-object"></span>
 </p>
 <p class="media-body">
  <h4 class="media-heading">{{ comment.username }}
  <small class="pull-right">{{ comment.time }} | <a href="#" rel="external nofollow" >{{ 'comment.reply' | translate }}</a></small>
  </h4>
  {{ comment.content }}
  <hr>
  <comment-view *ngIf="comment.cComments != null" [comments]="comment.cComments"></comment-view>
 </p>
 </p>
</p>comonent-view.component.css
.media {
 font-size: 14px;
}

.media-object {
 padding-left: 10px;
}Result
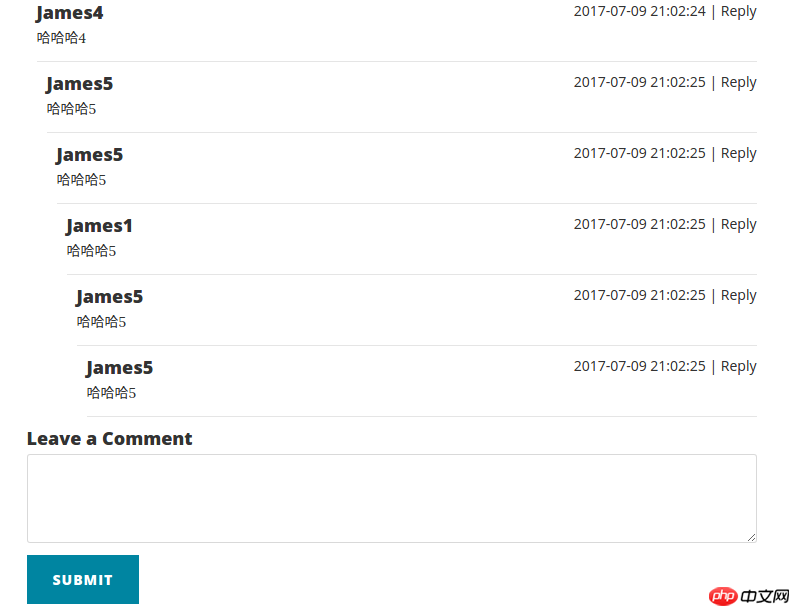
The display result at this time is as shown below:

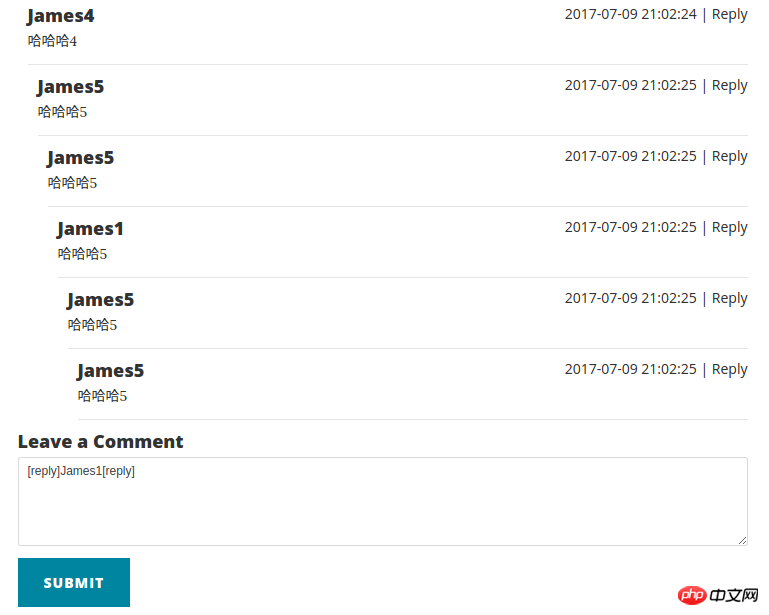
The above only explains how to realize the comment ladder display. In blog comments, we often see that we can reply to a certain comment. This article describes how to obtain the content of the comment and display it in the input box after clicking the reply button of a certain comment. Similar to CSDN blog comments, after clicking reply, the input box is automatically added with [reply]u011642663[/reply]
IDEA
According to the ladder display of comments in the previous article, we still need to implement After clicking to reply, the screen automatically reaches the input box position and the information of the comment clicked to reply is obtained. First, let’s break down this function point. In the project, we will often break down the function point. This function point has two small points: First, add a [reply] button to each comment, and click the reply to jump to the input box; Second, after clicking to reply, the information of the comment that was clicked to reply is obtained. Let’s solve them one by one below.
Jump to the input box
The first language we came into contact with in the previous section is HTML. We know that there is a # positioning in HTML. The following code is briefly explained.
Assume that this HTML code file is index.html
<html>
 <head>
 </head>
 <body>
 <a href="index.html#pointer" rel="external nofollow" >Click me to pointer</a>
 <p id="pointer">
  <h1>哈哈哈哈</h1>
 </p>
 </body>
</html>
As long as you click the link Click me to pointer in the above code, the page will jump to the position of p with id="pointer" . So we can use this method when implementing this click reply to jump to the input box.
We add id="comment" to the comment input box in comment-component.html. The next step is the problem of path splicing. We can get the URL of this page through the url of Angular's Router. path, and then add #comment after the path to achieve the jump. The following is the code to implement this jump function
Add id=”comment”
comment-component.html
<!-- Comment -->
<p class="container font-small">
 <p class="row">
 <p class="col-lg-8 offset-lg-2 col-md-10 offset-md-1">

  <comment-view [comments]="comments" (contentEvent)="getReplyComment($event)" ></comment-view>

  <p class="well" id="comment">
  <h4>{{ 'comment.leaveComment' | translate }}</h4>
  <form role="form">
   <p class="form-group">
   <input type="hidden" [(ngModel)]="id" name="id">
   <textarea [(ngModel)]="content" name="content" class="form-control" rows="5"></textarea>
   </p>
   <button type="submit" class="btn btn-primary">Submit</button>
  </form>
  </p>
 </p>
 </p>
</p>Add to get the current page URL through routing
comment-view.component.ts
@Component({
 selector: 'comment-view',
 templateUrl: './comment-view.component.html',
 styleUrls: ['./comment-view.component.css']
})
export class CommentViewComponent implements OnInit {
 @Input()
 public comments: Comment[];

 // 用于跳转到回复输入框的url拼接
 public url: string = "";

 constructor(private router: Router,
    private activateRoute: ActivatedRoute ) {
 }

 ngOnInit(): void {
 this.url = this.router.url;
 this.url = this.url.split("#")[0];
 this.url = this.url + "#comment";
 }
}Add link href=""
comment-view.component .html
<p *ngFor="let comment of comments">
 <p class="media">
 <p class="pull-left">
  <span class="media-object"></span>
 </p>
 <p class="media-body">
  <h4 class="media-heading">{{ comment.username }}
  <small class="pull-right">{{ comment.time }} | <a href="{{url}}" rel="external nofollow" rel="external nofollow" (click)="reply(comment)" >{{ 'comment.reply' | translate }}</a></small>
  </h4>
  {{ comment.content }}
  <hr>
  <comment-view *ngIf="comment.cComments != null" [comments]="comment.cComments" (contentEvent)="transferToParent($event)"></comment-view>
 </p>
 </p>
</p>This realizes the function point of page jump, and then realizes obtaining the information of the reply comment.
Get reply comment information
有人会说获取回复的评论信息,这不简单么?加个 click 事件不就行了。还记得上一篇文章咱们是如何实现梯形展示评论的么?咱们是通过递归来实现的,怎么添加 click 事件让一个不知道嵌了多少层的组件能够把评论信息传给父组件?首先不具体想怎么实现,我们这个思路是不是对的:把子组件的信息传给父组件?答案是肯定的,我们就是要把不管嵌了多少层的子组件的信息传给 comment.component.ts 这个评论模块的主组件。
Angular 提供了 @Output 来实现子组件向父组件传递信息,我们在 comment-view.component.ts 模块中添加 @Output 向每个调用它的父组件传信息,我们是嵌套的,这样一层一层传出来,直到传给 comment-component.ts 组件。我们看代码怎么实现。
实现代码
comment-view.component.ts
@Component({
 selector: 'comment-view',
 templateUrl: './comment-view.component.html',
 styleUrls: ['./comment-view.component.css']
})
export class CommentViewComponent implements OnInit {
 @Input()
 public comments: Comment[];
 // 点击回复时返回数据
 @Output()
 public contentEvent: EventEmitter<Comment> = new EventEmitter<Comment>();
 // 用于跳转到回复输入框的url拼接
 public url: string = "";

 constructor(private router: Router,
    private activateRoute: ActivatedRoute ) {
 }

 ngOnInit(): void {
 this.url = this.router.url;
 this.url = this.url.split("#")[0];
 this.url = this.url + "#comment";
 }

 reply(comment: Comment) {
 this.contentEvent.emit(comment);
 }

 transferToParent(event) {
 this.contentEvent.emit(event);
 }
}comment-view.component.html
<p *ngFor="let comment of comments">
 <p class="media">
 <p class="pull-left">
  <span class="media-object"></span>
 </p>
 <p class="media-body">
  <h4 class="media-heading">{{ comment.username }}
  <small class="pull-right">{{ comment.time }} | <a href="{{url}}" rel="external nofollow" rel="external nofollow" (click)="reply(comment)" >{{ 'comment.reply' | translate }}</a></small>
  </h4>
  {{ comment.content }}
  <hr>
  <comment-view *ngIf="comment.cComments != null" [comments]="comment.cComments" (contentEvent)="transferToParent($event)"></comment-view>
 </p>
 </p>
</p>comment.component.ts
@Component({
 selector: 'comment',
 templateUrl: './comment.component.html',
 styleUrls: ['./comment.component.css']
})
export class CommentComponent implements OnInit {

 @Input()
 public comments: Comment[];

 // 要回复的评论
 public replyComment: Comment = new Comment();

 public id: number = 0;
 public content: string = "";

 ngOnInit(): void {
 }

 getReplyComment(event) {
 this.replyComment = event;
 this.id = this.replyComment.id;
 this.content = "[reply]" + this.replyComment.username + "[reply]\n";
 }
}comment.component.html
<!-- Comment -->
<p class="container font-small">
 <p class="row">
 <p class="col-lg-8 offset-lg-2 col-md-10 offset-md-1">

  <comment-view [comments]="comments" (contentEvent)="getReplyComment($event)" ></comment-view>

  <p class="well" id="comment">
  <h4>{{ 'comment.leaveComment' | translate }}</h4>
  <form role="form">
   <p class="form-group">
   <input type="hidden" [(ngModel)]="id" name="id">
   <textarea [(ngModel)]="content" name="content" class="form-control" rows="5"></textarea>
   </p>
   <button type="submit" class="btn btn-primary">Submit</button>
  </form>
  </p>
 </p>
 </p>
</p>解释一下代码逻辑:
我们在 comment-view.component.ts 添加以下几点:
定义了@Output() contentEvent
添加了reply(comment: Comment) 事件在点击回复的时候触发的,触发的时候 contentEvent 将 comment 传到父模块
添加 transferToParent(event) 是接受子组件传来的 event, 并且继续将 event 传到父组件
在 comment.component.ts 中定义了 getReplyComment(event) 方法,该方法接收子组件传递来的评论信息,并将信息显示在页面上。大功告成。。。
效果图

相关推荐:
如何PHP制作简易博客
The above is the detailed content of Detailed example of how Angular implements recursive display of blog comments and obtains data for reply comments. For more information, please follow other related articles on the PHP Chinese website!
 switch statement usage
 ICP coin prospect analysis
 How to skip network connection during win11 installation
 Check out the top ten cryptocurrencies worth investing in
 What does wifi deactivated mean?
 What are the problems with using php
 The latest prices of the top ten virtual currencies
 disk recovery data


