


vue-router is the official routing plug-in of Vue.js. It is deeply integrated with vue.js and is suitable for building single-page applications. Vue's single-page application is based on routing and components. Routing is used to set access paths and map paths and components. Traditional page applications use some hyperlinks to achieve page switching and jumps. In the vue-router single-page application, it is switching between paths, that is, switching of components.
vue-router
We know that routing defines a series of access address rules, and the routing engine finds the corresponding processing page based on these rule matches. , and then forwards the request to the page for processing. It can be said that all back-end development does this, but there is no such thing as "request" in front-end routing.
Front-end routing is to find a component or object whose address matches and render it. There are two ways to change the browser address without sending a request to the server.
One is to add # to the address to deceive the browser. The change of address is due to in-page navigation; the other is to use the HTML5 window. The history function uses the hash of the URL to simulate a complete URL.
vue-router is a set of dedicated routing tool libraries provided by the official, and is a plug-in for vue. We need to introduce it into the vue instance through vue.use() in the global reference,

After using vue-cli to create the project (vue-router confirms y during init initialization)
Let’s first take a look at the structure of the project src and enter the project through cmd In the src directory, execute tree -f > list.txt Generate a structure tree (saved in list.txt):
The structure is as follows:
src
├─assets // 静态资源
│ └─image // 图片
│
├─components // 组件
│ └─HelloWorld
│  HelloWorld.vue
│
└─router // 路由配置
│ └─index.js
│
│ App.vue // 默认程序入口
│ main.js
│
1. Open main.js:
import Vue from 'vue'
import App from './App'
import router from './router'
Vue.config.productionTip = false
/* eslint-disable no-new */
new Vue({
 el: '#app',
 router,
 render: h => h(App)
})Line 10 binds the configured route to the vue instance, line 11 Use the render method in the vue instance to draw the vue component (App) to complete the initialization
Render is a new and unique method of vue2. In order to get better running speed, vue2 also uses something similar to react Virtual Dom
2. Then we register several components in components
3. Open router/index.js to configure routing
import Vue from 'vue'
import Router from 'vue-router'
import Singer from '@/components/rank/rank'
Vue.use(Router) // 注册router
export default new Router({
 routes: [
 {
 path: '/',
 name: 'Hello',
 component: MHeader // 路由中指定组件
 },
 {
 path: '/rank',
 name: 'rank',
 component: Rank
 }
 ]
})Routing mode
Keywords: "mode", "history Mode", "hash mode", "Abstract mode"
We can use the mode in the created Router, such as the parameter mode:history, this value means to use history mode, this mode makes full use of the history.pushState API to complete the URL jump without reloading the page.
If does not use the history mode, when When accessing rank, the route will become:
http://localhost/#rank
and vice versa:
http://localhost/rank
This is the difference between history mode and hash mode. In addition, there is an abstract mode
Hash: Use URL hash value as routing,
History: Depends on HTML5 History API and server configuration
Abstract: Supports all JavaScript running environments, such as node server. If it is found that there is no browser API, the routing will be forced into this mode
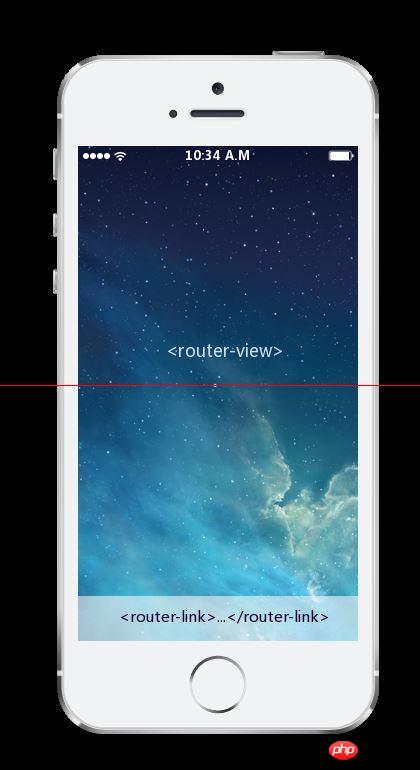
Routing and Navigation
Keywords: "router-link", "router-view"
vue-router provides two command tag components to handle this navigation and automatic rendering logic:
We use two label components to complete a simple page layout:
There is a principle to be clear when using routing That is: Do not directly reference the route definition (that is, do not directly use to='contents/rank/rank' in router-link to direct the route). Once the URL that explicitly references the route definition changes, all All references must be modified.
Refer to the route by name in router-link: pass an object to the to attribute to explicitly declare the name of the route:
Pay attention to the use of v-bind binding (abbreviation:) here, because what needs to be passed to router-link here is an object { name:'rank' } instead of a string
Dynamic routing
Keywords: "Dynamic routing parameters", "params", "$router.params"
vue-router将参数融入到路由的路径定义之内成为路由的一部分,我们称这种参数为"动态路径参数";
使用非常简单,在参数名之前加上":",然后将参数写在路由定义的path内,
 routers:[{
 name:'BookDetails',
 path:'books/:id',
 component:BookDetails
}]1、这样定义之后,vue-router就会自动匹配/books/1、/books/2、...、/books/n 形式的路由模式,因为这样定义的路由的数量是不确定的,所以也称为"动态路由"。
2、在
<router-link :to="{ name:'BookDetails',params:{ id:1 } }">
//...
</router-link>3、当我们导航进入图书详情页之后,我们可能需要获取属性指定的参数值(即重新将:id参数读取出来),我们可以通过$router.params来完成:
 export default {
 created () {
  const bookID = this.$router.params.id
 }
}嵌套式路由
关键词:"children",
我们利用下面的场景,首页/home/读书详情 页面,读书详情也我们不需要底部的导航区域,但是我们使用之前的路由定义,所有的页面都应该具有想用的底部导航条,按前面的路由结构是不可以导航到图书详情页的,如下:
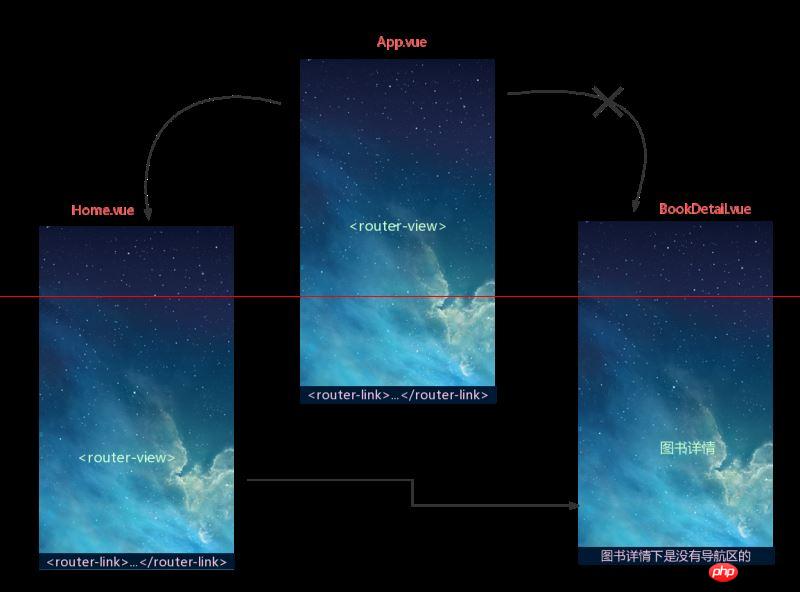
所以我们就需要另一种定义路由的方式,对前面的路由进行调整,
嵌套式路由又叫做子路由,要将路由显示到子视图中就要相应的子路由与之对应,我们只需要在路由定义中使用children数组属性就可以定义子路由了:
routers:[
 {
  name:'Main',
  path:'/',
  component:Main,
  children:[
  { name:'Home',path:'home',component:Home }
  { name:'Me',path:'me',component:Me }
  ]
 },
 { name:'BookDetail',path:'/books/:id',component:BookDetail }
]需要注意的是以"/"开头的嵌套路径会被当做根路径,所以不要在子路由上加上"/";
重定向路由与别名
关键词:"redirect","alias"
重定向也是通过 routes 配置来完成,下面例子是从 /a 重定向到 /b:
 routes: [
 { path: '/a', redirect: '/b' }
 ]
// 重定向的目标也可以是一个命名的路由
 routes: [
 { path: '/a', redirect: { name: 'foo' }}
]另外我们需要区别重定向和别名,『重定向』的意思是,当用户访问 /a时,URL 将会被替换成 /b,然后匹配路由为 /b,那么『别名』又是什么呢?
/a 的别名是 /b,意味着,当用户访问 /b 时,URL 会保持为 /b,但是路由匹配则为 /a,就像用户访问 /a 一样:
利用alias给路由设置别名
 routes: [
 { path: '/a', component: A, alias: '/b' }
]总结
到这里vue路由的基础我们已经总结完毕,我们需要在实战中不断练习,多多的去解决问题,方能更好的使用路由 帮我们完成任务,同时为vue进阶的路由知识打基础。
相关推荐:
The above is the detailed content of Detailed explanation of vue-router routing and navigation between pages. For more information, please follow other related articles on the PHP Chinese website!
 What to do if an error occurs in the script of the current page
 How to unlock oppo phone if I forgot password
 mysql error 10060
 What are the application scenarios of PHP singleton mode?
 What does vram mean?
 A complete list of alter commands in Mysql
 Detailed explanation of linux dd command
 How to buy and sell Bitcoin on Ouyi platform


![[Web front-end] Node.js quick start](https://img.php.cn/upload/course/000/000/067/662b5d34ba7c0227.png)


