
The following editor will bring you an example of how to implement permission management functions in PHP. The editor thinks it’s pretty good, so I’ll share it with you now and give it as a reference. Let’s follow the editor to take a look.
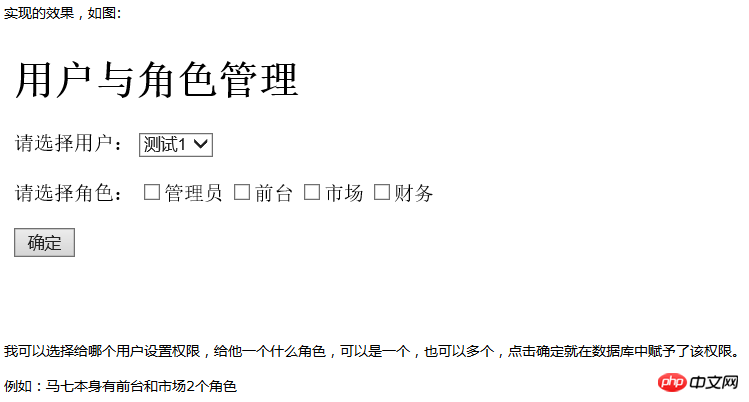
Permission management system is mainly used to set different permissions for different users, so that users with different permissions can use different functions after logging in.
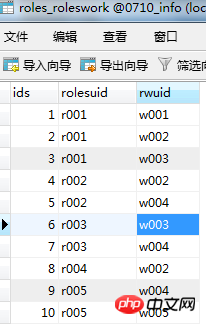
First look at the database
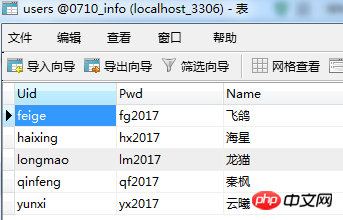
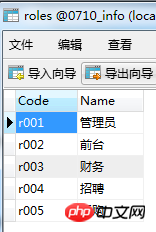
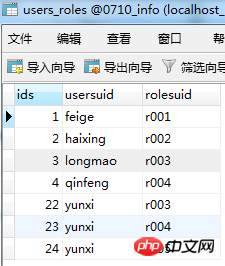
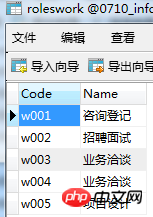
1.Admin page RBAC.php
##
<!DOCTYPE html>
<html>
<head>
<meta charset="UTF-8">
<title>权限管理</title>
<script src="bootstrap/js/jquery-1.11.2.min.js"></script>
</head>
<body>
<h2>用户与角色管理</h2>
<p>
请选择用户:
<select id="user">
<?php
require_once "./DBDA.class.php";
$db = new DBDA();
$sql = "select * from users";
$arr = $db->query($sql,0);
foreach($arr as $v){
echo "<option value='{$v[0]}'>{$v[2]}</option>";
}
?>
</select>
</p>
<br />
<p>
请选择角色:
<?php
$sql = "select * from roles";
$arr = $db->query($sql,0);
foreach($arr as $v){
echo "<input type='checkbox' class='ck' value='{$v[0]}'>{$v[1]}";
}
?>
</p>
<br />
<input type="button" value="确认" id="btn"/>
</body>
<script>
sel(); //选中默认角色
$("#user").change(function(){
//当用户选中变化的时候,去选中相应角色
sel();
})
//点击确定保存角色信息
$("#btn").click(function(){
var uid = $("#user").val();
var ck = $(".ck");
var role = "";//初始为空
for(i=0;i<ck.length;i++){
var v = ck.eq(i).val();
if(ck.eq(i).prop("checked")){
role += ck.eq(i).val()+"|";
}
}
$.ajax({
type:"POST",
url:"RBbtnchuli.php",
data:{uid:uid,role:role},
dataType:"TEXT",
success:function(data){
alert("修改成功!");
}
});
})
//选中默认角色的封装方法
function sel(){
var uid = $("#user").val();
$.ajax({
url:"RBchuli.php",
data:{uid:uid},
type:"POST",
dataType:"TEXT",
success:function(data){
var role = data.split("|");
var ck = $(".ck");
ck.prop("checked",false);
for(i=0;i<ck.length;i++){
var v = ck.eq(i).val();
if(role.indexOf(v)>=0){
ck.eq(i).prop("checked",true);
}
}
}
});
}
</script>
</html>2. The processing page for administrator RBchuli.php
<?php
$uid = $_POST["uid"];
require_once "./DBDA.class.php";
$db = new DBDA();
$sql = "select rolesuid from users_roles where usersuid='{$uid}'";
echo $db->StrQuery($sql,0); 保存角色信息的处理页面RBbtnchuli.php<?php
$uid = $_POST["uid"];
$role = $_POST["role"];//字符串
$role = substr($role,0,strlen($role)-1);
$arr = explode("|", $role);
require_once "./DBDA.class.php";
$db = new DBDA();
//删除
$sdel = "delete from users_roles where usersuid='{$uid}'";
$db->query($sdel);
//添加
foreach($arr as $v){
$sql = "insert into users_roles values(0,'{$uid}','{$v}')";
$db->query($sql);
}
##The next thing to do is to log in to an account. Check your own functions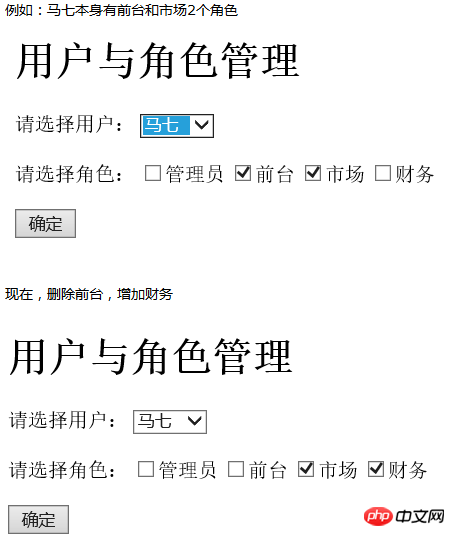
##
<!DOCTYPE html>
<html>
  <head>
    <meta charset="UTF-8">
    <title></title>
    <script src="bootstrap/js/jquery-1.11.2.min.js"></script>
    <script src="bootstrap/js/bootstrap.min.js"></script>
    <link href="bootstrap/css/bootstrap.min.css" rel="external nofollow" rel="stylesheet" type="text/css"/>
  </head>
  <style>
    .title{
      margin-left: 600px;
      margin-top: 150px;
    }
    .quanju{
      margin-left: 450px;
      margin-top: -180px;
    }
    .name,.pwd{
      max-width: 120px;
    }
    .yangshi1{
      margin-top: 200px;
    }
  </style>
  <body>
<form class="form-horizontal" role="form" action="RBloginchuli.php" method="post">
  <h3 class="title">用户登录</h3>
  <p class="quanju">
      <p class="form-group yangshi1">
        <label for="firstname" class="col-sm-2 control-label">用户名:</label>
        <p class="col-sm-10">
          <input type="text" class="form-control name" name="uid" placeholder="请输入用户名">
        </p>
      </p>
      <p class="form-group yangshi2">
        <label for="lastname" class="col-sm-2 control-label">密码:</label>
        <p class="col-sm-10">
          <input type="text" class="form-control pwd" name="pwd" placeholder="请输入密码">
        </p>
      </p>
      <p class="form-group">
        <p class="col-sm-offset-2 col-sm-10">
          <p class="checkbox">
            <label>
            <input type="checkbox">
            保存密码 </label>
            <label>
            <input type="checkbox">
            下次自动登录 </label>
          </p>
        </p>
      </p>
      <p class="form-group">
        <p class="col-sm-offset-2 col-sm-10">
          <button type="submit" class="btn btn-warning" value="登录" onclick="return login()" >
          登录
          </button>

        </p>
      </p>
    </p>
  </form>
  </body>
</html>
4. Login page processing page RBloginchuli.php
<?php
session_start();
$uid = $_POST["uid"];
$pwd = $_POST["pwd"];
require_once "./DBDA.class.php";
$db = new DBDA();
$sql = "select pwd from users where uid='{$uid}'";
$mm = $db->StrQuery($sql,0);
if(!empty($pwd) && $pwd==$mm){
$_SESSION["uid"] = $uid;
header("location:RBmain.php");
}else{
echo "<script>alert('用户名或密码有误!')</script>";
}
5. Finally, make the user’s main page RBmain. php
<!DOCTYPE html>
<html>
<head>
<meta charset="UTF-8">
<title>权限主页面</title>
</head>
<body>
<?php
session_start();
if(empty($_SESSION["uid"])){
header("location:RBlogin.php");
exit;
}
$uid = $_SESSION["uid"];
require_once "./DBDA.class.php";
$db = new DBDA();
//子查询
$sql = "select * from roleswork where code in (select * from roles_roleswork where rolesuid in (select * from users_roles where usersuid='{$uid}'))";
$arr = $db->query($sql,0);
foreach($arr as $v){
echo "<p class='menu'>{$v[1]}</p>";
}
?>
</body>
</html>The effect is as shown:
The above is the detailed content of How to implement PHP permission management function. For more information, please follow other related articles on the PHP Chinese website!


