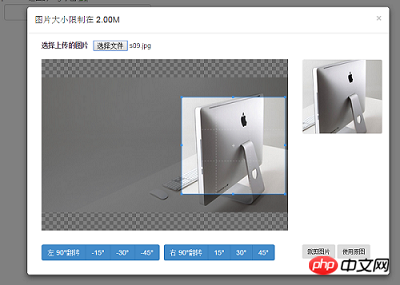
thinkphp5.0 image upload plug-in can preview cropped images and save original images. After cropping images, the directory of the original cropped images will be deleted to reduce space. For the specific implementation code, please refer to this article
Effect preview:

The main functions of this plug-in are: preview the cropped image and save the original image, and perform cropping of the image The cropped original image directory will be deleted later to reduce space.
1. Download attachment
Address: Link: https://pan.baidu.com/s/1nuQ4NgP Password: 4pbu
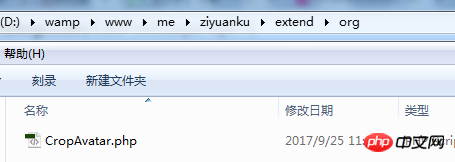
2. Put the CropAvatar.php in the attachment into the extend/org directory of your own program directory. If you encounter an exif_imagetype error, you need to open extension=php_exif.dll in php.ini

3. common.php public function
Find the common.php file in the application directory and add the common function in it:
/**
 * 转换字节
 * @param $bytes 传入字节数值
 * @param int $decimals
 * @return string BKMGTP
 */
function human_filesize($bytes, $decimals = 2) {
 $sz = 'BKMGTP';
 $factor = floor((strlen($bytes) - 1) / 3);
 return sprintf("%.{$decimals}f", $bytes / pow(1024, $factor)) . @$sz[$factor];
}
/**
 * 删除该目录以及该目录下面的所有文件和文件夹
 * @param $dir 目录
 * @return bool
 */
function removeDir($dirName) {
 //判断传入参数是否目录,如不是执行删除文件
 if (!is_dir($dirName)) {
  //删除文件
  @unlink($dirName);
 }
 //如果传入是目录,使用@opendir将该目录打开,将返回的句柄赋值给$handle
 $handle = @opendir($dirName);
 //这里明确地测试返回值是否全等于(值和类型都相同)FALSE
 //否则任何目录项的名称求值为 FALSE 的都会导致循环停止(例如一个目录名为“0”)
 while (($file = @readdir($handle)) !== false) {
  //在文件结构中,都会包含形如“.”和“..”的向上结构
  //但是它们不是文件或者文件夹
  if ($file != '.' && $file != '..') {
   //当前文件$dir为文件目录+文件
   $dir = $dirName . '/' .$file;
   //判断$dir是否为目录,如果是目录则递归调用reMoveDir($dirName)函数
   //将其中的文件和目录都删除;如果不是目录,则删除该文件
   is_dir($dir) ? removeDir($dir) : @unlink($dir);
  }
 }
 closedir($handle);
 return rmdir($dirName);
}4. Modify the configuration file
Find the configuration file config.php in the application directory, Add in the configuration:
//上传配置 根目录前需添加 一个 .
 'syc_images' => [
  //缩图保存位置
  'thumb' => './uploads/thumbs',
  //附件图片保存位置
  'image' => './uploads/images',
  //裁剪的原始图片保存位置
  'original' => './uploads/original',
  //上传限制 2*1024*1024
  'size' => 2097152,
 ],
5. Place the file-thumd-modal.html file in the view folder as a template file, such as:

6. Controller, the Thumbs.php file in the attachment is a sample controller. You can take the controller to your program directory and modify the namespace, method name, etc. , there is a method in this controller: index(), which is the method called when uploading files. If you want to display a page for selecting files, you need to write an operation method yourself, such as: test().
##
public function test() {
  return $this->fetch();
 }
public function index() {
 .....
}<!DOCTYPE html>
//id="art-thumb" 返回的图片地址
//id="preview" 返回的 img 小图
//该页面需引入bootstrap的js,css和jquery等文件
<head>
<script src="__STATIC__/dist/js/jquery-1.11.2.min.js"></script>
<script src="__STATIC__/dist/js/bootstrap.min.js"></script>
<link rel="stylesheet" href="__STATIC__/dist/css/bootstrap.min.css" rel="external nofollow" type="text/css" />
</head>
<body class="page-header-fixed">
<img src="./public/uploads/thumbs/20170925/20170925135203666.png" />
<p class="form-group">
<label class="control-label col-md-2">浓缩图片</label>
<p class="col-md-3"><input type="text" name="art_thumb" id="art-thumb" class="form-control"></p>
<p class="col-md-2">
{// 调用 avatar-view}
<a class="btn red btn-outline sbold avatar-view"> 选择图片</a>
</p>
<p class="col-md-3"><p id="preview"></p></p>
</p>
{// file-thumd-modal.html 可以引用到其他页面要用到的地方}
{// 引入上传图片modal}
{include file="public/file-thumd-modal"}
<script language="javascript" type="text/javascript">
$(function () {
var $imgp = $('.avatar-wrapper');
$imgp.find('img').cropper({aspectRatio:NaN}); //设置自由裁剪, NaN 为自由裁剪,此为覆盖默认 1:1比例裁剪框
})
</script>
</body>The above is the detailed content of Introduction to the plug-in for image upload in ThinkPHP5.0. For more information, please follow other related articles on the PHP Chinese website!


