This article mainly introduces the method of connecting small programs to Qiniu Cloud Storage. The editor thinks it is quite good, so I will share it with you now and give it as a reference. Let’s follow the editor and take a look.
Foreword:
I have been doing small programs for a while. Let me summarize the technical points I have made. , hereby contribute to my friends! In the project, there are three types of image storage, video storage, and recording storage that require cloud docking storage.
1. Upload pictures/videos/recordings for Qiniu docking
Preparation work:
a. You need to have a Qiniu account. After real-name authentication, there is a secret key management in Qiniu's personal center - there is a pair of secret keys in it, which are necessary for uploading. This pair of secret keys is configured in the backend. During configuration, you can set the allowed upload format, or you can set it to upload in any format. Let our backend brother do it slowly. In addition, you also need to create a new storage space in Qiniu's object storage. The files to be uploaded will be stored in the space you created. If you want to facilitate management, you can also create a storage space for pictures/videos/recordings/others. This storage space name must also be configured on the backend.
b. An upload token is required. One file upload corresponds to one token, which is necessary. Uploading tokens is also time-sensitive. The backend configuration takes 1 hour, which is enough for you to complete the upload operation. This token is generated by our own backend, and the frontend adjusts the interface to obtain the token, or like me, just throw the interface directly behind [uptokenURL], and Qiniu will get it by itself. We can also get the token ourselves first and then throw it to Qiniu.
uptokenURL:'https://get.qiniutoken.com/minibx/geo_f/gain_qn_toke',
uploadURL:'https://up.qbox.me',//华东
uptoken: token,uploadURL:'https://up.qbox.me',//华东
c. Qiniu’s js file qiniuUploader.js can be downloaded from the Qiniu address given below. There is an SDK for small programs inside. Unzip it and find qiniuUploader.js inside. Import this js on the page you need to upload. https://developer.qiniu.com/sdk#community-sdk
1. Image upload Qiniu
provides users with the ability to add local Picture, or take a photo, and then you will get the temporary path of the picture returned by the method. We can maintain the images in an array, so that when uploading Qiniu, they will be uploaded in the form of a queue.
constqiniuUploader = require("../../libs/qiniuUploader.js");
var sourceType = [['camera'], ['album'], ['camera','album']];
var sizeType = [['compressed'], ['original'], ['compressed','original']];
var imageArray = [];// 点击事件,从本地相册选择图片或使用相机拍照。
chooseImage: function (e) {
var that =this;
wx.chooseImage({
sourceType: sourceType[this.data.sourceTypeIndex],
sizeType: sizeType[this.data.sizeTypeIndex],
count:this.data.count[this.data.countIndex],//这个count可以用来删除当前图片
success: function (res) {
// 返回照片的本地文件路径,tempFilePath可以作为img标签的src属性显示图片vartempFilePaths = res.tempFilePaths;
imageArray.push(tempFilePaths);
that.setData({
imageList: tempFilePaths
})
that.pictureUploadqiniuMethod(imageArray,"tupian_");
},
})
},
//得到图片路径数组后,准备上传七牛
pictureUploadqiniuMethod: function (imageArray, fileHead){
var that =this;
for(vari =0; i < imageArray.length; i++) {
var filePath = imageArray[i];
var imgName = filePath.substr(30,50);
qiniuUploader.upload(filePath, (res) => {
//上传成功,上传成功一张图片,进入一次这个方法,也就是返回一次
console.log(res)
},
(error) => {
//图片上传失败,可以在七牛的js里面自己加了一个err错误的返回值console.log('error: '+ error)
},
{
domain:'oqxfq54dn.bkt.clouddn.com',
uptokenURL:'https://get.qiniutoken.com/minibx/geo_f/gain_qn_token',
uploadURL:'https://up.qbox.me',//华东key: fileHead + imgName,// 自定义文件 keyregion:'ECN',
});
}
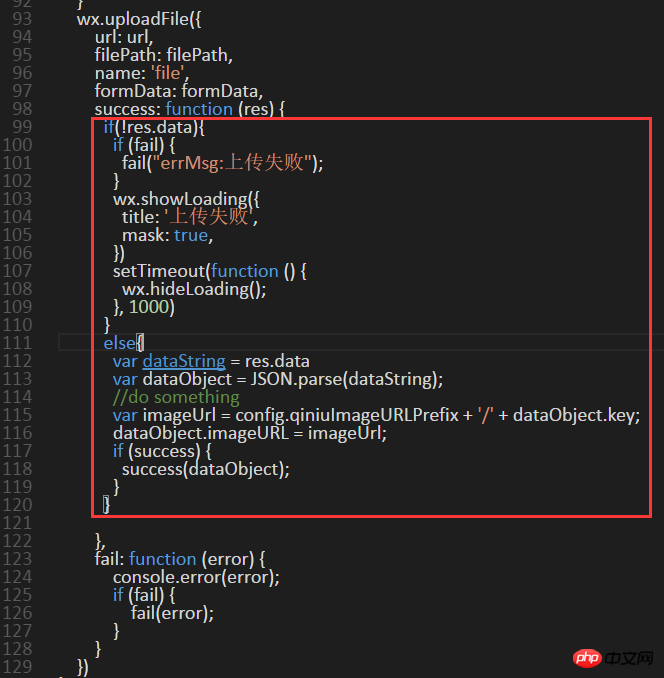
},The code in the red line box is in the Qiniu qiniuUploader.js file. I added an if judgment to prevent data from being returned even though the upload was successful. In this way, the return is obtained in line 112 of the code. data, an error will not be reported directly.

Explanation:
imageArray: Temporary address array of images to be uploaded.
fileHead: Customize the header of uploaded Qiniu file name. In order to distinguish uploaded files, such as pictures/videos/recordings/others,
imgName: Customize the uploaded Qiniu file name, front-end processing Well, I simply intercepted the 30-50 characters of the temporary path (filePath) as the file name stored in Qiniu. Even if you add two identical pictures, the temporary path given to you by the mini program will be different. So there will be no duplication of names.
domain: used when downloading resources. If set, the res.ImageURL field returned in the success after uploading is a directly accessible file address with http, otherwise you need to splice it yourself.
key: The file name finally stored in Qiniu. The image file name here = file header (fileHead) + pseudo file name (imgName)
uploadURL: The one uploaded to Qiniu The storage area, upload area and upload area code must correspond.
region: Upload region code.
shouldUseQiniuFileName: Indicates whether Qiniu defines the uploaded file name. If it is true, the file key is assigned by the qiniu server (global deduplication). The default is false, which is defined by ourselves. If the key is set, the priority is the highest.
Qiniu storage area table:

In this way, you can upload by calling QiniuUploader.js on the page that needs to be uploaded .
Problems you will encounter:
Possible reasons for failure to upload a certain picture/video/recording:
①The uploaded file is not supported by the backend Allowed size, pictures are generally smaller than 3M. My video/recording limit is less than 1M
②The uploaded file format is not allowed in the backend.
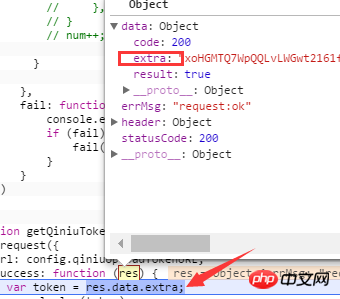
③Token acquisition failed. For example, what I encountered was that Qiniu’s qiniuUploader.js file obtains the token through the interface. The default is [var token = res.data.token;], and our backend interface returns The token is like this

#So I need to change it in Qiniu’s js file to [var token = res.data.extra;], or let the backend change it.
2. Video Upload Qiniu
Video uploading and picture uploading are the same routine, but the file formats are different. Videos are generally just one file, unlike pictures with multiple , you need to create a queue to upload. So upload the video like this:
//事件绑定,添加视频

chooseVideo: function (res) {

  var that =this;

  wx.chooseVideo({

    sourceType: sourceType[this.data.sourceTypeIndex],

    camera: camera[this.data.cameraIndex],

    maxDuration: duration[this.data.durationIndex],

    success: function (res) {

    var shipinFile= res.tempFilePath;

    that.setData({

    src: shipinFile

  });

    //用户寻选择好图片后,调用上传方法

    that.shipinUploadqiniuMethod(shipinFile,"shipin_");

    }

  })

},

//视频上传七牛

shipinUploadqiniuMethod: function (shipinFile, fileHead){

    var that =this;

    var shipinName = shipinFile.substr(30,50);

    qiniuUploader.upload(shipinFile, (res) => {

    //视频上传成功console.log(res)

  },

  (error) => {

    //视频上传失败,可以在七牛的js里面自己加了一个err错误的返回值

    console.log('error: '+ error)

  },

  {

    domain:'oqxfq54dn.bkt.clouddn.com',

    uptokenURL:'https://get.qiniutoken.com/minibx/geo_f/gain_qn_token',

    uploadURL:'https://up.qbox.me',//华东

    key: fileHead + shipinName ,// 自定义文件 keyregion:'ECN',//华东区域代码});

  }

},3、录音文件上传七牛
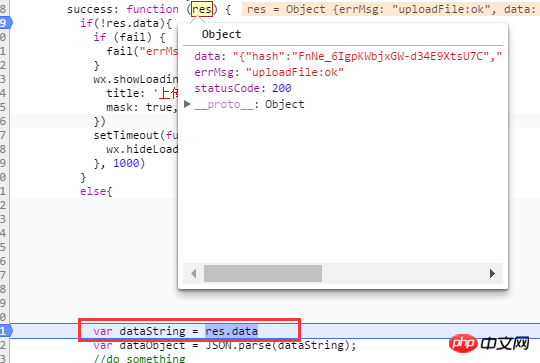
小程序的录音格式为silk,录音上传七牛,可以和视频共用一个方法。但虽然上传成功了,状态码为403,七牛没有返回data,像这样:

正常上传时,能正常返回data,并且状态码是200

后端配置silk格式允许,这样应该是没问题的。

上传成功七牛却没有返回data,这个data里有文件传七牛那边在线地址,不返回我们怎么访问了。现在的处理是:把音频文件传到自己服务器。目前就只能这么办了。
The above is the detailed content of An example of how WeChat applet can be connected to Qiniu Cloud Storage. For more information, please follow other related articles on the PHP Chinese website!


