This article mainly introduces the introduction of echart. The editor thinks it is quite good. Now I will share it with you and give you a reference. Let’s follow the editor to take a look
1. Download the plug-in
The following is the download link for ECharts. It should be noted that ECharts also relies on Another plug-in is called ZRender. Of course, ZRender is not required for most charts, but ZRender is required for map controls and other complex rendering controls. In order to avoid unnecessary problems, it is recommended that you also download ZRender when downloading ECharts.
ECharts download address: http://echarts.baidu.com/
ZRender download address: http://ecomfe.github.io/zrender/index. html
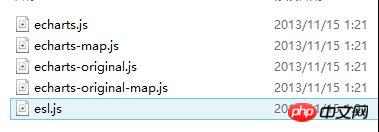
After downloading, unzip the respective file directory structures as follows:
ECharts:

ZRender:

##2. Plug-in reference


3. Specific use in the page
MapChart
Add a reference to echarts in the head tag as follows:
<head runat="server">
  <title></title>
  <script src="echarts/esl.js" type="text/javascript"></script>
</head>
<body>

<p id="main"style="height:500px;border:1px solid #ccc;padding:10px;"></p>

……………

……………

</body>
<script type="text/javascript">
//为模块加载器配置echarts的路径,这里主要是配置map图表的路径,其他的图表跟map的配置还不太一样,下边也会做另一种类型的图表事例。
这里引用的主要是echarts文件夹下的echarts-map文件,而其他类型的图表引用的都是echarts文件夹下的echarts文件。
require.config({
paths: {
echarts:'./echarts/echarts',
'echarts/chart/map':'./echarts/echarts-map'
}
});
//动态加载echarts,在回掉函数中使用,要注意保持按需加载结构定义图表路径
require(
[
'echarts',
'echarts/chart/map'
],
function (ec) {
varmyChart=ecinit(documentgetElementById('main'));
//option主要是图标的一些设置,这不是这篇文章的重点,关于具体的设置可以参考官方的文档说明文档
option= {
title: {
text:'iphone销量',
subtext:'纯属虚构',
x:'center'
},
tooltip: {
trigger:'item'
},
legend: {
orient:'vertical',
x:'left',
data: ['iphone3','iphone4','iphone5']
},
dataRange: {
min:0,
max:2500,
text: ['高','低'],
calculable:true,
textStyle: {
color:'orange'
}
},
toolbox: {
show:true,
orient:'vertical',
x:'right',
y:'center',
feature: {
mark:true,
dataView: { readOnly:false },
restore:true,
saveAsImage:true
}
},
series: [
{
name:'iphone3',
type:'map',
mapType:'china',
selectedMode: 'single',
itemStyle: {
normal: { label: { show:true },color:'#ffd700' },// for legend
emphasis: { label: { show:true} }
},
data: [
{ name:'北京',value:Math.round(Math.random() *1000) },
{ name:'天津',value:Math.round(Math.random() *1000) },
{ name:'上海',value:Math.round(Math.random() *1000) },
{ name:'重庆',value:Math.round(Math.random() *1000) },
{ name:'河北',value:Math.round(Math.random() *1000) },
{ name:'河南',value:Math.round(Math.random() *1000) },
{ name:'云南',value:Math.round(Math.random() *1000) },
{ name:'辽宁',value:Math.round(Math.random() *1000) },
{ name:'黑龙江',value:Math.round(Math.random() *1000) },
{ name:'湖南',value:Math.round(Math.random() *1000) },
{ name:'安徽',value:Math.round(Math.random() *1000) },
{ name:'山东',value:Math.round(Math.random() *1000) },
{ name:'新疆',value:Math.round(Math.random() *1000) },
{ name:'江苏',value:Math.round(Math.random() *1000) },
{ name:'浙江',value:Math.round(Math.random() *1000) },
{ name:'江西',value:Math.round(Math.random() *1000) },
{ name:'湖北',value:Math.round(Math.random() *1000) },
{ name:'广西',value:Math.round(Math.random() *1000) },
{ name:'甘肃',value:Math.round(Math.random() *1000) },
{ name:'山西',value:Math.round(Math.random() *1000) },
{ name:'内蒙古',value:Math.round(Math.random() *1000) },
{ name:'陕西',value:Math.round(Math.random() *1000) },
{ name:'吉林',value:Math.round(Math.random() *1000) },
{ name:'福建',value:Math.round(Math.random() *1000) },
{ name:'贵州',value:Math.round(Math.random() *1000) },
{ name:'广东',value:Math.round(Math.random() *1000) },
{ name:'青海',value:Math.round(Math.random() *1000) },
{ name:'西藏',value:Math.round(Math.random() *1000) },
{ name:'四川',value:Math.round(Math.random() *1000) },
{ name:'宁夏',value:Math.round(Math.random() *1000) },
{ name:'海南',value:Math.round(Math.random() *1000) },
{ name:'台湾',value:Math.round(Math.random() *1000) },
{ name:'香港',value:Math.round(Math.random() *1000) },
{ name:'澳门',value:Math.round(Math.random() *1000) }
]
},
{
name:'iphone4',
type:'map',
mapType:'china',
selectedMode: 'single',
itemStyle: {
normal: { label: { show:true },color:'#ff8c00' },// for legend
emphasis: { label: { show:true} }
},
data: [
{ name:'北京',value:Math.round(Math.random() *1000) },
{ name:'天津',value:Math.round(Math.random() *1000) },
{ name:'上海',value:Math.round(Math.random() *1000) },
{ name:'重庆',value:Math.round(Math.random() *1000) },
{ name:'河北',value:Math.round(Math.random() *1000) },
{ name:'安徽',value:Math.round(Math.random() *1000) },
{ name:'新疆',value:Math.round(Math.random() *1000) },
{ name:'浙江',value:Math.round(Math.random() *1000) },
{ name:'江西',value:Math.round(Math.random() *1000) },
{ name:'山西',value:Math.round(Math.random() *1000) },
{ name:'内蒙古',value:Math.round(Math.random() *1000) },
{ name:'吉林',value:Math.round(Math.random() *1000) },
{ name:'福建',value:Math.round(Math.random() *1000) },
{ name:'广东',value:Math.round(Math.random() *1000) },
{ name:'西藏',value:Math.round(Math.random() *1000) },
{ name:'四川',value:Math.round(Math.random() *1000) },
{ name:'宁夏',value:Math.round(Math.random() *1000) },
{ name:'香港',value:Math.round(Math.random() *1000) },
{ name:'澳门',value:Math.round(Math.random() *1000) }
]
},
{
name:'iphone5',
type:'map',
mapType:'china',
selectedMode: 'single',
itemStyle: {
normal: { label: { show:true },color:'#da70d6' },// for legend
emphasis: { label: { show:true} }
},
data: [
{ name:'北京',value:Math.round(Math.random() *1000) },
{ name:'天津',value:Math.round(Math.random() *1000) },
{ name:'上海',value:Math.round(Math.random() *1000) },
{ name:'广东',value:Math.round(Math.random() *1000) },
{ name:'台湾',value:Math.round(Math.random() *1000) },
{ name:'香港',value:Math.round(Math.random() *1000) },
{ name:'澳门',value:Math.round(Math.random() *1000) }
]
}
]
};
//以下的这段代码主要是用来处理用户的选择,应用场景是可以做地图的交互,比如点击地图上的某一个省,获取相应的省的指标变化等。
//需要特别注意的是,如果需要点击某一省作地图的操作交互的话,还需要为series属性的每一项添加一个selectedMode属性,这里的属性值为 'single'即单选,也可多选
varecConfig= require('echarts/config');
myChart.on(ecConfig.EVENT.MAP_SELECTED,function (param) {
varselected=param.selected;
varmapSeries=option.series[0];
vardata= [];
varlegendData= [];
varname;
for (varp=0,len=mapSeries.data.length; p<len; p++) {
name=mapSeries.data[p].name;
mapSeries.data[p].selected=selected[name];
if (selected[name]) {
alert(name); //这里只是简单的做一个事例说明,弹出用户所选的省,如需做其他的扩展,可以在这里边添加相应的操作
}
}
});
myChart.setOption(option);
}
);
</script> 
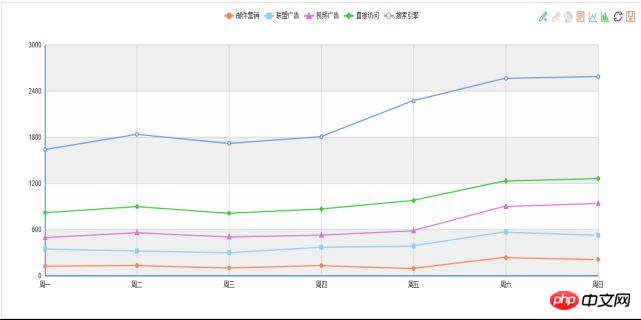
LineChart
<scripttype="text/javascript">
require.config({
paths: {
echarts:'./echarts/echarts',
'echarts/chart/bar':'./echarts/echarts',//这里需要注意的是除了mapchart使用的配置文件为echarts-map之外,
其他的图形引用的配置文件都为echarts,这也是一般的图形跟地图的区别
'echarts/chart/line':'./echarts/echarts'
}
});
require(
[
'echarts',
'echarts/chart/bar',
'echarts/chart/line'
],
function (ec) {
varmyChart=ecinit(documentgetElementById('main'));
option= {
tooltip: {
trigger:'axis'
},
legend: {
data: ['邮件营销','联盟广告','视频广告','直接问','搜索引擎']
},
toolbox: {
show:true,
feature: {
mark:true,
dataView: { readOnly:false },
magicType: ['line','bar'],
restore:true,
saveAsImage:true
}
},
calculable:true,
xAxis: [
{
type:'category',
boundaryGap:false,
data: ['周一','周二','周三','周四','周五','周六','周日']
}
],
yAxis: [
{
type:'value',
splitArea: { show:true }
}
],
series: [
{
name:'邮件营销',
type:'line',
stack:'总量',
data: [120,132,101,134,90,230,210]
},
{
name:'联盟广告',
type:'line',
stack:'总量',
data: [220,182,191,234,290,330,310]
},
{
name:'视频广告',
type:'line',
stack:'总量',
data: [150,232,201,154,190,330,410]
},
{
name:'直接访问',
type:'line',
stack:'总量',
data: [320,332,301,334,390,330,320]
},
{
name:'搜索引擎',
type:'line',
stack:'总量',
data: [820,932,901,934,1290,1330,1320]
}
]
};
myChart.setOption(option);
}
);
</script>
<pid="main1"style="height:500px;border:1px solid #ccc;padding:10px;"></p>
<scripttype="text/javascript">
require.config({
paths: {
echarts:'./echarts/echarts',
'echarts/chart/bar':'./echarts/echarts',
'echarts/chart/line':'./echarts/echarts'
}
});
require(
[
'echarts',
'echarts/chart/bar',
'echarts/chart/line'
],
function (ec) {
varmyChart=ecinit(documentgetElementById('main1'));
option= {
title: {
text:'未来一周气温变化',
subtext:'纯属虚构'
},
tooltip: {
trigger:'axis'
},
legend: {
data: ['最高气温'最低气温']
},
toolbox: {
show:true,
feature: {
mark:true,
dataView: { readOnly:false },
magicType: ['line','bar'],
restore:true,
saveAsImage:true
}
},
calculable:true,
xAxis: [
{
type:'category',
boundaryGap:false,
data: ['周一','周二','周三','周四','周五','周六','周日']
}
],
yAxis: [
{
type:'value',
axisLabel: {
formatter:'{value} '
},
splitArea: { show:true }
}
],
series: [
{
name:'最高气温',
type:'line',
itemStyle: {
normal: {
lineStyle: {
shadowColor:'rgba(0,0,0,4)'
}
}
},
data: [11,11,15,13,12,13,10]
},
{
name:'最低气温',
type:'line',
itemStyle: {
normal: {
lineStyle: {
shadowColor:'rgba(0,0,0,4)'
}
}
},
data: [-2,1,2,5,3,2,0]
}
]
};
myChart.setOption(option);
}
);
</script>
<pid="main2"style="height:500px;border:1px solid #ccc;padding:10px;"></p>
<scripttype="text/javascript">
require.config({
paths: {
echarts:'./echarts/echarts',
'echarts/chart/bar':'./echarts/echarts',
'echarts/chart/line':'./echarts/echarts'
}
});
require(
[
'echarts',
'echarts/chart/bar',
'echarts/chart/line'
],
function (ec) {
varmyChart=ec.init(document.getElementById('main2'));
option= {
title: {
text:'某楼盘销售情况',
subtext:'纯属虚构'
},
tooltip: {
trigger:'axis'
},
legend: {
data: ['意向','预购','成交']
},
toolbox: {
show:true,
feature: {
mark:true,
dataView: { readOnly:false },
magicType: ['line','bar'],
restore:true,
saveAsImage:true
}
},
calculable:true,
xAxis: [
{
type:'category',
boundaryGap:false,
data: ['周','周二','周三','周四','周五','周六','周日']
}
],
yAxis: [
{
type:'value'
}
],
series: [
{
name:'成交',
type:'line',
smooth:true,
itemStyle: { normal: { areaStyle: { type:'default'}} },
data: [10,12,21,54,260,830,710]
},
{
name:'预购',
type:'line',
smooth:true,
itemStyle: { normal: { areaStyle: { type:'default'}} },
data: [30,182,434,791,390,30,10]
},
{
name:'意向',
type:'line',
smooth:true,
itemStyle: { normal: { areaStyle: { type:'default'}} },
data: [1320,1132,601,234,120,90,20]
}
]
};
myChart.setOption(option);
}
);
</script>
The above is the detailed content of Introduction to basic usage of echart plug-in and so on. For more information, please follow other related articles on the PHP Chinese website!


