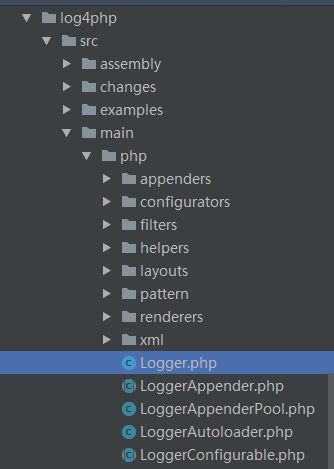
First introduce the logger.php file. log4php can complete the automatic loading process by introducing logger.php. The file location is as follows:

The logger itself does not define the output destination and format of the log, so we usually need to introduce the configuration file first after introducing log4php (details will be introduced below) ). A logger is a component through which we record log information. After introducing the configuration file, obtain a logger entity through getLogger. The log information can then be printed out via the print method. Printing methods usually include info, warn, error, debug, etc.
include('Logger.php');
Logger::Configure(COMMON_PATH . 'Conf/log.php');//引入配置文件
$logger = Logger::getLogger("main"); //生成日志实例
$logger->info("This is an informational message."); //在规定好的输出目的地用规定好的输出格式显示信息消息log4php configuration file supports XML, PHP, Properties (INI) and other formats. Programmable configuration is also supported, that is, the configuration can be changed through functions.
class MyConfigurator implements LoggerConfigurator {

    public function configure(LoggerHierarchy $hierarchy, $input = null) {

        // Create an appender which logs to file
        $appFile = new LoggerAppenderFile('foo');
        $appFile->setFile('D:/Temp/log.txt');
        $appFile->setAppend(true);
        $appFile->setThreshold('all');
        $appFile->activateOptions();

        // Use a different layout for the next appender
        $layout = new LoggerLayoutPattern();
        $layout->setConversionPattern("%date %logger %msg%newline");
        $layout->activateOptions();

        // Create an appender which echoes log events, using a custom layout
        // and with the threshold set to INFO
        $appEcho = new LoggerAppenderEcho('bar');
        $appEcho->setLayout($layout);
        $appEcho->setThreshold('info');
        $appEcho->activateOptions();
        // Add both appenders to the root logger
        $root = $hierarchy->getRootLogger();
        $root->addAppender($appFile);
        $root->addAppender($appEcho);
    }
}Logger::Configure(COMMON_PATH . 'Conf/log.php');
This line of code introduces configuration into the project. The configuration generally includes the following content:
1. The priority of the log information; 2. The output destination of the log information; 3. The output format of the log information.
The priorities of log information from high to low include ERROR, WARN, INFO, and DEBUG.
The following are the four commonly used levels:
DEBUG Level points out that fine-grained information events are very helpful for debugging applications.
INFO level indicates that the message highlights the running process of the application at a coarse-grained level.
WARN level indicates a potential error situation.
ERROR level indicates that although an error event occurs, it still does not affect the continued operation of the system.
The program can only display information with a lower priority than the currently set level. For example, the current program setting level is DEBUG, which means that all information in the program can be displayed. If the current program level is info, then only the log information of info, warn, and error can be displayed.
    return array(
    'rootLogger' => array(
        'appenders' => array(
            'myConsoleAppender',
        ),
        'level' => 'DEBUG'
    ),
)Like priority, output address can also be configured in the configuration file, and different output destinations can be set according to different log categories. Example:
'loginFileAppender' => [
            'class' => 'LoggerAppenderDailyFile',
            'layout' => [
                'class' => 'LoggerLayoutPattern',
                'params' => [
                    'conversionPattern' => '%date [%logger] %message%newline',
                ],
            ],
            'params' => [
                'file' => './log/login/login_%s.log',
                'datePattern' => 'Y_m_d',
            ]
],log4php supports 12 output destinations, which are:
LoggerAppenderConsole uses php://stdout as the output destination
LoggerAppenderFile takes the file as the output destination
LoggerAppenderDailyFile takes the file as the destination and outputs one file every day
LoggerAppenderDb takes the database as the output destination
LoggerAppenderEcho outputs at the end of the execution file
LoggerAppenderMail takes the email as the output destination
LoggerAppenderMailEvent uses mail as the output destination and triggers events
LoggerAppenderNull does not output any information
LoggerAppenderPhp LoggerAppenderPhp Output to PHP error information, convert various log level information into PHP standard information
LoggerAppenderRollingFile outputs in the form of xxx.log.1, xxx.log.2
LoggerAppenderSocket outputs in socket mode
LoggerAppenderSyslog outputs the system log as the destination, and uses the syslog() function in php to record
The code stipulates that a file should be output every day as the output destination to record login type log information.
It exists as an attribute of the output destination. Log4php contains 5 different output methods, which are:
LoggerLayoutHtml output in html format Debug information
LoggerLayoutSimple simply displays in the format of "level information - log information"
LoggerLayoutTTCC in "month/day/year time[ Process] Level information log name - debug information" is displayed in the format
LoggerLayoutPattern is displayed in the pattern expression as the output format (this pattern can customize the output format)
LoggerXmlLayout//Output in xml mode
LoggerLayoutPattern provides us with a custom log information format This method is often used in projects to customize log information. In actual use, we define the pattern by configuring the conversionPattern parameter. Parameter variables are usually configured using some conversion specifiers provided by log4php.
For example:
'conversionPattern' => '%date [%logger] %message%newline'
The format is: yyyy-mm-ddThh:mm:ss+08:00.[Log type].Log content.Newline.
Commonly used conversion specifiers are:
%logger(%lo,%c) The name of the logger that requests the log.
%data($d) time. The default is ISO8601 format. The format can be changed through %data{(format)}.
%location (%l) The location information of the caller
%message (%m %msg) The content of the log
%n (%newline) newline
%level (%p) priority of the current log event
The above is the detailed content of Configuration and use of log4php. For more information, please follow other related articles on the PHP Chinese website!


