MySQL is a relational database. In terms of WEB applications, MySQL is one of the best relational database management system application software. MySQL is a relational database management system that stores data in different tables instead of putting all the data in one big warehouse, which increases speed and flexibility.
1. The required software packages in Windows environment are: MySQL (relational database management system), Apache (Web server), PHP (programming language)
2. Download the Windows version installation software Packages can be downloaded from the official website. Windows version installation packages are divided into three categories: Windows Essentials (x86), Windows MSI Installer (x86), Without installer (unzip in C:/). It is recommended to use the Windows MSI Installer version.
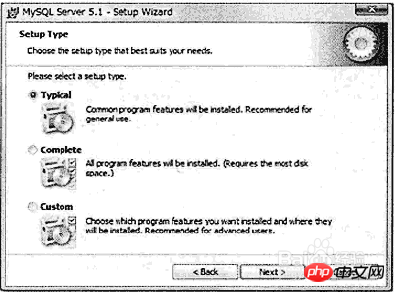
3. Execute the installation program under Windows. Double-click the downloaded installer to open the following welcome interface, click the Next button to enter the Setup Type interface, select the installation type, select Typtical to install common modules, select Complete to install all modules, select Custom to manually select the modules that need to be installed. , we generally choose the first Typtical type.

4. After completing the previous step, click the Install button to enter the installation progress interface. After the installation progress is completed, click the Next button to enter the Enterprise interface, then continue to click the Next button to enter the installation wizard completion interface, and then click Finsh to complete the installation.
5. On the last completion wizard page, check the first checkbox as shown in the figure check box, click Finish, and the page will enter the MySQL server instance configuration wizard interface, as shown in the figure below. Check the first radio button to optimize the settings for the MySQL database by yourself, and then proceed to the next step.
#6. The page shown below has three options. The first option indicates that the installed MySQL server is part of the [development machine] and occupies the least memory. ; When you select the second option, it means that the MySQL server is installed as part of the [server machine] and occupies a moderate amount of memory; when you select the third option, it means that a dedicated MySQL database server is installed, occupying all the effective memory of the machine. We select the first option with the default value here and click the Next button.
#7. After completing the previous step, enter the database purpose selection interface. Here you also select the default value, which is the first option, and then click the Next button to enter the following interface. In this interface, select the saving directory of the database file. After setting, click Next.
8. Next, set the maximum number of users that the database can accept simultaneous access. Among the three options displayed in the following interface, the first option supports a maximum of 20 users can access at the same time; the second option means a maximum of 500 users can access at the same time; the third option allows you to set the maximum number of users that can access the database at the same time, and then select it according to your requirements and click the Next button.
9. Next, proceed to the network settings. The default selections are to activate TCP/IP network and activate strict mode. All Web-based application systems must activate the first item. Otherwise, the database can only be accessed through the monitor or other client software. The default port is 3306. If the database is running as a transaction database, you must select the second check button, Enable Strict Mode, and then click Next.
10. Next enter the database default character set interface. The first option is to set Latin1 as the default character set, the second option is to set utf8 as the default character set, and the last one can be manually set and specified. character set. Just set it up as shown below.
The above is the detailed content of MySQL installation and configuration experience sharing. For more information, please follow other related articles on the PHP Chinese website!


