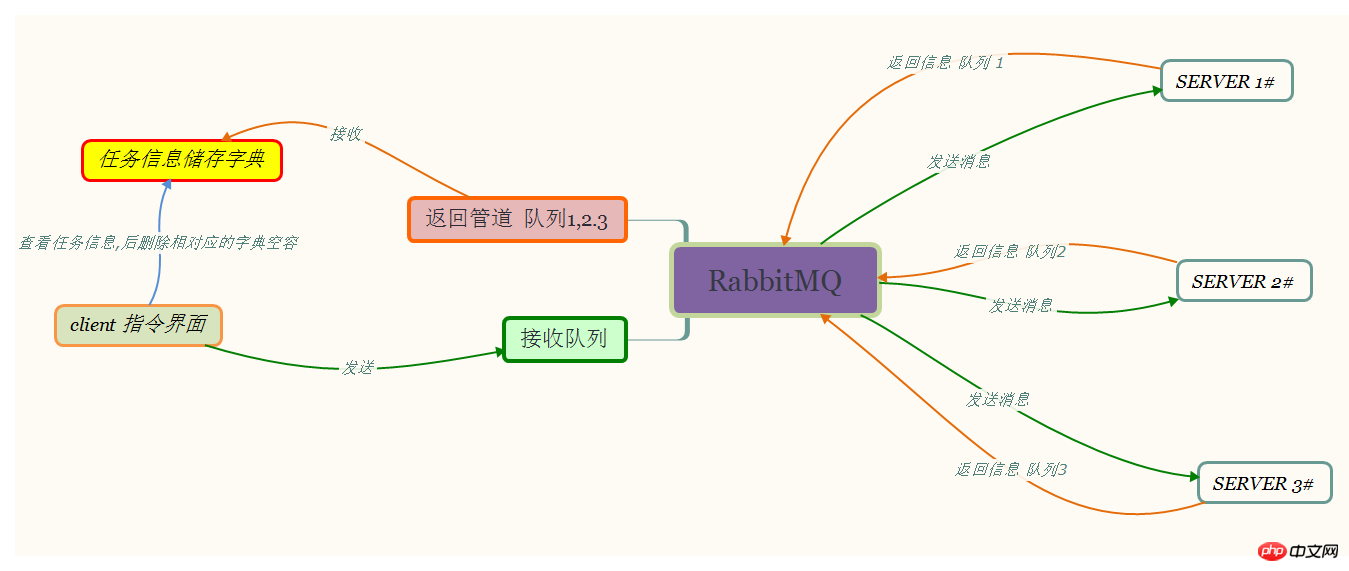
题目:基于RabbitMQ rpc实现的主机管理,下面就来具体介绍一下。
需求:
可以对指定机器异步的执行多个命令
例子:
>>:run "df -h" --hosts 192.168.3.55 10.4.3.4 task id: 45334 >>: check_task 45334 >>:
注意,每执行一条命令,即立刻生成一个任务ID,不需等待结果返回,通过命令check_task TASK_ID来得到任务结果
README
1 基于RabbitMQ rpc实现的主机管理 2 可以对指定机器异步的执行多个命令 3 例子: 4 >>:run "df -h" --hosts 192.168.3.55 10.4.3.4 5 task id: 45334 6 >>: check_task 45334 #查看任务信息 7 8 程序结构: 9 RabbitMQ_PRC/#综合目录10 |- - -PRC_CLIENT/#client程序主目录11 | |- - -__init__.py12 | |- - -bin/#执行程目录13 | | |- - -__init__.py14 | | |- - -clien_start.py #客户端执行文件15 | |16 | |17 | |- - -core #主逻辑程序目录18 | | |- - -__init__.py19 | | |- - -clien_class.py#客户端执行主要逻辑 类20 | |21 | |22 |23 |24 |- - -PRC_SERVER/#服务端程序目录25 | |- - -__init__.py26 | |- - -bin/#执行目录27 | | |- - -__init__.py28 | | |- - -server_start.py#服务端程序执行文件29 | |30 | |31 | |- - -core/##主逻辑程序目录32 | | |- - -server_class.py#主逻辑 相关类33 | |34 |35 |- - -README

程序结构: RabbitMQ_PRC/#综合目录 |- - -PRC_CLIENT/#client程序主目录 | |- - -__init__.py | |- - -bin/#执行程目录 | | |- - -__init__.py | | |- - -clien_start.py #客户端执行文件


1 import os ,sys2 BASE_DIR=os.path.dirname(os.path.dirname(os.path.abspath(__file__)))#获取相对路径转为绝对路径赋于变量3 sys.path.append(BASE_DIR)#增加环境变量4 5 from core.client_class import Threa6 7 if __name__ == '__main__':8 RPCS=Threa()9 response=RPCS.th_start()
| |- - -core #主逻辑程序目录 | | |- - -__init__.py | | |- - -clien_class.py#客户端执行主要逻辑 类


1 import pika 2 import uuid 3 import threading 4 import random 5 6 class FibonacciRpcClient(object): 7 def __init__(self): 8 #self.credentials=pika.PlainCredentials("test","test") 9 self.connection = pika.BlockingConnection(pika.ConnectionParameters(host="localhost"))#生成连接的服务端 ip 10 #self.connection = pika.BlockingConnection(pika.ConnectionParameters("192.168.11.51",15672,'/',self.credentials))#生成连接的服务端 ip 11 self.channel = self.connection.channel()#创建一个管道 12 13 def get_respon(self,cal_queue,cal_id):#取任务信息 14 self.response=None 15 self.callback_id=cal_id#队列名 16 self.channel.basic_consume(self.on_response,queue=cal_queue)# 使用回调函数 17 while self.response is None: 18 self.connection.process_data_events()#非阻塞模式接收消息 19 return self.response#返回 20 21 def on_response(self, ch, method, props, body):#回调函数 22 if self.callback_id == props.correlation_id:#判断服务端返回的队列名是否与当前所生成的队列名一致 23 self.response = body# 将服务端的结果赋于返回来的结果变量 24 ch.basic_ack(delivery_tag = method.delivery_tag)##确保消息被 接收 25 26 def call(self, queues,n):#发送消息的函数 27 result = self.channel.queue_declare(exclusive=False)#随机生成一个队列,收消息后不删除 28 self.callback_queue = result.method.queue#赋于管道 变量 29 self.corr_id = str(uuid.uuid4())#生成一个服务端返回消息的队列名 30 self.channel.basic_publish(exchange='', 31 routing_key=queues,#队列名 32 properties=pika.BasicProperties( 33 reply_to = self.callback_queue,#发送的管道队列名 34 correlation_id = self.corr_id,#发送给服务端,用于返回消息的队列名 35 ), 36 body=str(n))#发送的内容数据 37 return self.callback_queue,self.corr_id#返回管道名 队列id号 38 39 class Threa(object):#线程 类 40 def __init__(self): 41 self.info={}#生成一个字典 42 self.help_info=''' 指令示例\033[36;1m 43 run "df -h" --hosts 192.168.3.55 10.4.3.4 44 --- ------- ------- ------------ -------- 45 运行 指令 主机 ip 1# ip 2# 46 check_task_all #查看任务列表 47 check_task 25413 #查看具体id任务信息,过后删除 48 helps #查看指令帮助 49 \033[0m''' 50 51 def check_task_all(self,cmd):#查看所有任务信息 52 53 for i in self.info: 54 print("任务id:%s,服务端:%s,命令:%s"%(i,self.info[i][0],self.info[i][1])) 55 def check_task(self,take_id):#查看任务 56 try: 57 id=int(take_id.split()[1])#取任务ID 58 #print(id,'任务ID') 59 cal_queue=self.info[id][2]#管道名 60 #print(cal_queue,'队列') 61 cal_id=self.info[id][3]#消息队列位置 62 #print(cal_id,'消息位置') 63 clinets=FibonacciRpcClient()#调用类 64 rest=clinets.get_respon(cal_queue,cal_id)#取任务信息 65 print('任务执行结果:',rest.decode())#打印 66 del self.info[id]#从字典中删除对应任务 67 except Exception as e: 68 print(e) 69 return 70 71 def run(self,str_l):#run函数 72 addr_l=self.attr_l(str_l)#获取IP 73 oreds=self.oreds_(str_l)#获取 命令 74 #print(oreds,'上传命令') 75 for i in addr_l:#取出IP 76 tak_id=random.randint(10000,99999)#任务ID生成 77 #print(tak_id,'任务ID') 78 obj=FibonacciRpcClient()#生成连接类 79 r=obj.call(i,oreds)#ip做队列名 命令 80 self.info[tak_id]=[i,oreds,r[0],r[1]]#写入字典 tak_id{ ip 命令 管道名 队列名} 81 return self.info 82 83 def retf(self,str_l):#反射命令 84 sl=str_l.split()[0]#取命令开头 85 if sl=='helps': 86 self.helps() 87 if len(str_l.split())==1 and sl!='check_task_all' : 88 return 89 if hasattr(self,sl):#是否存在 90 func=getattr(self,sl)#调用 91 rer=func(str_l)#执行 92 #print(rer) 93 if rer is not None: 94 for i in rer: 95 print("任务id:%s"%i) 96 97 def attr_l(self,n):#命令分解函数 98 attr=n.split("--")##用--分割 99 addr=attr[1].split()[1:]#获取IP列表100 return addr#返回IP列表101 102 def oreds_(self,n):#获取 命令103 oreds=n.split("\"")[1]##用"分割取命令104 return oreds#返回 命令105 106 def helps(self):#查看指令帮助107 print(self.help_info)108 109 def th_start(self):#开始110 self.helps()111 while True:112 str_l=input(">>:").strip()113 if not str_l:continue#如果为空重新输入114 t1=threading.Thread(target=self.retf,args=(str_l,))#创建新线程 调用反射函数115 t1.start()#开始线程
|- - -PRC_SERVER/#服务端程序目录 | |- - -__init__.py | |- - -bin/#执行目录 | | |- - -__init__.py | | |- - -server_start.py#服务端程序执行文件
1 import os ,sys2 BASE_DIR=os.path.dirname(os.path.dirname(os.path.abspath(__file__)))#获取相对路径转为绝对路径赋于变量3 sys.path.append(BASE_DIR)#增加环境变量4 5 from core.client_class import Threa6 7 if __name__ == '__main__':8 RPCS=Threa()9 response=RPCS.th_start()
| |- - -core/##主逻辑程序目录
| | |- - -server_class.py#主逻辑 相关类
1 import pika,os 2 3 class RabbitMQ_PRC(object): 4 def __init__(self,myaddr): 5 self.queues=myaddr#用本机IP做队列名 6 self.connection = pika.BlockingConnection(pika.ConnectionParameters(host='localhost'))#生成消息对队 7 self.channel = self.connection.channel()#生成管道 8 self.channel.queue_declare(queue=self.queues)#消息收接队列 9 10 def str_run(self,body):#处理 run的函数11 msg = os.popen(body.decode()).read()#执行系统命令12 if not msg:13 msg = '系统命令不存在'14 return msg15 16 def on_request(self,ch, method, props, body):#回调函数17 resp=self.str_run(body)18 print('执行完成')19 #print(resp)20 ch.basic_publish(exchange='',21 routing_key=props.reply_to,#收消息的队列22 properties=pika.BasicProperties(correlation_id =props.correlation_id),#返回消息的队列23 body=str(resp))#返回结果数据24 ch.basic_ack(delivery_tag = method.delivery_tag)##确保消息被 客户端接收25 26 def run_(self):27 self.channel.basic_qos(prefetch_count=1)#同时只处理一个消息28 self.channel.basic_consume(self.on_request, queue=self.queues)#接收消息,自动调用回调函数29 30 print("开始接收数据!")31 self.channel.start_consuming()#开始接收
The above is the detailed content of Host management based on RabbitMQ rpc. For more information, please follow other related articles on the PHP Chinese website!


