


There is a problem in my friend’s project. His side is based on Spring architecture and has a relatively simple task that requires scheduled execution. After understanding his needs, he proposed a relatively simple Spring+quartz implementation.
Note that this article only discusses how to complete the simplest scheduled tasks under the completed Spring project.
The first step is to know the Spring architecture, which is very interesting and interesting. The effect of freely plugging and unplugging functional modules can be achieved. The project is based on MAVEN package dependency management, so list the required dependency package references this time:
1 <!-- 定时器依赖 开始 --> 2 <dependency> 3 <groupId>org.springframework</groupId> 4 <artifactId>spring-context-support</artifactId> 5 <version>4.0.2.RELEASE</version> 6 </dependency> 7 8 9 10 <dependency>11 <groupId>org.quartz-scheduler</groupId>12 <artifactId>quartz</artifactId>13 <version>2.2.1</version>14 </dependency>15 <!-- 定时器依赖 结束 -->
Of course, this must match the corresponding Spring version. . Our project here is 4.0.2. The previous package spring-context-support is mainly used as a component for communication and management between Spring and quartz. If it is commented out, an error like this will be reported

Configure in MAVEN After completing the packages that need to be added (other packages will not be discussed here for the time being, this article only discusses the configuration under the complete Spring project), we can start to add functional modules for scheduled tasks to this project.
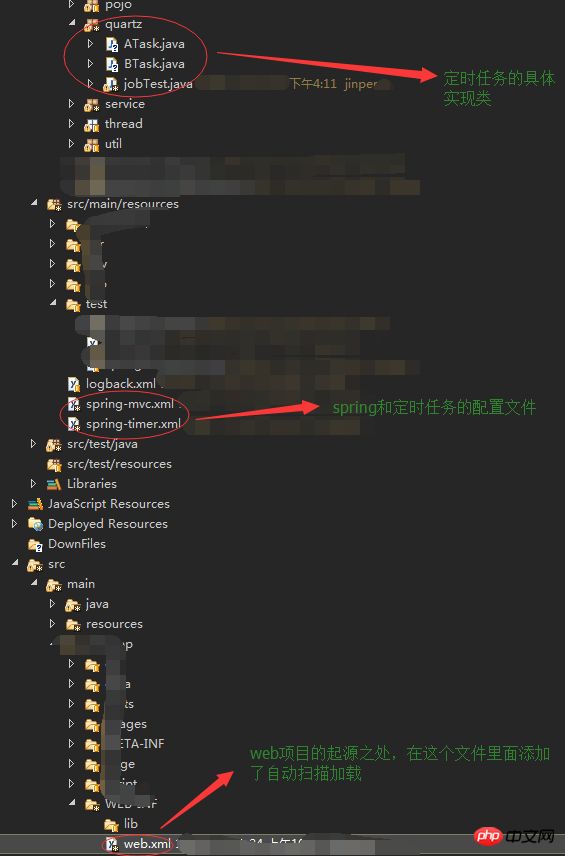
The second step is to start from the origin of the web project and make changes in web.xml. Since the Spring configuration file of the original project was Spring-mvc.xml, I changed the configuration file of the scheduled task to spring-time.xml. In this way, the same scan configuration can be read at startup. The specific code is as follows:
1 <context-param>2 <param-name>contextConfigLocation</param-name>3 <param-value>classpath:spring-*.xml</param-value>4 </context-param>
Then to show you my engineering structure:
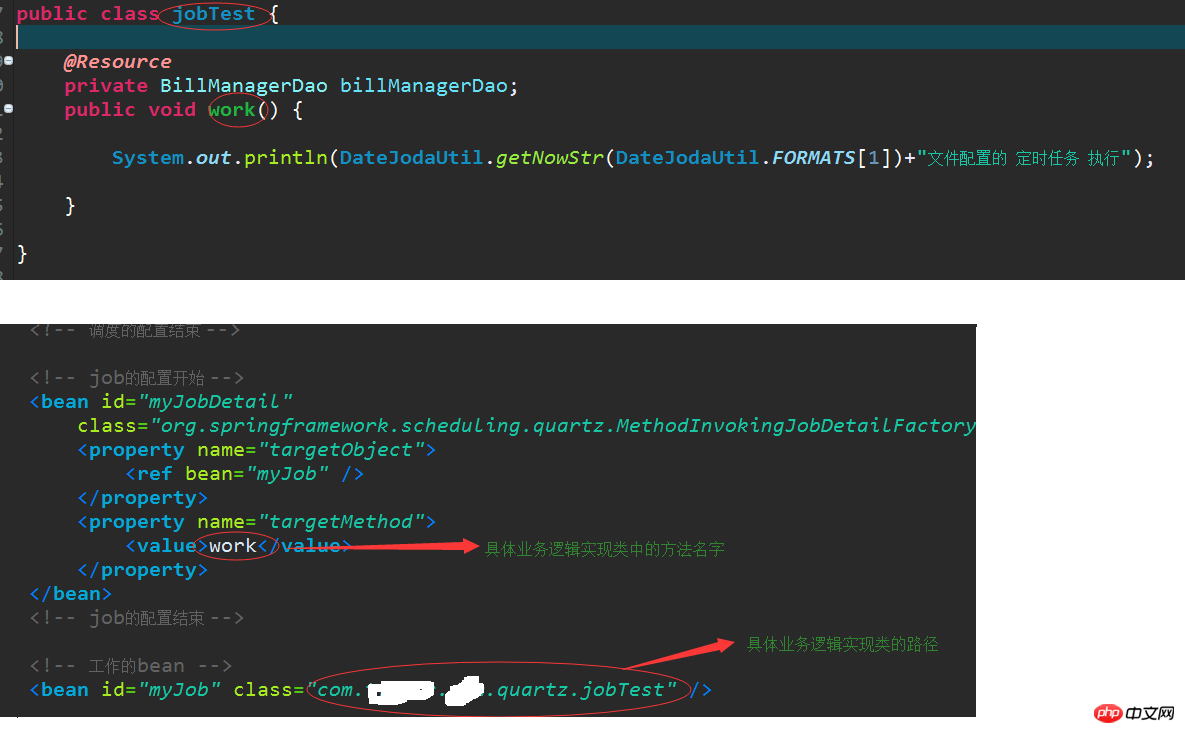
 1 <?xml version="1.0" encoding="UTF-8"?>   2 <beans xmlns="http://www.springframework.org/schema/beans"   3     xmlns:xsi="http://www.w3.org/2001/XMLSchema-instance"  4     xmlns:p="http://www.springframework.org/schema/p"   5     xsi:schemaLocation="http://www.springframework.org/schema/beans
 6      ">   7    8         <!-- 启动触发器的配置开始 -->   9     <bean name="startQuertz" lazy-init="false" autowire="no"  10         class="org.springframework.scheduling.quartz.SchedulerFactoryBean">  11         <property name="triggers">  12             <list>  13                 <ref bean="myJobTrigger" />  14             </list>  15         </property>  16     </bean>  17     <!-- 启动触发器的配置结束 -->  18   19     <!-- 调度的配置开始 -->  20     <!--  21         quartz-1.8以前的配置
22     <bean id="myJobTrigger"
23         class="org.springframework.scheduling.quartz.CronTriggerBean">
24         <property name="jobDetail">
25             <ref bean="myJobDetail" />
26         </property>
27         <property name="cronExpression">
28             <value>0/1 * * * * ?</value>
29         </property>
30     </bean>
31     -->  32     <!-- quartz-2.x的配置 -->  33     <bean id="myJobTrigger"  34         class="org.springframework.scheduling.quartz.CronTriggerFactoryBean">  35         <property name="jobDetail">  36             <ref bean="myJobDetail" />  37         </property>  38         <property name="cronExpression">  39         40         <value>0/10 * *  * * ?</value>41           <!--   <value>1 52 * * * ?</value>  --> 42         </property>  43     </bean>  44     <!-- 调度的配置结束 -->  45   46     <!-- job的配置开始 -->  47     <bean id="myJobDetail"  48         class="org.springframework.scheduling.quartz.MethodInvokingJobDetailFactoryBean">  49         <property name="targetObject">  50             <ref bean="myJob" />  51         </property>  52         <property name="targetMethod">  53             <value>work</value>  54         </property>  55     </bean>  56     <!-- job的配置结束 -->  57   58     <!-- 工作的bean -->  59     <bean id="myJob" class="com.tec.kevin.quartz.jobTest" />  60   61 </beans>
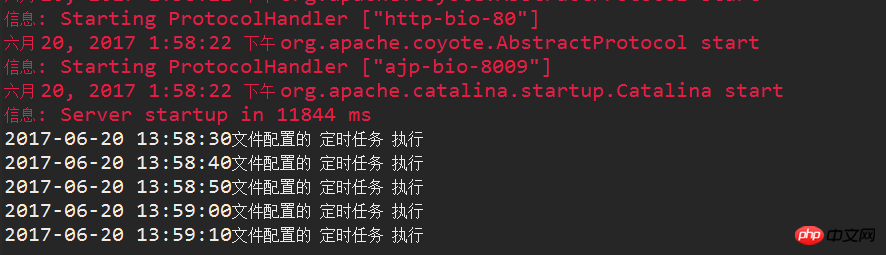 ##You can see here that the scheduled task is executed every 10 seconds according to the
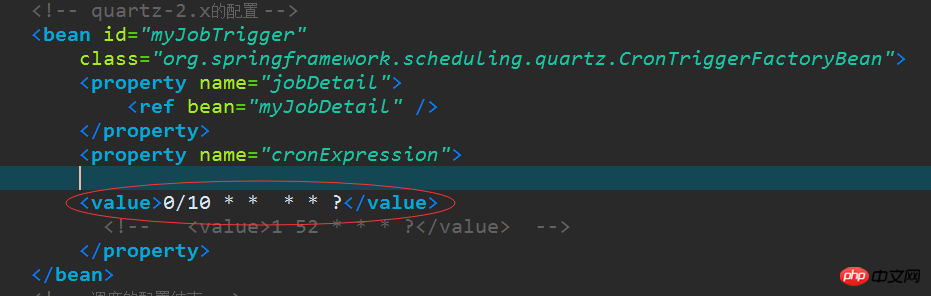
There will be two articles next, one is a simpler implementation method of writing scheduled tasks, and the other explains cron expressions.
The above is the detailed content of Example of implementation of Spring+quartz. For more information, please follow other related articles on the PHP Chinese website!
 How to solve the problem that the msxml6.dll file is missing
 telnet command usage
 cad2012 serial number and key collection
 phpstudy
 How to copy an Excel table to make it the same size as the original
 Commonly used codes in html language
 What are the main technologies of firewalls?
 How to solve parse error


![[Web front-end] Node.js quick start](https://img.php.cn/upload/course/000/000/067/662b5d34ba7c0227.png)


