1. Configure the maven file pom.xml
<?xml version="1.0" encoding="UTF-8"?>
<project xmlns="http://maven.apache.org/POM/4.0.0"
         xmlns:xsi="http://www.w3.org/2001/XMLSchema-instance"
         xsi:schemaLocation="http://maven.apache.org/POM/4.0.0 http://maven.apache.org/xsd/maven-4.0.0.xsd">
    <modelVersion>4.0.0</modelVersion>

    <groupId>com.hdwang</groupId>
    <artifactId>spring-boot-test</artifactId>
    <version>1.0-SNAPSHOT</version>

    <name>spring-boot-test</name>
    <description>project for test Spring Boot</description>

    <properties>
        <project.build.sourceEncoding>UTF-8</project.build.sourceEncoding>
        <java.version>1.8</java.version>
    </properties>

    <!-- Inherit defaults from Spring Boot -->
    <parent>
        <groupId>org.springframework.boot</groupId>
        <artifactId>spring-boot-starter-parent</artifactId>
        <version>1.5.4.RELEASE</version>
        <relativePath/>
    </parent>

    <dependencies>
        <!-- Add typical dependencies for a web application -->
        <dependency>
            <groupId>org.springframework.boot</groupId>
            <artifactId>spring-boot-starter-web</artifactId>
        </dependency>

        <dependency>
            <groupId>org.springframework.boot</groupId>
            <artifactId>spring-boot-starter-freemarker</artifactId>
        </dependency>


        <!-- auto redeploy -->
        <dependency>
            <groupId>org.springframework.boot</groupId>
            <artifactId>spring-boot-devtools</artifactId>
            <optional>true</optional>
        </dependency>

    <!-- Package as an executable jar -->
    <build>
        <plugins>
            <plugin>
                <groupId>org.springframework.boot</groupId>
                <artifactId>spring-boot-maven-plugin</artifactId>
            </plugin>
        </plugins>
    </build>

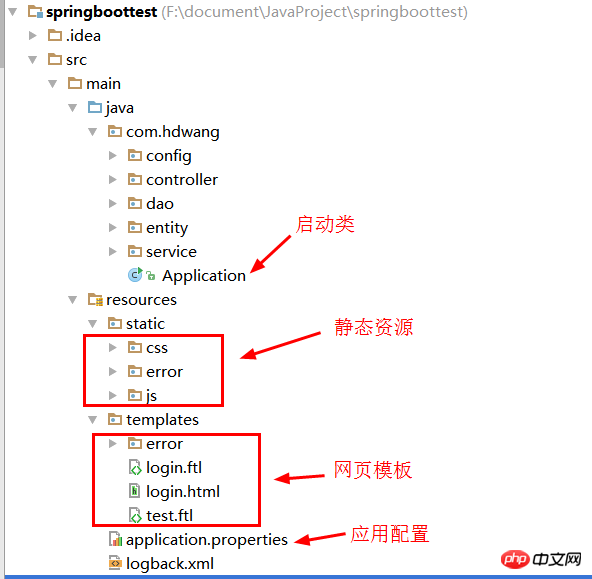
</project>2. File structure (the names of static/templates/application.properties/logback.xml are all agreed, only You can use certain names. Please refer to the official spring boot documentation for details. The following name is one of the configuration methods)

3. Create a startup class (put it at the top level, sub Only classes in the lower layer (lower-level folder) can be scanned and injected)
@SpringBootApplication
public class Application {

    /**
     * main function
     * @param args params
     */
    public static void main(String[] args){
       SpringApplication.run(Application.class,args);
    }
}4. Create a controller (in the lower-level directory of the Application class)
@Controller
@RequestMapping("/common")public class Common {

    @Value("${msg:Welcome!}")private String msg;/** * get a page
     * @return a page with name called return value     */@RequestMapping("login")public String getLoginPage(ModelMap map){
        map.put("welcomeMsg",this.msg);return "login";
    }


}5. Create a web page template login.ftl (freemarker must use the ftl suffix, and I have been fooled by this for a long time! Put js/css and so on in the corresponding folders. Note that there is no /static in the access path, and I have also been fooled by this. It’s been a long time! )
<!DOCTYPE html>
<html>
<head>
    <meta charset="UTF-8" />
    <title>login</title>

    <link href="/css/home.css?1.1.11" rel="stylesheet" type="text/css" />
    <script type="text/javascript" src="/js/jquery-2.0.3.min.js?1.1.11"></script>
    <script type="text/javascript" src="/js/home.js?1.1.11"></script>
</head>
<body>
<h1>login page</h1>
<h2>${welcomeMsg}</h2>
<form>
    <div>
     <label>用户名:<input type="text" id="username"/></label>
    </div>
    <div>
     <label>密码:<input type="password"/></label>
    </div>
    <div>
        <input type="submit" value="提交"/>
        <input type="reset" value="重置" />
    </div>
</form>
</body>
</html>
6. Write the application configuration file
Create a new application.properties file and add the following content
msg=Ladies and gentleman,Welcome!
7. Start running
and visit in the browser: http://localhost:8080/common/login

8. Deployment
mvn package Make a package
java -jar xxx.jar Run this package
The above is the detailed content of Detailed explanation of spring boot 1.5.4 getting started examples. For more information, please follow other related articles on the PHP Chinese website!


