


This article mainly introduces the whole process of building the Python web framework Django project. The editor thinks it is quite good. Now I will share it with you and give you a reference. Let’s follow the editor to take a look
The whole process of building Django project of Web framework in Python
IDE description:
Win7 system
Python: 3.5
Django:1.10
Pymysql:0.7.10
Mysql:5.5
Note: You can view the installed library version information through pip freeze.
Django is a free open source website framework developed in Python, which can be used to quickly build high-performance, elegant websites!
Django features
Powerful database functions
Use python classesInheritance, with just a few lines of code you can have a rich, dynamic database operationInterface(API), you can also execute SQL if needed statement.
Built-in powerful backend function
A few lines of simple code will give your website a powerful backend, making it easy to manage your Content! Elegant URL
Use regular expressions to match the URL, pass it to the corresponding function , and define it as you like!
Template system – a powerful, easy-to-expand template system with simple design. Code and styles are designed separately, making it easier to manage.
Caching system – Used in conjunction with memcached or other caching systems for better performance and faster loading speed.
Internationalization – fully supports multi-language application, allowing you to define translated characters and easily translate into languages of different countries.
The installation operations of Python and MySQL will not be explained here. You can find and solve them on the Internet. Among them, the installation of django and pymysql can be completed using the pip install * command.
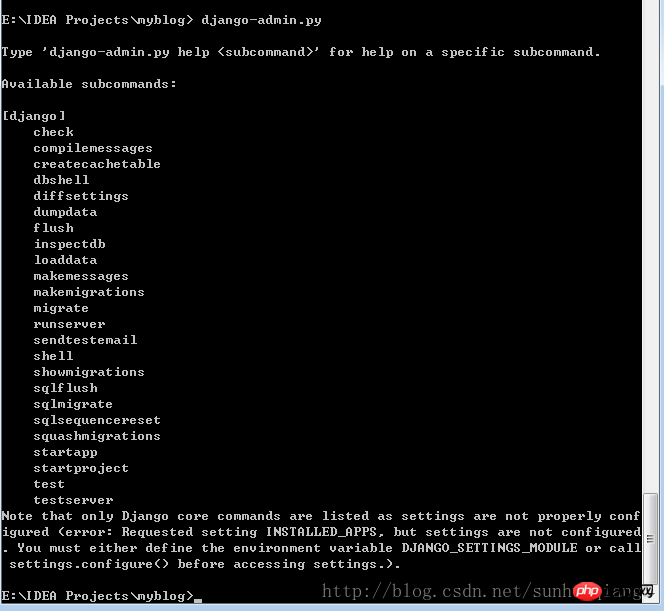
After installing Django, you can use the django-admin.py management tool to create a project. First, let’s take a look at the command introduction of django-admin.py. Enter django-admin.py on the command line to view the available project management commands.
Django project The specific process of creating a HelloWorld project is as follows:
#Step1: Before building a Django project, first select the project Storage directory. Then CD switch to the project storage directory in the Dos window.
Step2: Create project Execute django-admin.py startproject HelloWorld
Open IDEA, you can see the created project directory as shown below :
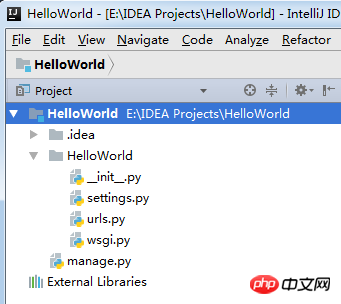
Directory description:
HelloWorld: The container of the project.
manage.py: A useful command line tool that allows you to interact with this Django project in various ways.
HelloWorld/init.py: An empty file that tells Python that the directory is a Python package.
HelloWorld/settings.py: Settings/configuration for this Django project.
HelloWorld/urls.py: URL declaration for this Django project; a "directory" of websites powered by Django .
HelloWorld/wsgi.py: A portal to a WSGI-compatible web server to run your project.
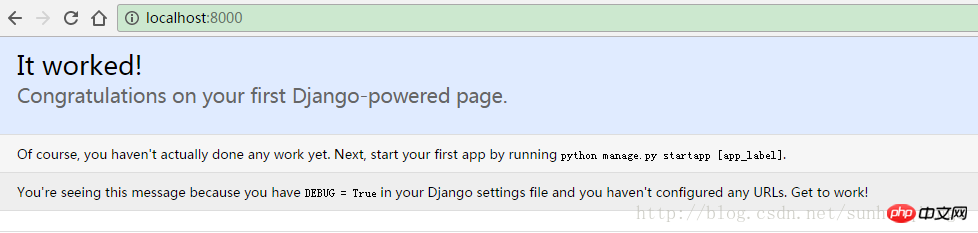
Next we enter the HelloWorld directory and enter the following command to start the server:
python manage.py runserver 0.0.0.0:8000
0.0.0.0 allows other computers to connect to the development server, 8000 is the port Number. If not specified, the port number defaults to 8000.
Enter your server’s IP and port number in the browser. If it starts normally, the output will be as follows:
Step3: To create an application, enter django-admin.py startapp demo
on the command line. Open IDEA and you can see the created project directory as shown below:
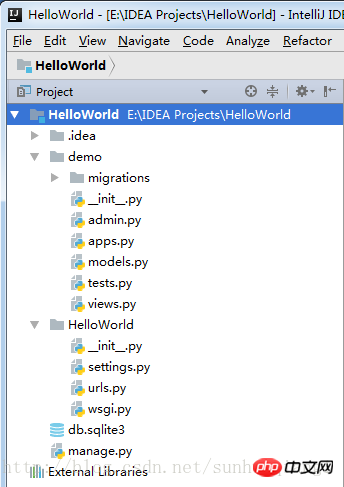
Directory description:
demo: 应用的容器。注:后面的页面设计文件,在此目录下创建目录templates,名为XX.html的文件放在此处。
init.py:如上一个init.py文件
migrations: 数据库相关目录,同步数据库之后会出现数据类。
admin.py: admin后台管理文件
apps.py: app应用管理文件
models.py:主要用一个 Python 类来描述数据表,称为模型(model) 。运用这个类,你可以通过简单的 Python的代码来创建、检索、更新、删除 数据库中的记录而无需写一条又一条的SQL语句。
tests.py:测试文件
views.py:包含了页面的业务逻辑。
创建超级管理员
python manage.py createsuperuser

# 按照提示输入用户名和对应的密码就好了邮箱可以留空,用户名和密码必填

# 修改 用户密码可以用:
python manage.py changepassword username
附
服务端响应客户端请求过程
流程图如下:
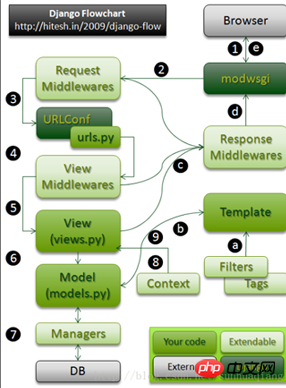
上面的流程图可以大致描述Django处理request的流程,按照流程图2的标注,可以分为以下几个步骤:
1.用户通过浏览器请求一个页面。
2.请求到达Request Middlewares,中间件对request做一些预处理或者直接response请求。
3.URLConf通过urls.py文件和请求的URL找到相应的View。
4.View Middlewares被访问,它同样可以对request做一些处理或者直接返回response。
5.调用View中的函数。
6.View中的方法可以选择性的通过Models访问底层的数据。
7.所有的Model-to-DB的交互都是通过manager完成的。
8.如果需要,Views可以使用一个特殊的Context。
9.Context被传给Template用来生成页面。
a.Template使用Filters和Tags去渲染输出
b.输出被返回到View
c.HTTPResponse被发送到Response Middlewares
d.任何Response Middlewares都可以丰富response或者返回一个完全不同的response
e.Response返回到浏览器,呈现给用户
url() 函数
Django url() 可以接收四个参数,分别是两个必选参数:regex、view 和两个可选参数:kwargs、name,接下来详细介绍这四个参数。
regex: 正则表达式,与之匹配的 URL 会执行对应的第二个参数 view。
view: 用于执行与正则表达式匹配的 URL 请求。
kwargs: 视图使用的字典类型的参数。
name: 用来反向获取 URL。
Django项目部署
在前面的介绍中我们使用 python manage.py runserver 来运行服务器。这只适用测试环境中使用。
正式发布的服务,我们需要一个可以稳定而持续的服务器,比如apache, Nginx, lighttpd等,本文后续将以 Nginx 为例。
设置用自己的iP地址访问项目
1.首先需要执行>manage.py runserver 0.0.0.0:8000。
2.在setting.py里面需要添加ALLOWED_HOSTS=”*”。
【相关推荐】
1. Python免费视频教程
2. Python学习手册
The above is the detailed content of Detailed explanation of the entire process of building a Django project in Python. For more information, please follow other related articles on the PHP Chinese website!


![[Web front-end] Node.js quick start](https://img.php.cn/upload/course/000/000/067/662b5d34ba7c0227.png)


