


This article mainly introduces in detail the solution of turning JavaScript solid color QR code into color QR code. It has certain reference value. Interested friends can refer to it.
The main content of this article is The discussion is about how to turn a solid color QR code into color.
Some time ago, there was a demand in the company's business. Customers did not like the solid color QR codes generated in the background. Pure blue, pure purple, and pure green were not acceptable. They wanted colored QR codes. Then this task fell on me. Because it was image processing, the main idea was to rely on canvas. Canvas can perform pixel operations, so I made some attempts and encountered some pitfalls. The specific records are as follows.
Prerequisite knowledge
drawImageMethod can draw pictures onto canvas, getImageData The method can obtain the information of all pixels in a rectangular area. The data attribute of the return value is a one-dimensional array, which stores the information of all pixels. The information of one pixel will occupy four elements, representing r,g,b and transparency. The order of pixels in a one-dimensional array is from left to right and top to bottom. The last is the putImageData method, which throws the changed pixel information array back to the canvas.
Some small pitfalls
The first pitfall is that canvas uses attributes to give width and height, don’t use css;
The second pitfall Pitfalls, image processing seems to require a server environment, which is not possible locally. I heard it was based on some security considerations. In the end, I solved the canvas error by setting up a local server.
The third pitfall is stack overflow. The reason for this has not been found yet. I will talk about it in detail later
The idea of discoloration
The main idea comes from "Aha!" algorithm! "In the chapters of depth-first search and breadth-first search, the last part of the chapter, "Treasure Island Adventure", implements numbering different areas in sequence. Think of the numbers as coloring, but they are actually the same.
Specific implementation
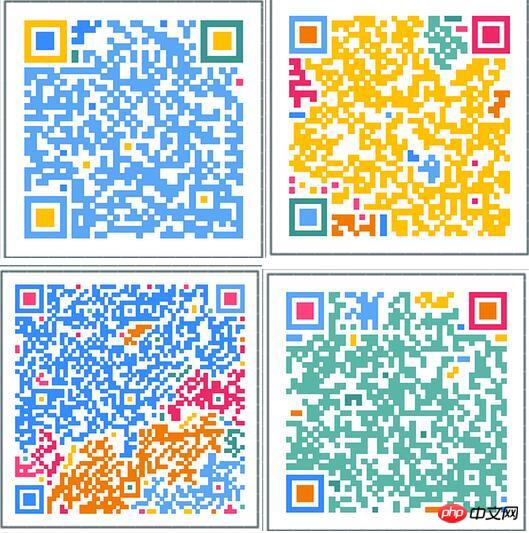
In fact, the so-called color QR code is not the kind of QR code where the color of each pixel is random. If you look closely at the QR code, you will find that the black parts are one piece at a time, and they are distributed among the white ones, just like islands distributed in the sea. What we have to do is to dye each black block individually. The essence of a black block is a black pixel.
As mentioned earlier, we use canvas because we can perform pixel operations, so our operation is actually to dye the pixels. We obviously do not want to dye the background color, so the background color needs to be judged; before It was also mentioned that the background color is like the ocean dividing the black color blocks. That means that after we read a pixel and dye it, we constantly judge the color of the pixels on the right side of it. When the background color appears, it means we have arrived. The boundary can stop coloring in the right direction, but each pixel actually has four connected directions. When the right side of a pixel is the background color, we should also try the possibility of other directions. This is depth-first search. Through recursion, constantly verify that the color of the next position of the current pixel is the background color, then come back and try another direction; if it is not the background color, then dye it, and then perform four directions on the dyed pixel. verify.
There are a few points to mention. To determine whether it is a background color, you must compare the rgba value, so the color parameters must be processed. The other is an array of pixel information. Every four elements represent a pixel. Therefore, if you want to compare the correct pixel information, this part must also be processed.
It may be a bit confusing, let’s take a look at the code
The first part,canvas
// canvas 部分
var canvas = $("canvas")[0];
var ctx = canvas.getContext("2d");

var img = new Image();
img.src = path; //这里的path就是图片的地址The second part,Color processing
// 分离颜色参数  返回一个数组
var colorRgb = (function() {
  var reg = /^#([0-9a-fA-f]{3}|[0-9a-fA-f]{6})$/;

  return function(str) {
    var sColor = str.toLowerCase();
    if (sColor && reg.test(sColor)) {
      if (sColor.length === 4) {
        var sColorNew = "#";
        for (var i = 1; i < 4; i += 1) {
          sColorNew += sColor.slice(i, i + 1).concat(sColor.slice(i, i + 1));
        }
        sColor = sColorNew;
      }
      //处理六位的颜色值
      var sColorChange = [];
      for (var i = 1; i < 7; i += 2) {
        sColorChange.push(parseInt("0x" + sColor.slice(i, i + 2)));
      }
      return sColorChange;
    } else {
      var sColorChange = sColor.replace(/(rgb\()|(\))/g, "").split(",").map(function(a) {
        return parseInt(a);
      });
      return sColorChange;
    }
  }
})();The third part, Give initial parameters
In order to avoid redundant operations, we use a marker array to record the judged position
// 参数
var bg = colorRgb("#fff"); //忽略的背景色
var width = 220;
var height = 220;
var imgD; //预留给 像素信息
var colors = ["#368BFF", "#EF2767", "#F17900", "#399690", "#5aa6f7", "#fd417e", "#ffc000", "#59b6a6"];  //染色数组
// 随机colors数组的一个序号
var ranNum = (function() {
  var len = colors.length;
  return function() {
    return Math.floor(Math.random() * len);
  }
})();

// 标记数组
var book = [];
for (var i = 0; i < height; i++) {
  book[i] = [];
  for (var j = 0; j < width; j++) {
    book[i][j] = 0;
  }
}Part 4, Get the pixel information, traverse each pixel, and finally throw it back to the canvas
If it has been marked, skip it. If it has not been marked, just randomly Color, depth-first search and dyeing
img.onload = function() {
  ctx.drawImage(img, 0, 0, width, height);
  imgD = ctx.getImageData(0, 0, width, height);

  for (var i = 0; i < height; i++) {
    for (var j = 0; j < width; j++) {
      if (book[i][j] == 0 && checkColor(i, j, width, bg)) { //没标记过 且是非背景色
        book[i][j] = 1;
        var color = colorRgb(colors[ranNum()]);
        dfs(i, j, color);  //深度优先搜索
      }
    }
  }

  ctx.putImageData(imgD, 0, 0);
}
// 验证该位置的像素 不是背景色为true
function checkColor(i, j, width, bg) {
  var x = calc(width, i, j);

  if (imgD.data[x] != bg[0] && imgD.data[x + 1] != bg[1] && imgD.data[x + 2] != bg[2]) {
    return true;
  } else {
    return false;
  }
}

// 改变颜色值
function changeColor(i, j, colorArr) {
  var x = calc(width, i, j);
  imgD.data[x] = colorArr[0];
  imgD.data[x + 1] = colorArr[1];
  imgD.data[x + 2] = colorArr[2];
}


// 返回对应像素点的序号
function calc(width, i, j) {
  if (j < 0) {
    j = 0;
  }
  return 4 * (i * width + j);
}Key code
We use a direction array to simplify the operation. We have agreed that the direction to try is clockwise. Start from the right.
// 方向数组
var next = [
  [0, 1], //右
  [1, 0], //下
  [0, -1], // 左
  [-1, 0] //上
];

// 深度优先搜索
function dfs(x, y, color) {
  changeColor(x, y, color);
  for (var k = 0; k <= 3; k++) {
    // 下一个坐标
    var tx = x + next[k][0];
    var ty = y + next[k][1];

    //判断越界
    if (tx < 0 || tx >= height || ty < 0 || ty >= width) {
      continue;
    }


    if (book[tx][ty] == 0 && checkColor(tx, ty, width, bg)) {
      // 判断位置
      book[tx][ty] = 1;
      dfs(tx, ty, color);
    }

  }
  return;
}The last pitfall I encountered is that when the length and width are greater than 220, the stack will overflow, but if it is less than this value, there will be no problem. The specific reason is not clear. I guess it may be that there is a problem there. , leading to an infinite loop.
All code here
// 分离颜色参数  返回一个数组
var colorRgb = (function() {
  var reg = /^#([0-9a-fA-f]{3}|[0-9a-fA-f]{6})$/;

  return function(str) {
    var sColor = str.toLowerCase();
    if (sColor && reg.test(sColor)) {
      if (sColor.length === 4) {
        var sColorNew = "#";
        for (var i = 1; i < 4; i += 1) {
          sColorNew += sColor.slice(i, i + 1).concat(sColor.slice(i, i + 1));
        }
        sColor = sColorNew;
      }
      //处理六位的颜色值
      var sColorChange = [];
      for (var i = 1; i < 7; i += 2) {
        sColorChange.push(parseInt("0x" + sColor.slice(i, i + 2)));
      }
      return sColorChange;
    } else {
      var sColorChange = sColor.replace(/(rgb\()|(\))/g, "").split(",").map(function(a) {
        return parseInt(a);
      });
      return sColorChange;
    }
  }
})();

// 验证该位置的像素 不是背景色为true
function checkColor(i, j, width, bg) {
  var x = calc(width, i, j);

  if (imgD.data[x] != bg[0] && imgD.data[x + 1] != bg[1] && imgD.data[x + 2] != bg[2]) {
    return true;
  } else {
    return false;
  }
}

// 改变颜色值
function changeColor(i, j, colorArr) {
  var x = calc(width, i, j);
  imgD.data[x] = colorArr[0];
  imgD.data[x + 1] = colorArr[1];
  imgD.data[x + 2] = colorArr[2];
}

// 返回对应像素点的序号
function calc(width, i, j) {
  if (j < 0) {
    j = 0;
  }
  return 4 * (i * width + j);
}
// 方向数组
var next = [
  [0, 1], //右
  [1, 0], //下
  [0, -1], // 左
  [-1, 0] //上
];

// 深度优先搜索
function dfs(x, y, color) {
  changeColor(x, y, color);
  for (var k = 0; k <= 3; k++) {
    // 下一个坐标
    var tx = x + next[k][0];
    var ty = y + next[k][1];

    //判断越界
    if (tx < 0 || tx >= height || ty < 0 || ty >= width) {
      continue;
    }

    if (book[tx][ty] == 0 && checkColor(tx, ty, width, bg)) {
      // 判断位置
      book[tx][ty] = 1;
      dfs(tx, ty, color);
    }

  }
  return;
}

/*****上面为封装的函数*****/

/***参数***/
var bg = colorRgb("#fff"); //忽略的背景色
var width = 220;
var height = 220;
var imgD; //预留给 像素信息数组
var colors = ["#368BFF", "#EF2767", "#F17900", "#399690", "#5aa6f7", "#fd417e", "#ffc000", "#59b6a6"];  //染色数组
// 随机colors数组的一个序号
var ranNum = (function() {
  var len = colors.length;
  return function() {
    return Math.floor(Math.random() * len);
  }
})();

// 标记数组
var book = [];
for (var i = 0; i < height; i++) {
  book[i] = [];
  for (var j = 0; j < width; j++) {
    book[i][j] = 0;
  }
}
// canvas 部分
var canvas = $("canvas")[0];
var ctx = canvas.getContext("2d");

var img = new Image();
img.src = path; //这里的path就是图片的地址
img.onload = function() {
  ctx.drawImage(img, 0, 0, width, height);
  imgD = ctx.getImageData(0, 0, width, height);

  for (var i = 0; i < height; i++) {
    for (var j = 0; j < width; j++) {
      if (book[i][j] == 0 && checkColor(i, j, width, bg)) { //没标记过 且是非背景色
        book[i][j] = 1;
        var color = colorRgb(colors[ranNum()]);
        dfs(i, j, color);  //深度优先搜索
      }
    }
  }

  ctx.putImageData(imgD, 0, 0);
}Summary
Although it seems a bit long, most functions actually process pixel information. To implement it, the main thing is to have an understanding of depth-first search. Every pixel is searched for depth-first. The dyed ones are naturally marked, so when a new unmarked pixel appears, it naturally means New color blocks. In terms of details, just pay attention to the correspondence between imgD.data and pixel serial numbers, and everything else will be fine. However, one thing to note is that because the pixels are very small, color blocks that appear to be disconnected to the naked eye may be connected together and dyed the same color.
I forgot to post pictures, so here are a few. They were taken from QQ, and the outer borders were accidentally cut off. Well, let’s take a look.
The above is the detailed content of How to convert a solid color QR code into a colored QR code (JavaScript). For more information, please follow other related articles on the PHP Chinese website!


![[Web front-end] Node.js quick start](https://img.php.cn/upload/course/000/000/067/662b5d34ba7c0227.png)


