


In actual mobile application interaction methods, the most common one is sliding operation. Sliding left and right to switch pages, spreading your fingers to enlarge pictures, etc. are all done by sliding operations.
The related events provided by WeChat applet by default are as follows:
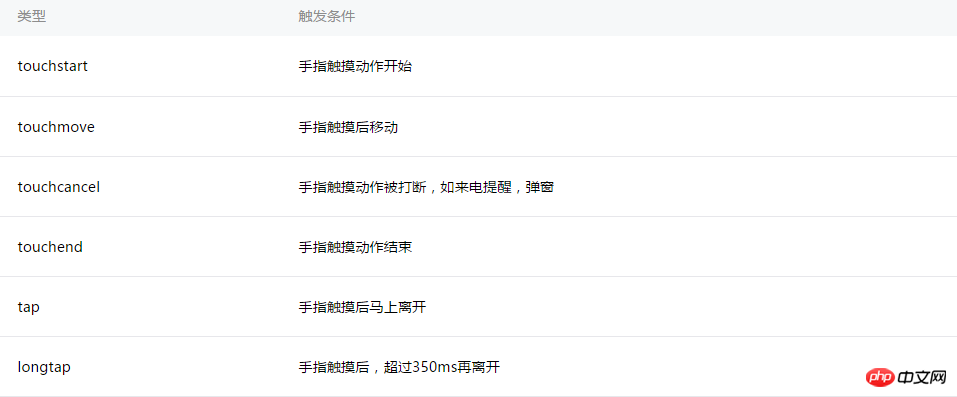
Touch related operation events
tapCorresponding to click operations, longtap is also provided to support long press operations. These are relatively simple, so I won’t go into details.
touchmove corresponds to the sliding operation, and bindtouchmove can respond to the sliding operation.
//wxml
<view id="id" bindtouchmove="handletouchmove" style = "width : 100px; height : 100px; background : #167567;">
</view>

//js
Page({
  handletouchmove: function(event) {
    console.log(event)
  },
})When you press and hold the view label and slide the mouse, the sliding event will be triggered continuously until you release the mouse. When the mouse moves out of the view label Event will still be triggered after the area is reached.
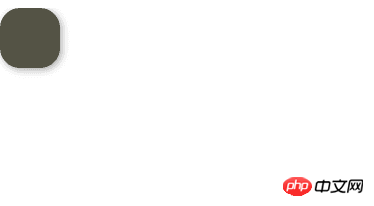
By listening to sliding events, some practical functions can be implemented. For example, users who have used iPhone know assistivetouch, a shortcut button on the desktop, which can drag the button to Anywhere on the desktop. For convenience, a circle is used to represent the button.
//wxml
<view id="id" class = "ball" bindtouchmove="handletouchmove" style = "width : 60px; height : 60px; background : #545345;">
</view>

//wxss
.ball {
  box-shadow:2px 2px 10px #AAA;
  border-radius: 20px;
  position: absolute;
}

//js
Page({
  handletouchmove: function(event) {
    console.log(event)
  },
})
View Follow
Okay, the button is a bit ugly, that’s not the point. The implementation idea of drag and drop operation is also very simple. When a sliding event is triggered, the event object will contain the coordinate information of the current touch position, which can be passed through event.touches[0].pageX and event.touches [0].pageY to get why touches is an array. The answer is to support multi-touch (I don’t know how to simulate multi-touch on the computer). Next, set the button's position to the touch position, which should achieve the desired effect. Let's give it a try.
Define the button's position data ballBottom and ballRight in the Page and bind them to the corresponding properties of the view.
//wxml
<view id="id" class = "ball" bindtouchmove="handletouchmove" style = "width : 60px; height : 60px; background : #545345; top:{{ballTop}}px; left: {{ballLeft}}px">
</view>

//js
Page({
  data: {
    ballTop: 0,
    ballLeft: 0,
  },
  handletouchmove: function(event) {
    console.log(event)
  },
})Next, update the position data of the button in the handletouchmove method
handletouchmove: function(event) {
  console.log(event)
  this.setData ({
    ballTop: event.touches[0].pageY,
    ballLeft: event.touches[0].pageX,
  });
},It is found that the effect can be basically achieved, but there are two problems. One is that the button will be dragged out of the edge of the screen, and the second button is always at the bottom right of the mouse.
Next, add judgment on the screen boundaries and correct the button position. The screen size can be obtained through wx.getSystemInfo.
The complete code is as follows:
Page({
  data: {
    ballTop: 0,
    ballLeft: 0,
    screenHeight:0,
    screenWidth:0

  },
  onLoad: function () {
      //获取屏幕宽高
    var _this = this;
    wx.getSystemInfo({
     success: function (res) {
        _this.setData({
          screenHeight: res.windowHeight,
          screenWidth: res.windowWidth,
        });
      }
    });
  },
  handletouchmove: function(event) {
    console.log(event)
    let pageX = event.touches[0].pageX;
    let pageY = event.touches[0].pageY;
    //屏幕边界判断
    if (pageX < 30 || pageY < 30)
      return;
    if (pageX > this.data.screenWidth - 30)
      return;
    if (pageY > this.data.screenHeight - 30)
      return;
    this.setData ({
      ballTop: event.touches[0].pageY - 30,
      ballLeft: event.touches[0].pageX - 30,
    });
  },
})Run it again, everything is ok.
Various gesture operations can be recognized by processing sliding operations, such as left and right sliding, etc. The idea is also very simple, just bind the touchstart and touchmove events, and then identify and calculate the coordinate information (for example, current.PageX - last.PageX < 0 is considered to be sliding to the left)
//wxml
<view id="id" class = "ball" bindtap = "handletap" bindtouchstart = "handletouchtart" bindtouchmove="handletouchmove" style = "width : 100%px; height : 40px;">
{{text}}
</view>

//js
Page({
  data: {
    lastX: 0,
    lastY: 0,
    text : "没有滑动",
  },
  handletouchmove: function(event) {
    console.log(event)
    let currentX = event.touches[0].pageX
    let currentY = event.touches[0].pageY

    console.log(currentX)
    console.log(this.data.lastX)
    let text = ""
    if ((currentX - this.data.lastX) < 0)
      text = "向左滑动"
    else if (((currentX - this.data.lastX) > 0))
      text = "向右滑动"

    //将当前坐标进行保存以进行下一次计算
    this.data.lastX = currentX
    this.data.lastY = currentY
    this.setData({
      text : text,
    });
  },

  handletouchtart:function(event) {
    console.log(event)
    this.data.lastX = event.touches[0].pageX
    this.data.lastY = event.touches[0].pageY
  },
  handletap:function(event) {
    console.log(event)
  },
})Run the program , when sliding to the left, view will display "Swipe to the left", and the same applies to the right.
Identify left and right sliding and up and down interactions at the same time
Sometimes you want to recognize left and right sliding and up and down sliding at the same time. You can compare the difference on the X-axis with the difference on the Y-axis. The larger difference is the sliding direction.
 handletouchmove: function(event) {
    console.log(event)
    let currentX = event.touches[0].pageX
    let currentY = event.touches[0].pageY
    let tx = currentX - this.data.lastX
    let ty = currentY - this.data.lastY
    let text = ""
    //左右方向滑动
    if (Math.abs(tx) > Math.abs(ty)) {
      if (tx < 0)
        text = "向左滑动"
      else if (tx > 0)
        text = "向右滑动"
    }
    //上下方向滑动
    else {
      if (ty < 0)
        text = "向上滑动"
      else if (ty > 0)
        text = "向下滑动"
    }

    //将当前坐标进行保存以进行下一次计算
    this.data.lastX = currentX
    this.data.lastY = currentY
    this.setData({
      text : text,
    });
},In actual applications, when a certain gesture is triggered, the gesture will be recognized until the user releases the mouse or finger. For example, when the user triggers the left swipe gesture and then swipes down, the user still has to follow the left swipe gesture.
You can define a mark to record the first recognized gesture. If the gesture has been recognized, subsequent sliding operations can be ignored until the user releases the mouse or finger. Release the mouse or finger operation can be handled by binding the handletouchend event.
Page({
  data: {
    lastX: 0,
    lastY: 0,
    text : "没有滑动",
    currentGesture: 0,
  },
  handletouchmove: function(event) {
    console.log(event)
    if (this.data.currentGesture != 0){
      return
    }
    let currentX = event.touches[0].pageX
    let currentY = event.touches[0].pageY
    let tx = currentX - this.data.lastX
    let ty = currentY - this.data.lastY
    let text = ""
    //左右方向滑动
    if (Math.abs(tx) > Math.abs(ty)) {
      if (tx < 0) {
        text = "向左滑动"
        this.data.currentGesture = 1
      }
      else if (tx > 0) {
        text = "向右滑动"
        this.data.currentGesture = 2
      }

    }
    //上下方向滑动
    else {
      if (ty < 0){
        text = "向上滑动"
        this.data.currentGesture = 3

      }
      else if (ty > 0) {
        text = "向下滑动"
        this.data.currentGesture = 4
      }

    }

    //将当前坐标进行保存以进行下一次计算
    this.data.lastX = currentX
    this.data.lastY = currentY
    this.setData({
      text : text,
    });
  },

  handletouchtart:function(event) {
    console.log(event)
    this.data.lastX = event.touches[0].pageX
    this.data.lastY = event.touches[0].pageY
  },
  handletouchend:function(event) {
    console.log(event)
    this.data.currentGesture = 0
    this.setData({
      text : "没有滑动",
    });
  },
})Multi-touch control
Since multi-touch control requires a real machine to test, and my appid is still being applied for, I can only postpone the explanation. Here is a general idea. For example, the operation of opening your fingers can determine the moving direction of the two touch points respectively. For example, the touch point on the left slides to the left, and the touch point on the right slides to the right, that is, It can be judged as a finger spread operation.
The above is the detailed content of Basics of Mini Program Development: Sliding Operation (10). For more information, please follow other related articles on the PHP Chinese website!


![[Web front-end] Node.js quick start](https://img.php.cn/upload/course/000/000/067/662b5d34ba7c0227.png)


