
In view of the current basic situation of high population density on university campuses, frequent crowd activities, and the easy loss of items such as teachers and students' study and life, we analyzed the low work efficiency, low recovery rate, poor confidentiality, etc. in the traditional lost and found process. Based on the problems and deficiencies such as decentralized management, a WEB model lost and found information management platform was proposed. This platform mainly solves the shortcomings of information silos in the traditional lost and found management process, improves the efficiency of lost and found work, reduces the direct economic losses of teachers and students, and facilitates teachers and students through the functions of lost and found information release and lost and found. daily life. This system uses LAMP (ubuntu+Apache+MySQL+php) as the development environment. The back-end php framework uses the currently popular laravel framework and fully follows MVC The Design pattern. The domestic open source responsive HTML5 development framework AmazeUI is selected as the front-end view framework, which can well adapt to the mobile terminalpage layout.
Keywords: campus; lost and found; information release; content management system; php; laravel; MySQL; AmazeUI
1. Research background and significance of the topic
2. System feasibility analysis
1. Business process analysis
2. User experience analysis
1. Function module
2. User interface
1. Development environment
2. Technical framework
3. Database design
4.MVC design pattern
5. Core code implementation
6. Testing and operation instructions
College students carry more things, have many activities, and often travel to different places, so it is easy for items to be lost. At present, our school There is a lack of an effective system to help students find lost items. Considering that college students generally use the Internet and the campus network coverage is high, a lost and found system is implemented through the Internet as a convenient and efficient way to optimize the lost and found business, making the lost and found management clear, transparent, easy to operate, and easy to manage. . Through this system, the owner of the lost property can publish the latest notice of finding to notify everyone, and the owner can find and contact the owner of the lost property through this platform. And as long as you are a registered user of the website, you can post management articles and leave messages. This not only avoids property losses, but also strengthens communication between people. Therefore, the development of this lost and found platform will definitely greatly facilitate the lives of teachers and students on campus. They no longer have to worry about trivial matters such as finding lost items, and truly let technology serve life.
Technical feasibility
Utilize stable ubuntu linux As a server environment, Apache handles the communication between the client and the server. MySQL database stores user information and published articles and messages. PHP is used as the back-end language to implement dynamic page processing, coupled with simple and elegant responsiveness. The front-end development framework can develop a management system that meets the requirements.
Economic feasibility
The development and later operation and maintenance of the website platform require very little manpower and material resources, and can be deployed in the school On the server, it is managed uniformly by the staff of the network service center.
Social feasibility
On campus, we often see this scene. A classmate is looking for the door of the hot water room over and over again, and then says, why is it missing again? , while looking for it again unwillingly. Or maybe it's like this scene, "Notice of found items - dormitory number, lost items, and finally curse those who pick up items and don't return them." The existing lost and found office work is cumbersome and inefficient, so it is very important to develop a lost and found management system. necessary.
Business process analysis can help developers understand the business process, discover and process it Systematic investigation of errors and omissions in work. Business process analysis is carried out through business process diagrams, which use some prescribed symbols and connections to represent a specific business process.
The specific business process of this system is shown in the following figure:
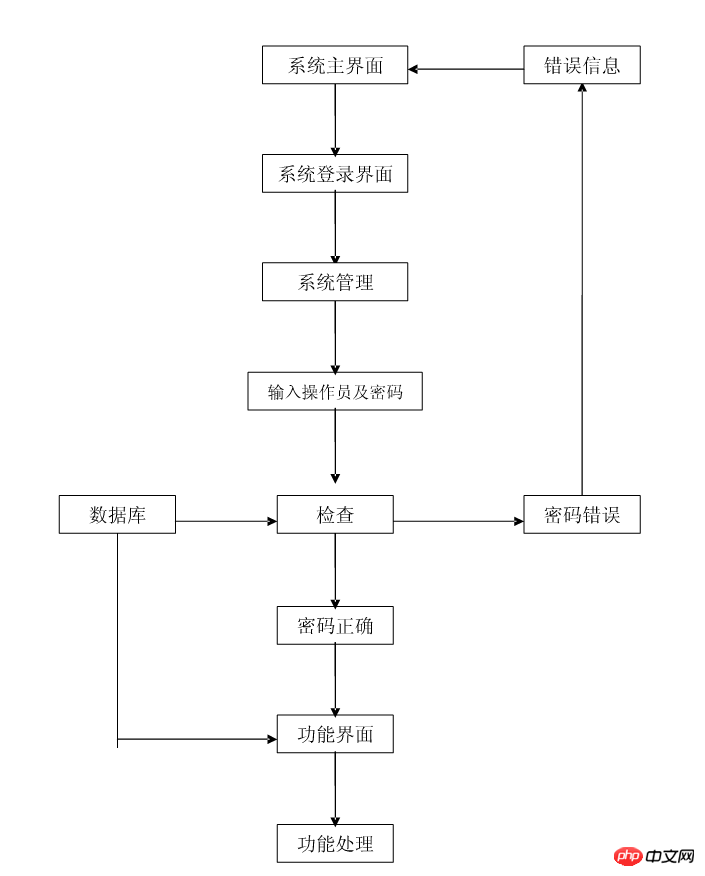
Business process.PNG
User experience is an aspect that attaches great importance to today's product development process. When we develop a product or provide a service, it is ultimately aimed at the majority of users who do not pay attention to or care about the technical aspects. Therefore, in the interface Friendliness, intuitiveness, and ease of operation must be considered. This lost and found system is operated in accordance with the following principles:
Practicality: The system targets user needs, takes user convenience as the principle, fully considers all details of actual operation, and makes ordinary Users can have a clear understanding of the operation process at the first glance when they open the page. It truly builds a platform that serves teachers and students and provides convenience for users to issue online lost and found items.
: In the design, various security measures in network software and hardware will be fully considered to ensure the security of user data and information. For example, if the user's account and password stored in the database are encrypted using PHP hash, even if the database is leaked, what you will see will be a bunch of garbled characters.
, user (Administrator) Functions of several major modules such as login, home page display, lost and found article publishing, message board, background management, and tag management:
The main functional structure of this system is shown in the following figure:
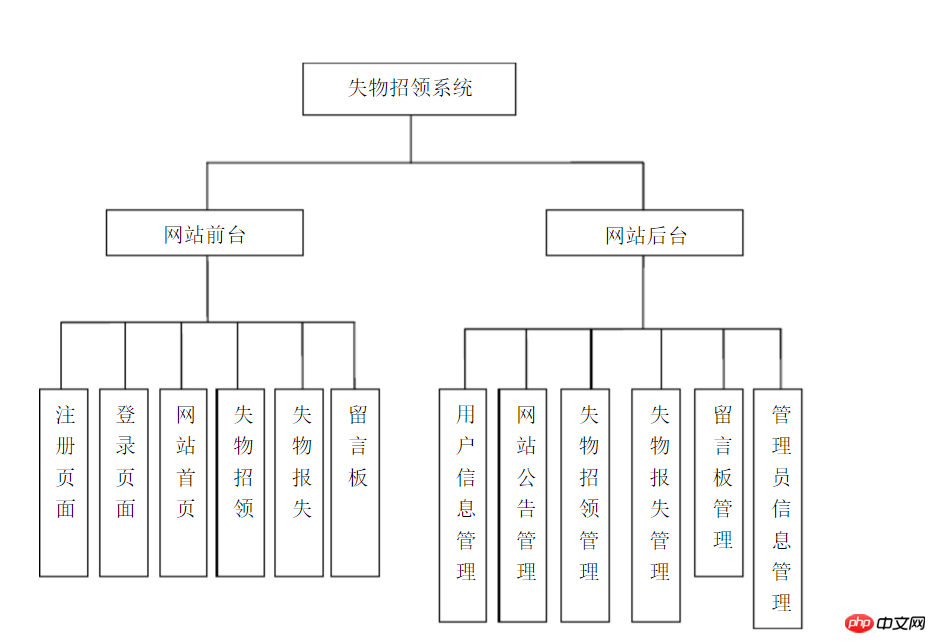 ##Functional structure diagram.PNG
The local development environment of the website uses lamp (i.e. Linux+Apache+MySQL+PHP) . Lamp is a set of open source software commonly used to build dynamic websites or servers. They are independent programs, but because they are often used together, they have increasingly higher compatibility, and together they form a powerful Web application. program platform. All development tools of lamp are open source software. With the vigorous development of the open source trend, it is foreseeable that lamp will become the mainstream of web development in the future. Because of its zero cost and abundant learning materials, it has naturally become my preferred development environment.
The back-end PHP framework uses the popular foreign open source framework - laravel, which is also known as "the most concise and elegant PHP web development framework". Based on this, it can be quickly and To build a web APP efficiently, Laravel's goal is to create a pleasant development process for developers without sacrificing application functionality. Not long after I started learning PHP development, I knew very little about some PHP frameworks. I saw an article on csdn titled "phpDevelopmentFrameworkPopularity Ranking: Laravel Tops", and then I learned that there is such a thing as Laravel. Framework, and its file directory and code structure are clear. It is based on the MVC design pattern and is friendly to beginners, so I chose this framework. This course design can be regarded as my learning and practice of the laravel framework to a large extent. There are many PHP application frameworks, such as the domestic thinkPHP framework, which is also widely used in China. In the early stage, I tried to use thinkPHP for development. Its structural code is simple and direct, and easy to use, but it has mixed reputations in terms of code specification , is not suitable for beginners to develop good coding habits, so abandon it.
The following is a brief introduction to the laravel framework architecture.
Laravel is called a "full stack" framework because it can handle everything from network services to database management and HTML generation. The vertically integrated web development environment provides developers with a better experience. Developers can generate and manage Laravel project environments through command line tools. Laravel comes with an excellent command line tool called Artisan that you can use to generate framework code and database schema. Artisan can handle everything from database schema migration to resource and configuration management.
Laravel projects are created using composer (Composer is a tool used in PHP to manage dependency (dependency) relationships. You can declare the external tool libraries you depend on in your project (libraries), Composer will help youinstallthese dependent library files). Execute in the linux terminal:
$ composer create-project laravel/laravel --prefer-dist web 5.1
will create a file named The project folder of the web, the specified laravel version is 5.1. Its directory structure is as shown below:
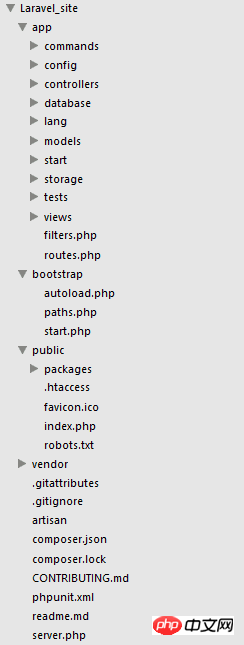
| Top-level folder | Function |
|---|---|
| Contains the site The controller ( | controller), models (model), views (views) and assets (resources). These are the main pieces of code that run your website, and you'll spend most of your time on them. |
| bootstrap | Used to store files required when the system starts. These files will be called by files such as index.php.|
| static resources, such as css, JavaScript, images, etc. | |
| is used to store all third-party code. In a typical laravel application, this includes larceny source code and its related, and contains additional pre- A plugin that wraps functionality. |
| Files and folders | Function |
|---|---|
| Configure the application's runtime rules, database, | session, etc. Contains a number of config files for changing various aspects of the framework. Most options returned in configuration files are associated with PHP arrays. |
| Various application-level settings, time zone, regional settings (locale), | Debug mode and a unique encryption key. |
| Control how authentication is performed in the application, that is, the authentication | driver program. |
| cache.php | If the application usescache to speed up response time, it must be This configures the feature. |
| Here you can specify some additional classes to include the compiled files claimed by the 'artisan optimize' command. These should be classes that are included on basically every request to the application. | |
| Contains the relevant configuration information of the database, that is, the default database engine and connection information. | |
| is the configuration file of the email sending engine, that is, the SMTP server. | |
| Control how Laravel manages user sessions, that is, session driver, session l | ifetime . |
| Miscellaneous configuration of the template system. | |
| Contains controller classes that provide basic logic, interact with the data model, and load the application's view files. | |
| Contains some PHP classes that allow Laravel | to update the schema of the current database while maintaining all versions of the database synchronization. Migration files are generated using Artisan tools. |
| Contains PHP files that allow Artisan tools to populate database tables with relational data. | |
| lang/ | PHP file containingstrings that make the application easy to localize array. By default the directory contains language lines for pagination and form validation for the English language. |
| Models are classes that represent an application’s information (data) and rules for operating the data. In most cases, each table in the database will correspond to a model in the application. The majority of the application business logic will be concentrated in the model. | |
| Contains custom settings related to Artisan tools and global and local contexts. | |
| This directory stores temporary files for Laravel's various services, such as session, cache, and compiled view templates. This directory must be writable on the web server. This directory is maintained by Laravel and we don't care. | |
| This folder provides you with a convenient location for doing | unit tests. If you use PHPUnit, you can use Artisan tools to execute all tests at once. |
| This folder contains HTML templates used by controllers or | routes. Please note that you can only place template files in this folder. Other static resource files such as css, javascript and images files should be placed in the /public folder. |
| /app/filters.php | This file contains various application and route filtering methods that can be used to alter the results of your application. Laravel has some predefined filters for access control and XSS protection. |
| /app/routes.php | This is your application’s routes file, which contains routing rules that tell Laravel how to connect incoming requests to routes Handling closuresfunctions, controllers and actions. The file also contains several Event declarations, including those for error pages, that can be used to define view composers. |
There are three subdirectories under the /app folder: models/, views/ and controllers/. This shows that laravel follows the MVC architectural pattern. This forces the separation of the "business logic" that feeds into the presentation logic from the graphical user interface (GUI). As far as laravel web applications are concerned, business logic usually consists of data models like users and articles. The GUI is just a web page in the browser. The MVC design pattern is very popular in the world of web development.
MVC pattern includes three components:
Model
A typical laravel application contains the MVC components mentioned above, as shown below:
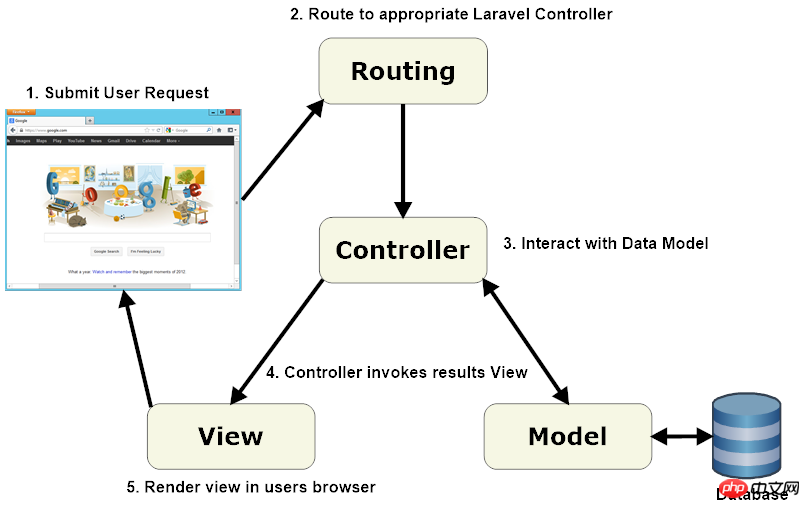
071626088464369.png
When interacting with Laravel, the browser sends a Request, the web server receives the request and passes it to the Laravel routing engine. Laravel routing receives the request and then redirects to the appropriate controller class method based on the route's URL pattern. Then the controller class takes over. In some cases, the controller will immediately render a view, which is a template that is converted into HTML and sent back to the browser. More commonly for dynamic websites, the controller interacts with the model, which is a PHP object that represents an element in the application (such as a user, a blog post) and is responsible for communicating with the database. After calling the model, the controller renders the final view (HTML, CSS, and images) and returns the complete web page to the user's browser. Laravel promotes the concept that models, views, and controllers should be kept fairly independent by storing these elements in separate code files in different directories. This is where the Laravel directory structure comes into play.Use phpmyadmin to perform visual operations on the MySQL database. First create a database named web in MySQL. Then configure laravel's database configuration file/config/database.php as follows:4. Database design
'mysql' => [
'driver' => 'mysql','host' => env('DB_HOST', 'localhost'),'database' => env('DB_DATABASE', 'web'),
'username' => env('DB_USERNAME', ' root'),
'password' => env('DB_PASSWORD', 'sheng'),
'charset' => 'utf8',
'collation' => 'utf8_unicode_ci',
'prefix' => '',
'strict' => false,
],
The tables that exist in the MySQL database are as shown below:
 Constituency_015.png
article_tag: tags of published articles migrations: generated when PHP migrates data, has nothing to do with core functions tags: user tags users: stores user accounts Information5. Core code implementationWeb programs generally have a lot of code. It is unrealistic to put all the codes into the paper and explain them one by one without detail. , so only the core business logic part of the code will be selected, with necessary explanations. On the front end, the AmazeUI responsive development framework and the
The main explanations include the following:
Routing managementArticle management, such as publishing articles, modifying articles, etc.
Tag management, articles will have one or more tags
Database management, such as migration, filling data, etc.
Web form validation
Blade template engine
Paging processing
Safety processing
laravel uses bladetemplate engine, so the view files must be in the form of xxx.blade.php Naming, the directory structure under the web/resources/views/ folder is as shown in the figure:

Selection_017.png
WebsiteEntry fileThe first view file to be loaded is layouts/defalut.blade.php:
<meta charset="UTF-8"/>
<title>Campus Lost and Found Platform</title>
<meta http-equiv="X-UA-Compatible" content="IE=edge"/>
<meta name="<a href="//m.sbmmt.com/css/css-rwd-viewport.html" target="_blank" _href="//m.sbmmt.com/css/css-rwd-viewport.html">viewport</a>"
 content="<a href="//m.sbmmt.com/wiki/835.html" target="_blank" _href="//m.sbmmt.com/wiki/835.html">width</a>=device-width, initial-scale=1.0, minimum-scale=1.0, maximum-scale=1.0, user-<a href="//m.sbmmt.com/wiki/1518.html" target="_blank" _href="//m.sbmmt.com/wiki/1518.html">scala</a>ble=no">
<meta name="<a href="//m.sbmmt.com/wiki/125.html" target="_blank" _href="//m.sbmmt.com/wiki/125.html">for</a>mat-detection" content="telephone=no"/>
<meta name="renderer" content="webkit"/>
<meta http-equiv="Cache-Control" content="no-siteapp"/>
<link rel="alternate icon" type="image/x-icon" href="{{ asset('img/favicon.ico') }}"/>
<link rel="stylesheet" href="http://cdn.amazeui.org/amazeui/2.7.1/css/amazeui.min.css"/>
<link rel="stylesheet" href="{{asset('css/custom.css')}}">
<script src="//cdn.bootcss.com/jquery/3.1.0/jquery.min.js"></script>
topbar am-topbar-fixed-top"> <p class="am-container"> <h1 class="am-topbar-brand"> <a href="/">Campus Lost and Found Platform</a> </h1> @<a href="//m.sbmmt.com/wiki/137.html" target="_blank" _href="//m.sbmmt.com/wiki/137.html">include</a>('layouts.nav') </p>
@yield('main')
@include('layouts.footer')
amazeui front-end framework file and jQuery files are stored on the cdn network and do not need to be loaded locally, which simplifies the structure of the website folder.
asset('img/favicon.ico') will generate http://localhost:8000/img/favicon.ico
Inheritance
Most view files will inherit the template framework of default.blade.php, such as index.blade.php:@extends('layouts.default')
@section('main')
<p class="am-g am-g-fixed"><br> <p class="am-u-md-8"><br> <!-- 循环输出文章 --><br> @foreach ($articles as $article)<br> <article class="blog-main"><br> <h3 class="am-article-title blog-title"><br> <a href="{{ URL::route('article.show', $article->id) }}">{{{ $article->title }}}</a><br> </h3><br> <h4 class="am-article-meta blog-meta"><br> 由 <a href="{{ URL::to('user/' . $article->user->id . '/articles') }}">{{{ $article->user->nickname }}}</a> 发布于 {{ $article->created_at->format('Y/m/d H:i') }} 标签:<br> <!-- 输出标签 --><br> @foreach ($article->tags as $tag)<br> <a href="{{ URL::to('tag/' . $tag->id . '/articles') }}">{{ $tag->name }}</a><br> @endforeach<br> </h4><br> <p class="am-g"><br> <p class="am-u-sm-12"><br> @if ($article->summary)<br> <p>{!! $article->summary !!}</p><br> @endif<br> <hr class="am-article-pider"/><br> </p><br> </p><br> </article><br> @endforeach<br> </p><br>Copy after login
@extends('layouts.default') will inherit the app/views/layouts/default.blade.php file
@yield( 'main') corresponds to @section('main') and is filled with the content
User login form (in the login.blade.php file) is as follows:
<form action="login" method="post" accept-charset="utf-8" class="am-form"><br> <!-- 添加 token 值 --><br> <input type="hidden" name="_token" value="<?php echo csrf_token(); ?>"><br> <label for="email">邮箱:<br> <input type="email" name="email" value="{{Input::old('email')}}" placeholder=""><br> </label><br> <br><br> <label for="password">密码:<br> <input type="password" name="password" value="" placeholder=""><br> </label><br> <br><br> <label for="remember_me"><br> <input id="remember_me" name="remember_me" type="checkbox" value="1"><br> 记住我<br> </label><br> <br><br> <p class="am-cf"><br> <input type="submit" name="submit" value="登录" class="am-btn am-btn-primary am-btn-sm am-fl"><br> </p><br> </form><br>Copy after login
Laravel and most PHP frameworks use routing (route) to generate URLs and process http requests. The verification of user login data is also placed in the routing file (web/app/route.php):
//post login data
Route::post('login', function(){<br> //数据验证规则<br> $rules = array(<br> 'email' => 'required|email',<br> 'password' => 'required|min:6',<br> 'remember_me' => 'boolean',<br> );<br> $validator = Validator::make(Request::all(), $rules);<br> //验证通过<br> if ($validator->passes())<br> {<br> if (Auth::attempt([<br> 'email' => Request::input('email'),<br> 'password' => Request::input('password'),<br> 'block' => 0], <br> (boolean) Request::input('remember_me')))<br> {<br> return Redirect::to('home');<br> } <br> //账号或密码错误<br> else {<br> return Redirect::to('login')->withInput()->with('message', array('type' => 'danger', 'content' => 'E-mail or password error'));<br> }<br> } <br> //数据格式错误<br> else {<br> return Redirect::to('login')->withInput()->withErrors($validator);<br> }<br>});<br>Copy after login//Visit the homepage
Route::get('home', ['middleware' => 'auth', function()
{
return view ('home');
}]);
Registration operation route:
Route::post('register', function()
{
$rules = ['email' => 'required|email|unique:users,email',<br> 'nickname' => 'required|min:4|unique:users,nickname',<br> 'password' => 'required|min:6|confirmed',<br>Copy after login];
$validator = Validator::make(Request::all(), $rules);
if ($validator->passes())
{$user = new App\User();<br> $user->email = Request::input('email');<br> $user->nickname = Request::input('nickname');<br> $user->password = Hash::make(Request::input('password'));<br> if ($user->save())<br> {<br> return Redirect::to('login')->with('message', array('type' => 'success', 'content' => 'Register successfully, please login'));<br> } else {<br> return Redirect::to('register')->withInput()->with('message', array('type' => 'danger', 'content' => 'Register failed'));<br> }<br>Copy after login} else {
return Redirect::to('register')->withInput()->withErrors($validator);<br>Copy after login}
});
The unique:users,email of the above form validation rules can ensure that the email field in the users table is unique. For example, when entering an existing email, An error message will appear:
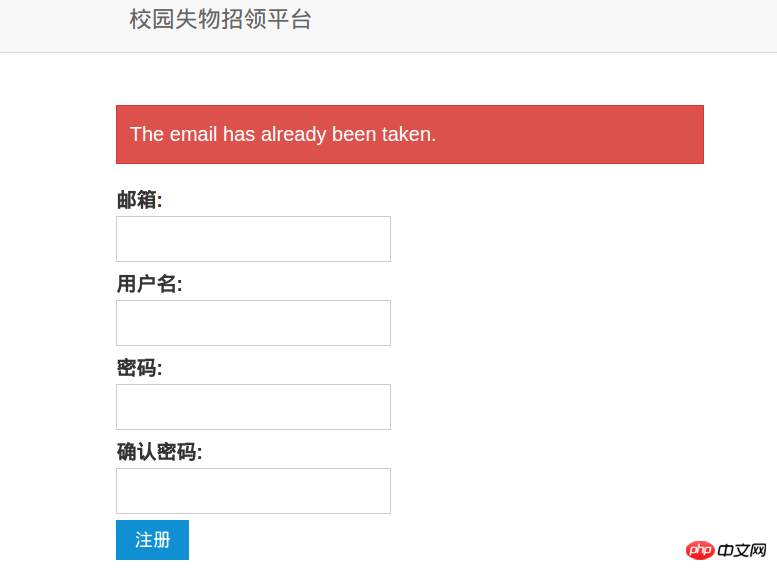
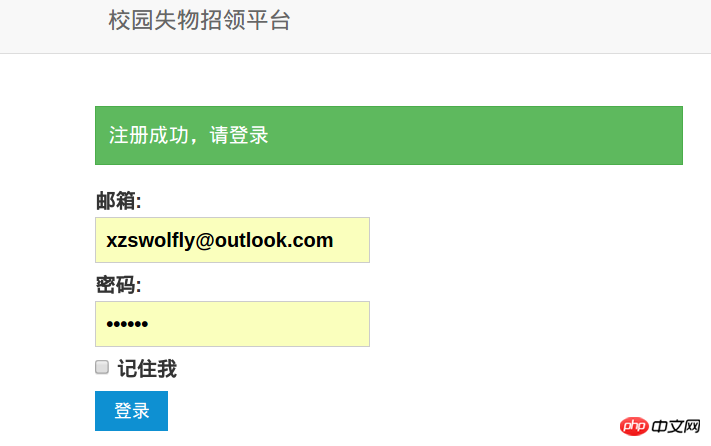
## Constituency_014.png
Users publish lost and found notices, that is, the article publishing module, in the database There are three tables corresponding to: articles, tags and article_tag. Each article will have one or more tags, and each tag will have one or more articles. The core codes of the model file/app/Article.php and Tag.php and User.php are as follows:
User.php:
namespace App;
use Illuminate\Auth\Authenticatable;
use Illuminate\Database\Eloquent\Model;use Illuminate\Auth\Passwords\Can
Reset
Password;use Illuminate\Contracts\Auth\Authenticatable as AuthenticatableContract;use Illuminate\Contracts\Auth\CanResetPassword as CanResetPasswordContract;
User extends Model implements AuthenticatableContract, CanResetPasswordContract{
use Authenticatable, CanResetPassword;<br/>
/**<br/> * The database table used by the model.<br/> *<br/> * @var string<br/> */<br/>protected $table = 'users';<br/><br/>/**<br/> * The attributes that are mass assignable.<br/> *<br/> * @var array<br/> */<br/>protected $fillable = ['name', 'email', 'password'];<br/><br/>/**<br/> * The attributes excluded from the model's JSON form.<br/> *<br/> * @var array<br/> */<br/>protected $hidden = ['password', 'remember_token'];<br/>//模型关联<br/>public function articles()<br/>{<br/> return $this->hasMany('App\Article');<br>}<br>
<br>}<p></p>A user will have multiple articles. <p>Article.php:</p>
<p></p><?php<blockquote>namespace App;<p>use Illuminate\Database\Eloquent\Model;<br/>use Illuminate\Database\Eloquent \Soft<br/>Delete<br/>s; //Use <a href="//m.sbmmt.com/wiki/1298.html" target="_blank" _href="//m.sbmmt.com/wiki/1298.html">soft delete</a> trait<a href="//m.sbmmt.com/php/php-tp-padamlembut.html" target="_blank" _href="//m.sbmmt.com/php/php-tp-padamlembut.html"></a>class Article extends Model</p>{<p><pre class="brush:php;toolbar:false">use SoftDeletes;<br/>protected $fillable = ['title', 'content'];<br/>
public function tags()<br/>{<br/>    return $this->belongsToMany('App\Tag');<br>}<br><br>public function user()<br>{<br>    return $this->belongsTo('App\User');<br>}<br>
 <br>}<p></p>An article will have multiple tags and belong to one user. <p>Tag.php:</p>
<p></p><?php<blockquote><p>namespace App;</p><p>use Illuminate\Database\Eloquent\Model;</p> use Illuminate\Database\Eloquent\SoftDeletes;<p><br/>class Tag extends Model</p>{<p><pre class="brush:php;toolbar:false">use SoftDeletes;<br/>protected $fillable = ['name'];<br/>
public function articles()<br/>{<br/>    return $this->belongsToMany('App\Article');<br>}<br>
 <br>}<p></p>A tag will have multiple articles. <p>This article</p>Editor<p> uses the markdown editor. The simple and elegant layout format of markdown can make the article style more beautiful (it may also require a certain learning cost)<a href="//m.sbmmt.com/code/6852.html" target="_blank" _href="//m.sbmmt.com/code/6852.html"><p>向数据库中添加文章,要用到MVC中的control了./web/app/http/Controllers/ArticleController.php的核心代码如下:</p>
<blockquote><p><?php</p><pre class="brush:php;toolbar:false">namespace App\Http\Controllers;<br/>use Illuminate\Http\Request;<br/>
use App\Http\Requests;<br/>use App\Http\Controllers\Controller;<br/>use Markdown;<br/>use Validator;<br/>use App\Article;<br/>use Auth;<br/>use App\Tag;<br/>use Redirect;<br/><br/>class ArticleController extends Controller<br/><br/>******<br/>******<br/><br/> //保存文章<br/>public function store(Request $request)<br/>{<br/> $rules = [<br/> 'title' => 'required|max:100',<br> 'content' => 'required',<br> 'tags' => ['required', 'regex:/^\w+$|^(\w+,)+\w+$/'],<br> ];<br> //数据校验<br> $validator = Validator::make($request->all(), $rules);<br> if ($validator->passes()) {<br> $article = Article::create($request->only('title', 'content'));<br> $article->user_id = Auth::id();<br> $resolved_content = Markdown::parse($request->input('content'));<br> $article->resolved_content = $resolved_content;<br> $tags = explode(',', $request->input('tags'));<br> //添加 summary<br> if (str_contains($resolved_content, '<p>')) {<br> $start = strpos($resolved_content, '<p>');<br> $length = strpos($resolved_content, '</p>') - $start - 4;<br> $article->summary = substr($resolved_content, $start + 3, $length);<br> } else if (str_contains($resolved_content, '</h')) {<br/> $start = strpos($resolved_content, '<h>');<br> $length = strpos($resolved_content, '</h>') - $start - 4;<br> $article->summary = substr($resolved_content, $start + 4, $length);<br> }<br> $article->save();<br> //处理标签<br> foreach ($tags as $tagName) {<br> $tag = Tag::whereName($tagName)->first();<br> if (!$tag) {<br> $tag = Tag::create(array('name' => $tagName));<br> }<br> $tag->count++;<br> $article->tags()->save($tag);<br> }<br> return Redirect::route('article.show', $article->id);<br> } else {<br> return Redirect::route('article.create')->withInput()->withErrors($validator);<br> }<br>}<br>//展示文章详情<br>public function show($id)<br>{<br> return view('articles.show')->with('article', Article::find($id));<br>}<br></p></blockquote>
<p>上面代码实现了保存文章和显示文章的业务逻辑,保存文章时验证 tags 用了 regex <a href="//m.sbmmt.com/wiki/588.html" target="_blank" _href="//m.sbmmt.com/wiki/588.html">正则表达式</a>来验证标签是否用逗号分隔。</p>
<p>用户修改已经发布的文章的核心代码如下:</p>
<blockquote></blockquote>
<p>@extends('layouts.default')<br> <!-- 编辑文章页面 --><br> @section('main')<br> <p class="am-g am-g-fixed"><br> <p class="am-u-sm-12"></p>
<pre class="brush:php;toolbar:false"> <h1>Edit Article</h1><br> <hr/><br> @if ($errors->has())<br> <p class="am-alert am-alert-danger" data-am-alert><br> <p>{{ $errors->first() }}</p><br> </p><br> @endif<br><form action="{{ URL::route('article.update',$article->id)}}" method="post" accept-charset="utf-8" class="am-form"><br> <input type="hidden" name="_token" id="token" value="<?php echo csrf_token(); ?>"><br> <p class="am-form-group"><br> <label for="title">Title:</label><br> <input type="text" name="title" id="title" value="{{ $article->title}}" placeholder=""><br> </p><br> <p class="am-form-group"><br> <label for="content">Content:</label><br> <textarea name="content" id="content" rows="20" >{{ $article->content }}</textarea><br> <p class="am-form-help"><br> <button id="preview" type="button" class="am-btn am-btn-xs am-btn-primary"><br> <span class="am-icon-eye"></span> Preview<br> </button><br> </p><br> </p><br> <p class="am-form-group"><br> <label for="tags">Tags:<br> <input type="text" name="tags" value="{{ $article->tags }}" placeholder=""><br> </label><br> <p class="am-form-help">Separate multiple tags with a comma ","</p><br> </p><br> <p><button type="submit" class="am-btn am-btn-success"><br> <span class="am-icon-pencil"></span> Modify</button><br> </p><br></form><br></p><br>
<p class="am-popup-hd"><br> <h4 class="am-popup-title"></h4><br> <span data-am-modal-close<br/> class="am-close">×</span><br> </p><br> <p class="am-popup-bd"><br> </p><br>
</p><br>
<script><br> $(function() {</p>
<div class="code" style="position:relative; padding:0px; margin:0px;"><pre class="brush:php;toolbar:false"> $('#preview').on('click', function() {<br> $('.am-popup-title').text($('#title').val());<br> $.post('preview', {'content': $('#content').val(),'_token':$('#token').val()}, function(data, status) {<br> $('.am-popup-bd').html(data);<br> });<br> $('#preview-popup').modal();<br> });<br></pre><div class="contentsignin">Copy after login</div></div>
<div class="code" style="position:relative; padding:0px; margin:0px;"><pre class="brush:php;toolbar:false">});<br></pre><div class="contentsignin">Copy after login</div></div>
<p></script>
@endsection
标签是为了给用户发布的文章分类,便于查找相关信息,其核心代码实现为:
@extends('layouts.default')
@section('main')
<table class="am-table am-table-hover am-table-striped "> <thead> <tr> <th>TagName</th> <th>ArticleCount</th> <th>CreateDateTime</th> <th>Managment</th> </tr> </thead> <tbody> @foreach ($tags as $tag) <tr> <td>{{{ $tag->name }}}</td> <td>{{ $tag->count }}</td> <td>{{ $tag->created_at->format('Y-m-d H:i') }}</td> <td> <a href="{{ URL::to('tag/'. $tag->id . '/edit') }}" class="am-btn am-btn-xs am-btn-primary"><span class="am-icon-pencil"></span> Edit</a> <form action="{{ URL::to('tag/'.$tag->id.'/delete')}}" method="get" accept-charset="utf-8" style="<a href="//m.sbmmt.com/wiki/927.html" target="_blank" _href="//m.sbmmt.com/wiki/927.html">display</a>: inline;"> <button type="button" class="am-btn am-btn-xs am-btn-danger" id="delete{{ $tag->id }}"> <span class="am-icon-remove"></span> Delete </button> </form> </td> </tr> @endforeach </tbody> </table>
</p><br>
</p><br>Copy after login<script><br> $(function() {</p> <div class="code" style="position:relative; padding:0px; margin:0px;"><pre class="brush:php;toolbar:false">$('[id^=delete]').on('click', function() {<br> $('.am-modal-bd').text('Sure you want to delete it?');<br> $('#my-confirm').modal({<br> relatedTarget: this,<br> onConfirm: function(options) {<br> $(this.relatedTarget).parent().submit();<br> },<br> onCancel: function() {<br> }<br> });<br>});<br></pre><div class="contentsignin">Copy after login</div></div> <p>});<br></script>
@endsection
错误处理:
如果用户访问的URL不存在或者服务器存在错误时,我们不希望返回一个默认的错误页面,而想返回一个友好提示的页面,在 Laravel 中可以很轻松地实现,Laravel有很简单的错误和日志处理,当服务器端存在错误时,app\Exceptions\Handler.php 里默认有一个报告所有异常的程序:
/**
* Report or log an exception.<br>*<br>* This is a great spot to send exceptions to Sentry, Bugsnag, etc.<br>*<br>* @param \Exception $e<br>* @return void<br>*/<br>Copy after loginpublic function report(Exception $e)
{return parent::report($e);<br>Copy after login}
当访问的URL不存在时,服务器会抛出一个 404 错误,laravel 对 HTTP 异常有特别的处理方式:
@extends('layouts.default')
@section('main')
<h1 style="text-align:center;">啊哦,你访问的页面不存在!</h1><br><h2 style="text-align:center;">返回 <a href="/">首页</a></h2><br>Copy after login@endsection
现在当你访问的 URL 不存在时,laravel 会自动到模板目录去寻找状态码为 404 的错误模板页面 404.blade.php
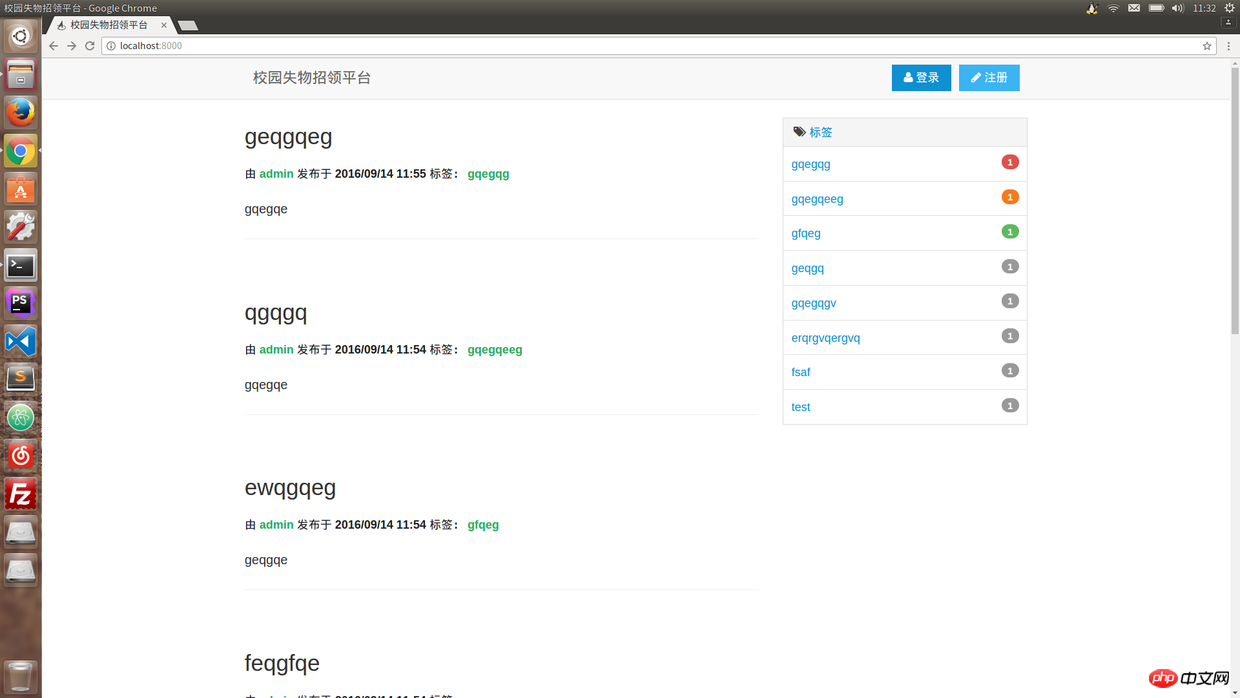
主页展示.png
整体页面做的比较简洁,因为我侧重在功能实现,故对界面设计方面没有花太多时间。
用户登录:

管理员登录.png
这里的登录注册使用了laravel框架的regex正则表达式匹配。
登录之后,会出现文章管理界面:

文章管理.png
这里随便添加了一些测试数据。
删除文章:

预览文章.png
点击删除文章会调用一段js代码,实现模态弹出框。
发布文章:
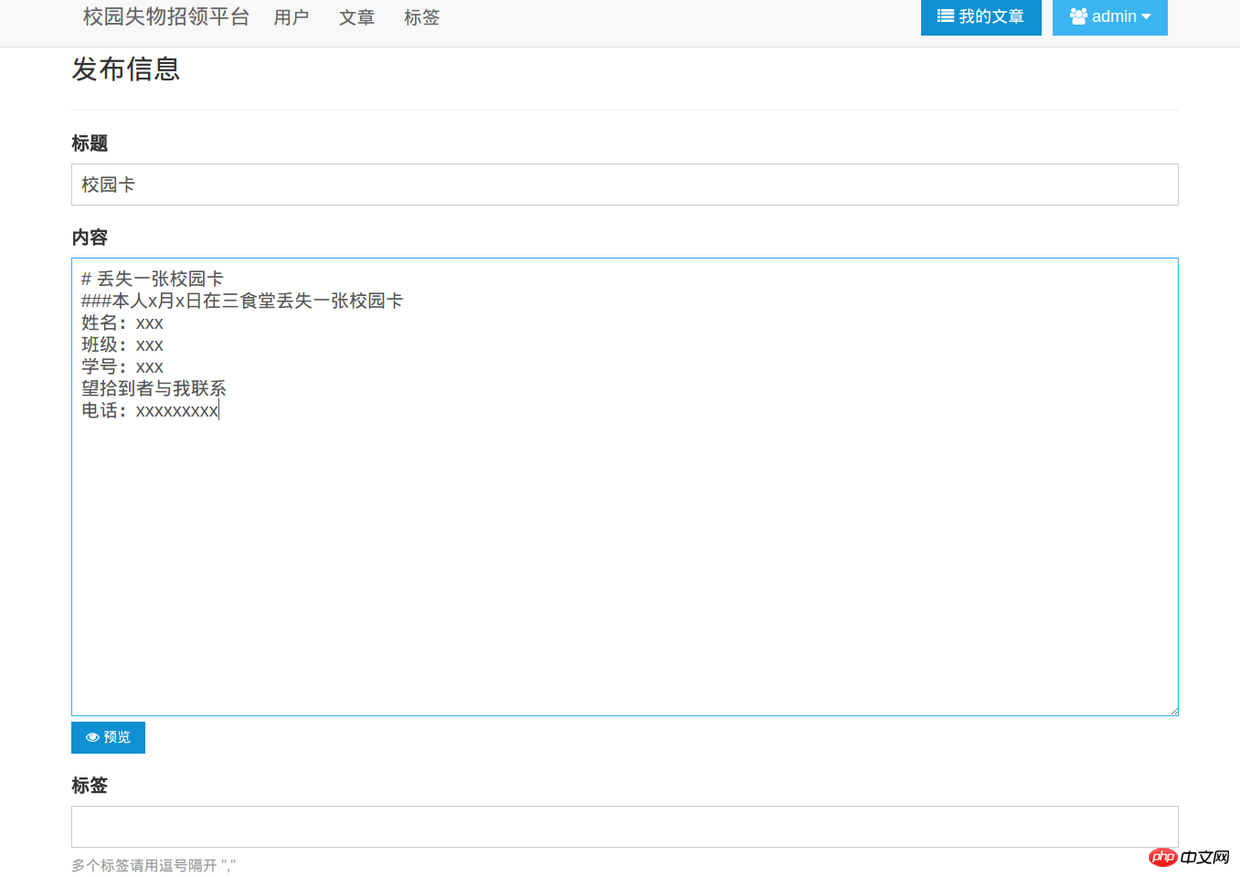
发布信息.png
这个编辑器使用了markdown语法来编辑文字,可能对于普通用户来说有比较高的门槛,本想用富文本编辑器的,但是由于时间较为紧张,而markdown插件易于使用,故在beta版本中以此来暂时代替。
点击预览:
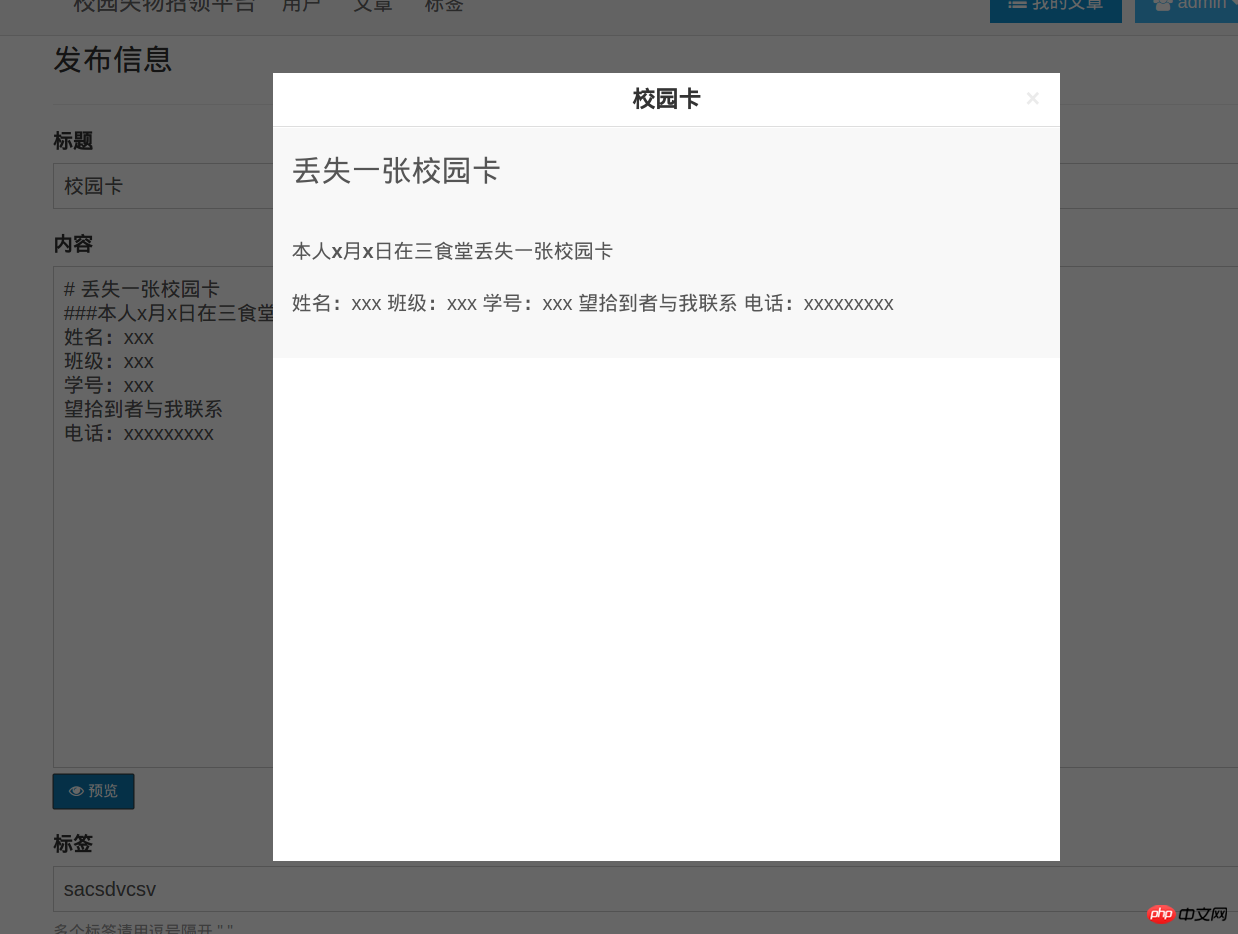
预览文章.png
这里也调用了js解析markdown,生成html。
发布之后:
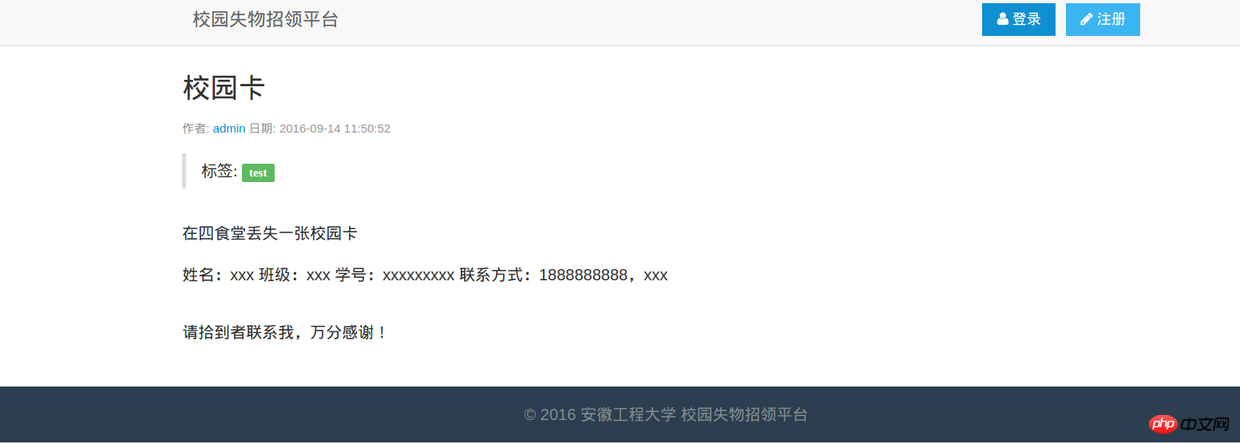
失物招领启事详情.png
这样一个简单的失物招领启事发布管理系统就完成了,测试各功能正常。
通过开发这个校园失物招领平台,其实就完成了一个最小内容管理系统,一个完整的内容管理系统包括这几个核心的模块:
用户管理
文章管理
标签管理
90%的网站功能开发都可以归纳为CRUD(即增删改查)操作,可能对于一个这样功能简单的管理系统来说,没有必要去使用重型的laravel框架,看起来有点过度设计了,但是我作为一个php初学者来说,也是想通过这个机会来学习一下这个优秀的框架,学习框架的过程也加深了对php语言的理解,对于以后开发更大型的网站能够积累一点相关经验。
这个系统目前还存在很多问题,比如界面不太符合失物招领的常规设计,有很多当初的设想也没能实现,markdown的编辑器不可能用在面向普通用户的网页中,入口首页和留言板功能由于时间关系没能加上,颇为遗憾。我希望以后能有时间去逐步地完善它,改造为我的个人博客,或者以此为基础,实现我一直以来的一个想法——搭建一个学生门户网站,当然这个工程量就非常大了。
Looking back at this entire learning and development process, I feel that it was not easy. Starting from the most basic front-end html+css+js, to the basic syntax of php, and then to the laravel framework, I consulted a lot of information and watched 100+ hours of online moocvideo. Completed this course design. Thanks to those technology bloggers for their selfless sharing. The experience and insights of predecessors have saved future generations from making many detours. From this, I deeply feel the importance of the spirit of open source sharing. It is the open source movement that has made today’s Internet industry so prosperous. develop. Therefore, I think that in the future learning process, I should always remember to summarize my personal experience and share it, so that my detours can become a bridge for others.
I would also like to thank my friends for their encouragement and dedication. It was the cooperation of a team that enabled this work to be completed as scheduled.
The above is the detailed content of Content management system based on laravel framework. For more information, please follow other related articles on the PHP Chinese website!
 Introduction to laravel components
 Introduction to laravel middleware
 What are the design patterns used by laravel?
 Which one is easier, thinkphp or laravel?
 Laravel Tutorial
 How to cancel automatic renewal on Baidu Netdisk
 Which mobile phone models does Hongmeng OS 3.0 support?
 How to pass value to vue component


