
What I share with you today is the 3D predefined model of the 3D series.
HT for Web provides a variety of basic types for users to use for modeling. Different from traditional 3D modeling methods, the core modeling of HT is based on API interface methods. HT predefined primitive types and parameter interfaces can be set to achieve the construction of 3D models. Next let’s talk about predefined 3D models and parameter settings.
HT The predefined 3D models are: box, sphere, cone, torus, cylinder, star, rect, roundRect, triangle, tightTriangle, parallelogram and trapezoid. Then this How are the twelve types set?
On the 2D graphics of the network topology graph GraphView, the presentation of various graphics is determined by the shape attribute in the style. HT provides the shape3d attribute to predefine a variety of 3D shapes in 3D. . The default value of the shape3d attribute is undefined, and the primitive is displayed as a six-sided cubic shape. When shape3d specifies a value, it is displayed as the shape specified by shape3d. Next, we will introduce each shape of the 3D model one by one.
1. box: Cube, different from the default hexahedron, the six faces of the cube type can only have the same color and texture, and the drawing performance is higher than the default hexahedron;
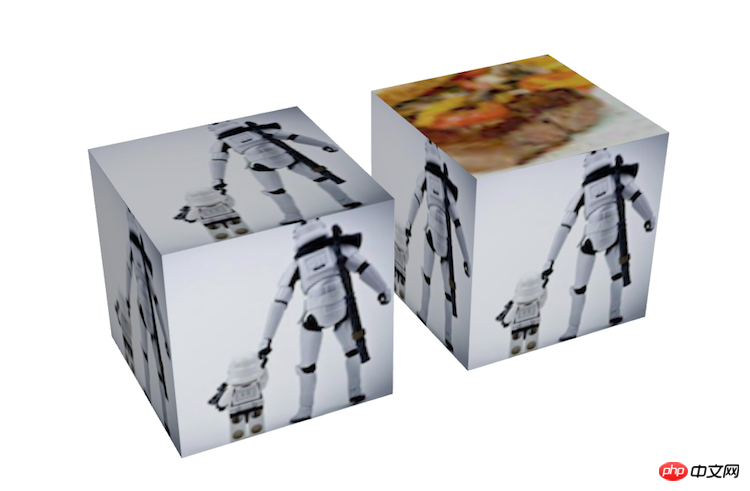
#As shown in the picture above, the left side is shape3d set to box, and the right side is the default hexahedron. Both nodes have textures set for the upper surface, but from the effect, the node with shape3d set to box directly ignores the texture settings of the upper surface. , this also confirms what is described above. The colors and textures of the six sides of the box type can only be the same, and it only works for shape3d.image and shape3d.color. The following is the specific setting code:
node = new ht.Node();
node.s3(80, 80, 80);
node.s({
'shape3d': 'box',
'shape3d.image': 'img11',
'shape3d.top.image': 'img10'});
dm.add(node);

node = new ht.Node();
node.s3(80, 80, 80);
node.p3(100, 0, 0);
node.s({
'all.image': 'img11',
'top.image': 'img10'});
dm.add(node);2. Sphere: The sphere can be divided into multiple pieces through shape3d.side. Combining shape3d.side.from and shape3d.side.to can form a hemisphere, etc.
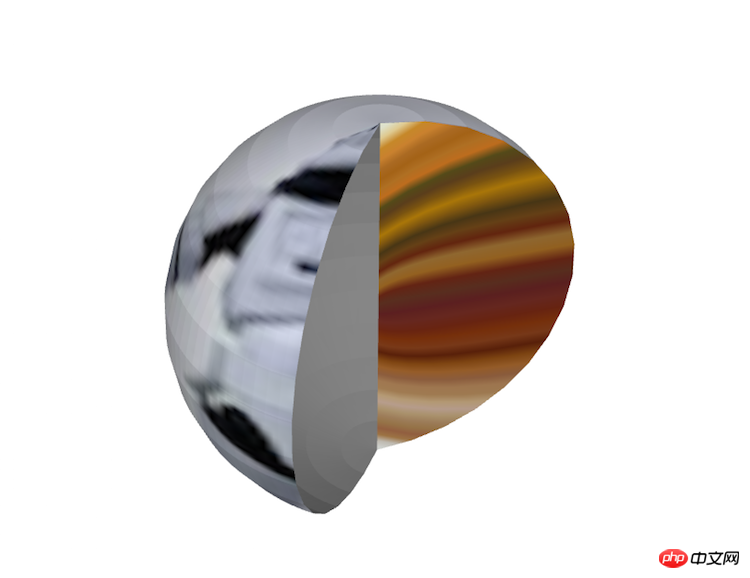
## As shown in the picture above, part of the ball has been cut off. The two faces can be controlled independently. The display effects of the two faces can be controlled independently through two sets of parameters: shape3d.from.* and shape3d.to.*. In the picture above, I hide the to face through shape3d.to.visible. A new texture is set for the from side through shape3d.from.image. The specific code is as follows: node.s({
'shape3d': 'sphere',
'shape3d.image': 'img11',
'shape3d.side': 100,
'shape3d.side.from': 0,
'shape3d.side.to': 65,
'shape3d.from.image': 'img10',
'shape3d.to.visible': false});
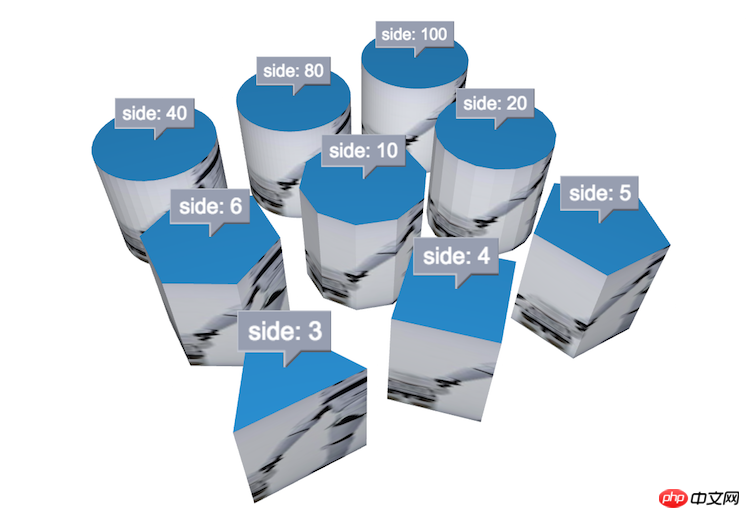
3. cone: cone, which can be passed through shape3d.side Form triangular pyramids, quadrangular pyramids and other shapes
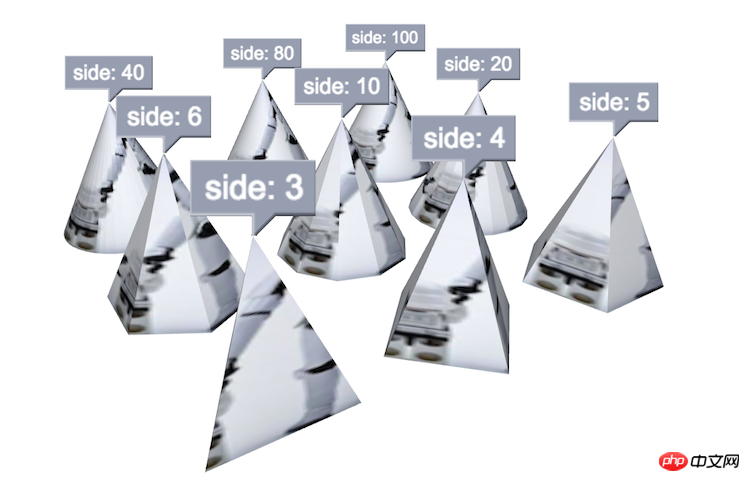
[3, 4, 5, 6, 10, 20, 40, 80, 100].forEach(function(side, index) {
var x = ((index / 3) >> 0) * 100 - 100,
        y = index % 3 * 100 - 100;
    node = new ht.Node();
    node.p3(x, 40, y);
    node.s3(80, 80, 80);
    node.s({
    'shape3d': 'cone',
    'shape3d.image': 'img11',
    'shape3d.side': side,
    'note': 'side: ' + side,
    'note.autorotate': true,
    'note.position': 17,
    'note.face': 'top',
    'note.background': '#979EAF'
    });
    dm.add(node);
});
In the above code, you can see the note-related settings. In passing, the note.autorotate style is used to control the orientation of the note. If set to true , then this note is always facing the direction of the eye, no matter how the scene is rotated.
4. torus: a circle, which can be divided into multiple pieces through shape3d.side. Combining shape3d.side.from and shape3d.side.to can form a semi-circular ring, etc.
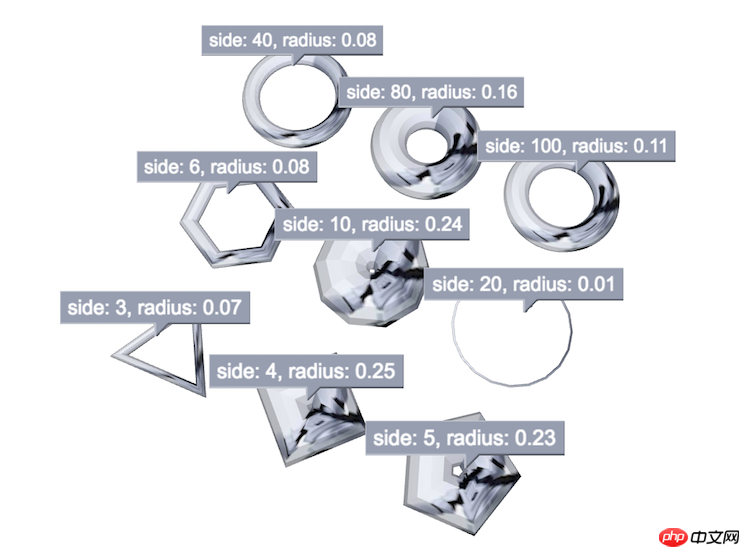 ## As you can see in the picture above, the ring is actually the same as Cones are the same. You can also set the number of sides to form triangular rings, quadrangular rings and other shapes. When the number of sides reaches a certain level, the more sides, the smoother the ring will be.
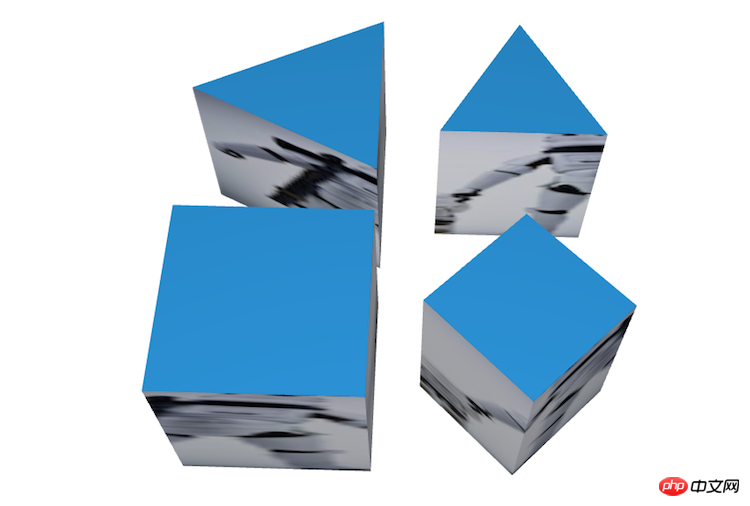
在上图中可以看到 note 中多加了一个 radius 值的打印,这个值对应的是样式中的 shape3d.torus.radius,那么这个值的作用是什么呢,我想从上图也可以看得出来,radius 值是用来控制圆环的半径,但是为什么 radius 为 0.25 的时候圆环中间就被填上了,没有像其他的圆环中间都漏空呢?我们可以这样理解,一个圆环的切面有两个圆环直径,那就有四个圆环半径,那按百分比去计算的话,一个半径就是占整个图元宽的 1/4,也就是 0.25,所以这个 shape3d.torus.radius 样式的取值范围为 0~0.25。 5. cylinder:圆柱,可通过 shape3d.top.* 和 shape3d.bottom.* 可控制顶面和底面的参数 圆柱的参数除了 shape3d.top.* 之外,其他的都和前面提到的圆锥的参数一样,因为圆柱体其实就是比圆锥体多了一个面。 到这里所有的可裁切的基本模型都介绍完了,下面要介绍的几个基本模型就没有 side 的相关属性了,也就意味着,它们将没有 from 和 to 的相关参数,没有裁切的功能。 如果想让不能裁切的基本图元达到裁切的效果,还是有其他方案和方法的,这些,我们就在后续的章节中介绍,还望耐心等待。 6. star:星形体,可通过 shape3d.top.* 和 shape3d.bottom.* 可控制顶面和底面的参数 7. rect:矩形体,可通过 shape3d.top.* 和 shape3d.bottom.* 可控制顶面和底面的参数 8. roundRect:圆矩形体,可通过 shape3d.top.* 和 shape3d.bottom.* 可控制顶面和底面的参数 9. triangle:三角形体,可通过 shape3d.top.* 和 shape3d.bottom.* 可控制顶面和底面的参数 10. rightTriangle:直角三角形体,可通过 shape3d.top.* 和 shape3d.bottom.* 可控制顶面和底面的参数 11. parallelogram:平行四边形体,可通过 shape3d.top.* 和 shape3d.bottom.* 可控制顶面和底面的参数 12. trapezoid:梯形体,可通过 shape3d.top.* 和 shape3d.bottom.* 可控制顶面和底面的参数 上图就是几个还未介绍的基本模型。 仔细观察上图,你会发现,从左算起,第二个和第四个好像在前面的例子中有见过。没错,在形状上是一样的,但是在表现上却是有些差异,到底存在什么差异呢,我们通过图来瞧瞧。 左边是基本模型 rect 和 triangle,右边是通过基本模型 cylinder 模拟出来的 rect 和 triangle,四个图元设置的大小都是一样的,边长都是 80,可以发现基本模型 rect 和 triangle 在表现上会比通过 cylinder 模拟出来的 rect 和 triangle 来的大些,原因很简单,通过 cylinder 模拟出来的 rect 和 triangle 因为其本质还是圆柱体,side 参数是是让图形能够更接近圆形而已,所以绘制出来的图形将会是在一个圆柱体内,也就是 rect 基本模型上表面的内切圆范围内,也就是说通过 cylinder 模拟出来的 rect 上表面的对角线才是图元的变成 80。 以下是相关代码,大家可以尝试下,通过不同角度的观察,可能会更好理解一些。[3, 4, 5, 6, 10, 20, 40, 80, 100].forEach(function(side, index) {
var x = ((index / 3) >> 0) * 100 - 100,
y = index % 3 * 100 - 100;
radius = (Math.random() * 0.25).toFixed(2);
node = new ht.Node();
node.p3(x, 40, y);
node.s3(80, 80, 80);
node.s({
'shape3d': 'torus',
'shape3d.image': 'img11',
'shape3d.side': side,
'shape3d.torus.radius': radius,
'note': 'side: ' + side + ', radius: ' + radius,
'note.autorotate': true,
'note.position': 17,
'note.face': 'top',
'note.background': '#979EAF'
});
dm.add(node);
});
[3, 4, 5, 6, 10, 20, 40, 80, 100].forEach(function(side, index) {
var x = ((index / 3) >> 0) * 100 - 100,
        y = index % 3 * 100 - 100;
    node = new ht.Node();
    node.p3(x, 40, y);
    node.s3(80, 80, 80);
    node.s({
    'shape3d': 'cylinder',
    'shape3d.image': 'img11',
    'shape3d.side': side,
    'note': 'side: ' + side,
    'note.autorotate': true,
    'note.position': 17,
    'note.face': 'top',
    'note.background': '#979EAF'
    });
    dm.add(node);
});
[    'star', 'rect', 'roundRect', 'triangle',
'rightTriangle', 'parallelogram', 'trapezoid'].forEach(function(shape, index) {
var x = index * 100 - 300;
    node = new ht.Node();
    node.p3(x, 40, 0);
    node.s3(80, 80, 80);
    node.s({
    'shape3d': shape,
    'shape3d.image': 'img11'
    });
    dm.add(node);
});
node = new ht.Node();
node.s3(80, 80, 80);
node.p3(-50, 40, 50);
node.s({
'shape3d':
'cylinder',
'shape3d.side': 4,
'shape3d.image': 'img11'});
dm.add(node);

node = new ht.Node();
node.s3(80, 80, 80);
node.p3(50, 40, 50);
node.s({
'shape3d':
'cylinder',
'shape3d.side': 3,
'shape3d.image': 'img11'});
dm.add(node);

node = new ht.Node();
node.s3(80, 80, 80);
node.p3(-50, 40, -50);
node.s({
'shape3d': 'rect',
'shape3d.image': 'img11'});
dm.add(node);

node = new ht.Node();
node.s3(80, 80, 80);
node.p3(50, 40, -50);
node.s({
'shape3d': 'triangle',
'shape3d.image': 'img11'});
dm.add(node);
The above is the detailed content of Detailed introduction to the graphic and text code for constructing 3D scenes based on HTML5 WebGL technology (1). For more information, please follow other related articles on the PHP Chinese website!
 What are the production methods of html5 animation production?
 The difference between HTML and HTML5
 National Anti-Fraud Center Call Warning
 Will the Bitcoin inscription disappear?
 How to buy and sell Bitcoin on okex
 403forbidden solution
 How to solve problems when parsing packages
 propertydescriptor usage


