This article mainly introduces m.sbmmt.com/wiki/1498.html" target="_blank">A simple introduction to Node.js and Express, and details how to build a web server with Node.js and Express , if you are interested, you can learn about it
It’s just an introduction to how to build a web server with Node.js and Express, it doesn’t explain too many conceptual things. , Introduction to Nodejs
==Node is the server running environment for the Javascript
language ==The so-called "running environment." "It has two meanings: first, the Javascript language runs on the server through Node. In this sense, Node is a bit like a Javascript virtual machine; second, Node provides a large number of tool libraries that enable the Javascript language to interact with the operating system (such as reading and writing files, creating new Subprocess), in this sense, Node is also a tool library for Javascript. Node uses Google's V8 engine internally as the Javascript language interpreter; it calls operating system resources through the self-developed libuv library.
2. Node.js download and installation
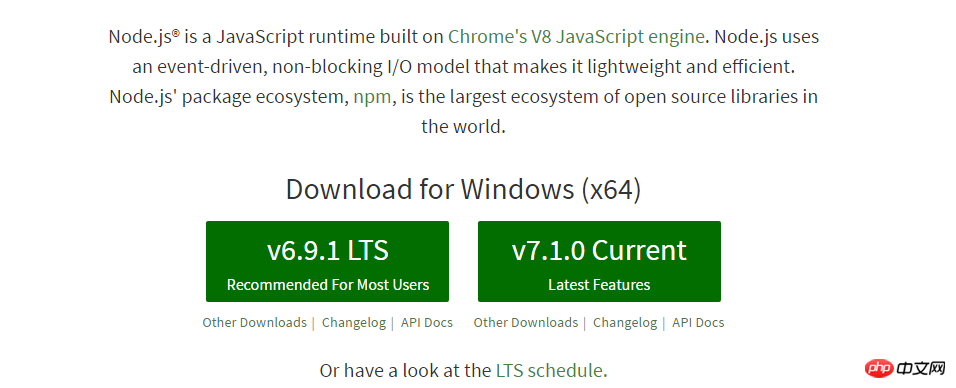
2.1 Node.js downloadThe official website will download and install Node.js according to your current Operating system, provide you with the most suitable version to download
##2.2 Installation
After successful download, there will be an msi file, double-click it to install. Yes. After the installation is successful, the corresponding environment variables  will be automatically configured, and we do not need to manually configure
## to install successfully. 2.3 Test whether Node.js is installed successfully
After the installation is successful, you can check whether the installation is successful in the window console. 
node -v
node
##Create a nodeproject directory and create a js file. 01_hello.js
var num1 = 10;
var num2 = 20;
console.log(num1 + num2);
In the windows console, switch to the directory where the js file is located and enter
 node. 01_hello.js
3. Clarification of some basic concepts in Node.js
3.1 Node.js is not a JS application, but a JS running platform
Since it is not a Javascript application, why is it called .js? Because Node.js is a Javascript running environment. When it comes to Javascript, the first thing that comes to mind is the browser you use every day. Modern browsers include various components, including rendering engines, Javascript engines, etc. The Javascript engine is responsible for interpreting and executing the Javascript code in web pages. As one of the most important languages for the Web front-end, Javascript has always been the patent of front-end engineers. However, Node.js is a back-end Javascript running environment (supported systems include Linux, Windows), which means you can write system-level or server-side Javascript code and leave it to Node.js for interpretation and execution ,
3.2 The relationship between Node.js and JavascriptJavascript includes 3 parts: ECMAscript-262, BOM, and DOM. The BOM is related to the browser, and the DOM is related to the HTML page. Node.js just includes ECMAscript-262. Therefore, some of our previous operations on BOM and DOM were run on the browser side and cannot be used in Node.js.3.3 Several global variables in Node.js
global: represents the global environment where Node is located , similar to the browser's  window object
property
of a global object. For example, var x = 1 is equivalent to setting window.x = 1, but this is not the case with Node. , at least not in modules (the REPL environmentprocess: This object represents the current process in which Node is located, allowing developers to interact with the process.
console:指向Node内置的console模块,提供命令行环境中的标准输入、标准输出功能。
3.4 Node.js中的几个全局函数
setTimeout():用于在指定毫秒之后,运行回调函数。实际的调用间隔,还取决于系统因素。间隔的毫秒数在1毫秒到2,147,483,647毫秒(约24.8天)之间。如果超过这个范围,会被自动改为1毫秒。该方法返回一个整数,代表这个新建定时器的编号。
clearTimeout():用于终止一个setTimeout方法新建的定时器。
setInterval():用于每隔一定毫秒调用回调函数。由于系统因素,可能无法保证每次调用之间正好间隔指定的毫秒数,但只会多于这个间隔,而不会少于它。指定的毫秒数必须是1到2,147,483,647(大约24.8天)之间的整数,如果超过这个范围,会被自动改为1毫秒。该方法返回一个整数,代表这个新建定时器的编号。
clearInterval():终止一个用setInterval方法新建的定时器。
require():用于加载模块。
Buffer():用于操作二进制数据。
3.5 Node.js的核心模块
如果只是在服务器运行Javascript代码,用处并不大,因为服务器脚本语言已经有很多种了。Node.js的用处在于,它**本身**还提供了一系列功能模块,与操作系统互动。这些核心的功能模块,不用安装就可以使用,下面是它们的清单。
http:提供HTTP服务器功能。
url:解析URL。
fs:与文件系统交互。
querystring:解析URL的查询字符串。
child_process:新建子进程。
util:提供一系列实用小工具。
path:处理文件路径。
crypto:提供加密和解密功能,基本上是对OpenSSL的包装。
三、搭建web应用
使用Node.js搭建web服务器,一般使用一些框架来帮助完成。
express 是一个开源的node.js项目框架,初学者使用express可以快速的搭建一个Web项目,express中已经集成了Web的http服务器创建、请求和文件管理以及Session的处理等功能,所以express是非常适合初学者的入门学习。
3.1 安装Express框架
使用node.js自带的包管理器npm安装。
创建一个项目目录,Node_Hello。进入该目录,创建一个package.json文件,文件内容如下:
{
 "name": "Node_Hello",
 "description": "nodejs hello world app",
 "version": "0.0.1",
 "private": true,
 "dependencies": {
  "express": "4.x"
 }
}上面代码定义了项目的名称、描述、版本等,并且指定需要4.0版本以上的Express。
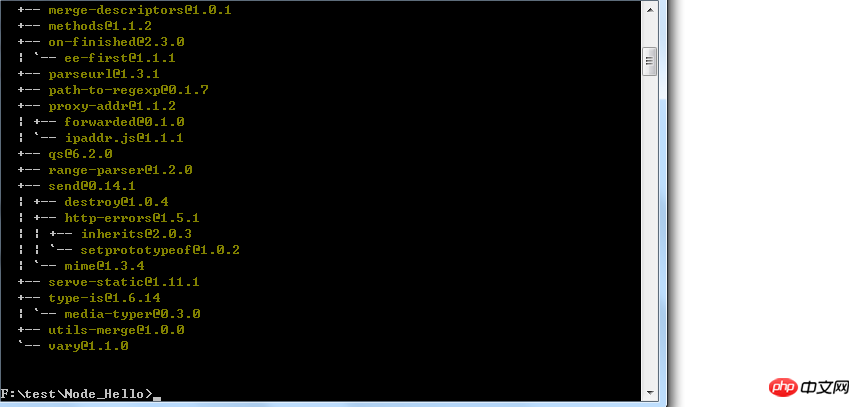
==从控制台首先进入刚才的项目目录==,然后输入如下命令,则会开始下载Express。
npm install

下载完成


3.2 创建启动文件
在上面的项目目录下,新建一个启动文件,名字暂叫 ==index.js== 。书写如下代码:
var express = require('express');
var app = express();
app.get('/', function (req, res) {
res.send('<h1>你好,这是我们的第一个nodejs项目</h1>');
});
app.listen(8080);3.3 运行index.js文件
node index.js
3.4 使用浏览器访问
在浏览器输入下面的地址就可以访问我们刚刚搭建的web网站了。
127.0.0.1:8080
四、使用Webstorm搭建Node.js web应用
使用webstorm搭建Node.js应用更加方便。
4.1 下载WebStorm,并安装
下载完成后,直接安装即可。
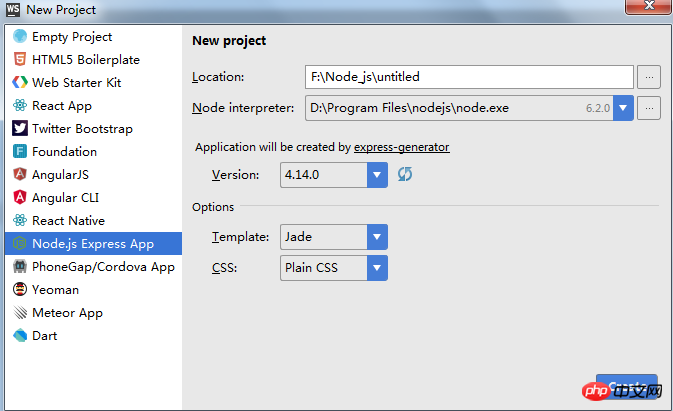
4.2 创建Node + Express应用

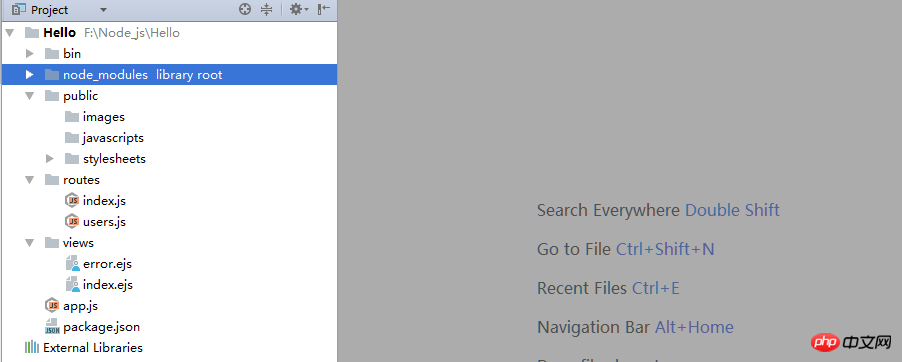
4.3 Project目录结构

app.js:启动文件,或者说入口文件
package.json:存储着工程的信息及模块依赖,当在 dependencies 中添加依赖的模块时,运行 npm install ,npm 会检查当前目录下的 package.json,并自动安装所有指定的模块
node_modules:存放 package.json 中安装的模块,当你在 package.json 添加依赖的模块并安装后,存放在这个文件夹下
public:存放 image、css、js 等文件
routes:存放路由文件
views:存放视图文件或者说模版文件
bin:存放可执行文件(www)
4.4 各个主要文件的说明
4.4.1 app.js
//加载模块
var express = require('express');
var path = require('path');
var favicon = require('serve-favicon');
var logger = require('morgan');
var cookieParser = require('cookie-parser');
var bodyParser = require('body-parser');
//加载路由文件
var index = require('./routes/index');
var users = require('./routes/users');

// 生产一个express的实例
var app = express();

// view engine setup
/*
设置 views 文件夹为存放视图文件的目录,
即存放模板文件的地方,dirname 为全局变量,
存储当前正在执行的脚本所在的目录。
 */
app.set('views', path.join(dirname, 'views'));
//设置模板引擎为ejs
app.set('view engine', 'ejs');

// uncomment after placing your favicon in /public
//app.use(favicon(path.join(dirname, 'public', 'favicon.ico')));
//加载日志中间件
app.use(logger('dev'));
//加载解析json的中间件
app.use(bodyParser.json());
//加载解析urlencoded请求体的中间件。 post请求
app.use(bodyParser.urlencoded({extended: false}));
//加载解析cookie的中间件
app.use(cookieParser());
//设置public文件夹为放置静态文件的目录
app.use(express.static(path.join(dirname, 'public')));

// 路由控制器。
app.use('/', index); // http://localhost:3000
app.use('/users', users);  //http://localhost:3000/users


// catch 404 and forward to error handler
app.use(function (req, res, next) {
  var err = new Error('Not Found');
  err.status = 404;
  next(err);
});

// error handler
app.use(function (err, req, res, next) {
  // set locals, only providing error in development
  res.locals.message = err.message;
  res.locals.error = req.app.get('env') === 'development' ? err : {};

  // render the error page
  res.status(err.status || 500);
  res.render('error');
});

//把app导出。 别的地方就可以通过 require("app") 获取到这个对象
module.exports = app;4.4.2 bin/www
#!/usr/bin/env node //表明是node可执行文件

/**
 * Module dependencies.
 */
//引入我们在app.js中导出的app模块
var app = require('../app');
//引入debuger模块,打印调试日志
var debug = require('debug')('hello:server');
//引入http模块
var http = require('http');

/**
 * Get port from environment and store in Express.
 */

var port = normalizePort(process.env.PORT || '3000');
app.set('port', port); //设置端口号

/**
 * Create HTTP server.
 */
//创建Http服务器
var server = http.createServer(app);

/**
 * Listen on provided port, on all network interfaces.
 */
//监听指定的端口
server.listen(port);
//监听error事件。 onError是发生错误的时候的回调函数
server.on('error', onError);
//监听listening事件
server.on('listening', onListening);

/**
 * Normalize a port into a number, string, or false.
 */

function normalizePort(val) {
 var port = parseInt(val, 10);

 if (isNaN(port)) {
  // named pipe
  return val;
 }

 if (port >= 0) {
  // port number
  return port;
 }

 return false;
}

/**
 * Event listener for HTTP server "error" event.
 */

function onError(error) {
 if (error.syscall !== 'listen') {
  throw error;
 }

 var bind = typeof port === 'string'
  ? 'Pipe ' + port
  : 'Port ' + port;

 // handle specific listen errors with friendly messages
 switch (error.code) {
  case 'EACCES':
   console.error(bind + ' requires elevated privileges');
   process.exit(1);
   break;
  case 'EADDRINUSE':
   console.error(bind + ' is already in use');
   process.exit(1);
   break;
  default:
   throw error;
 }
}
/**
 * Event listener for HTTP server "listening" event.
 */

function onListening() {
 var addr = server.address();
 var bind = typeof addr === 'string'
  ? 'pipe ' + addr
  : 'port ' + addr.port;
 debug('Listening on ' + bind);
}4.4.3 routes/index.js
var express = require('express');
var router = express.Router();

/* GET home page. */
router.get('/', function(req, res, next) {
 res.render('index', { title: '育知同创' });
});

module.exports = router;
/*
 生成一个路由实例用来捕获访问主页的GET请求,
 导出这个路由并在app.js中通过app.use('/', routes);
 加载。这样,当访问主页时,就会调用res.render('index', { title: '育知同创' });
 渲染views/index.ejs模版并显示到浏览器中。
*/4.4.4 对路由写法的优化
在前面的==app.js中==,每个模板都有添加一次路由比较麻烦,其实应该把添加路由的事情专门交给index.js来做。也就是可以把多个路由放在一个路由文件中。
//加载路由文件
var index = require('./routes/index'); //去掉
var users = require('./routes/users'); //去掉
// 路由控制器。
app.use('/', index); // http://localhost:3000 //去掉
app.use('/users', users);  //http://localhost:3000/users  //去掉
可以改成:
var routes = require('./routes/index');
routes(app);
==index.js==文件优化成: 这样管理起来就方便很多
module.exports = function (app) {
 //一个get请求的路由 http://localhost:3000
 app.get("/", function (req, res) {
   res.render("index", {title:"育知同创abc"})
 });
 //又一个请求路由:http://localhost:3000/abc
 app.get("/abc", function (req, res) {
   res.render("index", {title:"育知同创" + req.path})
 });
}4.4.5 ejs模板
模板引擎(Template Engine)是一个将页面模板和要显示的数据结合起来生成 HTML 页面的工具。如果说上面讲到的 express 中的路由控制方法相当于 MVC 中的控制器的话,那模板引擎就相当于 MVC 中的视图。
模板引擎的功能是将页面模板和要显示的数据结合起来生成 HTML 页面。它既可以运 行在服务器端又可以运行在客户端,大多数时候它都在服务器端直接被解析为 HTML,解析完成后再传输给客户端,因此客户端甚至无法判断页面是否是模板引擎生成的。有时候模板引擎也可以运行在客户端,即浏览器中,典型的代表就是 XSLT,它以 XML 为输入,在客户端生成 HTML 页面。但是由于浏览器兼容性问题,XSLT 并不是很流行。目前的主流还是由服务器运行模板引擎。
在 MVC 架构中,模板引擎包含在服务器端。控制器得到用户请求后,从模型获取数据,调用模板引擎。模板引擎以数据和页面模板为输入,生成 HTML 页面,然后返回给控制器,由控制器交回客户端。
==ejs 是模板引擎的一种,它使用起来十分简单,而且与 express 集成良好。==
我们通过以下两行代码设置了模板文件的存储位置和使用的模板引擎:(app.js文件中进行的设置)
app.set('views', dirname + '/views');
app.set('view engine', 'ejs');
<!DOCTYPE html> <html> <head> <title><%= title %></title> <link rel='stylesheet' href='/stylesheets/style.css' /> </head> <body> <h1><%= title %></h1> <p>Welcome to <%- title %></p> </body> </html>
说明:
ejs 的标签系统非常简单,它只有以下三种标签:
<% code %>:Javascript 代码。
<%= code %>:显示替换过 HTML 特殊字符的内容。(也就是说如果code中有标签,则会原样输出,不会让浏览器解析)
<%- code %>:显示原始 HTML 内容。(如果有a标签,在浏览器端这则会看到一个超链接)
路由代码:
router.get('/', function(req, res, next) {
res.render('index', { title: "<a href='http://www.baidu.com'>百度 </a>"});
});
// 则会用title的值去替换ejs中的相应的代码。则生成的代码:
<!DOCTYPE html> <html> <head> <title><a href='http://www.baidu.com'>百度 </a></title> <link rel='stylesheet' href='/stylesheets/style.css' /> </head> <body> <h1><a href='http://www.baidu.com'>百度 </a></h1> <p>Welcome to <a href='http://www.baidu.com'>百度 </a></p> </body> </html>
The above is the detailed content of A brief introduction to getting started with Node.js and Express (pictures and text). For more information, please follow other related articles on the PHP Chinese website!


