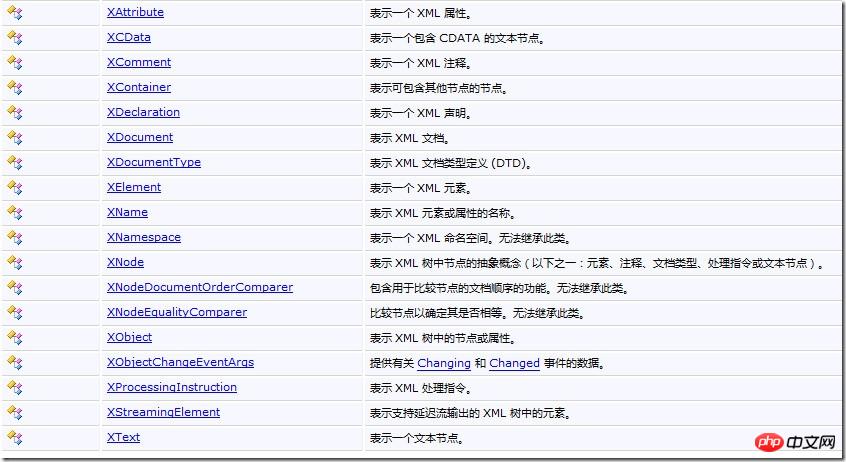

The following code demonstrates how to use LINQ to XML to quickly create an xml:
public static void CreateDocument() { string path = @"d:\website"; XDocument xdoc = new XDocument(new XDeclaration("1.0", "utf-8", "yes"), new XElement("Root", "root")); xdoc.Save(path); }
Running this example will get an xml file with the following content:
root
The XElement class is LINQ One of the base classes in to XML. It represents an XML element. You can use this class to create an element; change the element's content; add, change, or delete child elements; add attributes to the element; or serialize the element's content in text format. It also interoperates with other classes in System.Xml, such as XmlReader, XmlWriter, and XslCompiledTransform.
There are many ways to create xml documents using LINQ to XML. The specific method to use depends on actual needs. The simplest and most common way to create xml documents is to use the XElement class. The following code demonstrates how to use the XElement class to create an xml document:
This is a piece of program code.
public static void CreateCategories() { string path = @"d:\website"; XElement root = new XElement("Categories", new XElement("Category", new XElement("CategoryID", Guid.NewGuid()), new XElement("CategoryName", "Beverages") ), new XElement("Category", new XElement("CategoryID", Guid.NewGuid()), new XElement("CategoryName", "Condiments") ), new XElement("Category", new XElement("CategoryID", Guid.NewGuid()), new XElement("CategoryName", "Confections") ) ); root.Save(path); }
Running this example will result in an xml file whose content is:
57485174-46fc-4e8c-8d98-d25b53d504a1 Beverages 1474dde1-8014-48f7-b093-b47ca5d5b770 Condiments 364224e0-e002-4939-90fc-0fd93e0cf35b Confections
The XElement class contains many methods that make processing xml Got it easy. Please refer to MSDN for these methods.
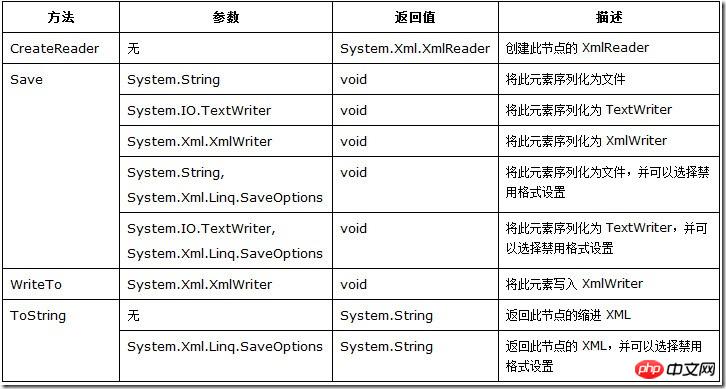
Among them, Save, CreateReader, ToString and WriteTo methods are the three more commonly used methods:

The XAttribute class is used to process the attributes of elements. Attributes are "name-value" pairs associated with elements. Each element cannot have attributes with repeated names. Using the XAttribute class is very similar to using the XElement class. The following example demonstrates how to add an attribute to an xml tree when creating it:
public static XElement CreateCategoriesByXAttribute() { XElement root = new XElement("Categories", new XElement("Category", new XAttribute("CategoryID", Guid.NewGuid()), new XElement("CategoryName", "Beverages") ), new XElement("Category", new XAttribute("CategoryID", Guid.NewGuid()), new XElement("CategoryName", "Condiments") ), new XElement("Category", new XAttribute("CategoryID", Guid.NewGuid()), new XElement("CategoryName", "Confections") ) ); root.Save(path); return root; }
Running this example will get an xml file whose content is:
Beverages Condiments Confections
The XAttribute class has relatively few methods, and the three commonly used ones are:

The following example uses Remove to delete the CategoryID attribute of the first element:
public static void RemoveAttribute() { XElement xdoc = CreateCategoriesByXAttribute(); XAttribute xattr = xdoc.Element("Category").Attribute("CategoryID"); xattr.Remove(); xdoc.Save(path); }
Running this example will result in an xml file with the following content:
Beverages Condiments Confections
As an experiment, try the following method of deleting attributes:
public static void RemoveAttributeByDoc() { XElement xdoc = CreateCategoriesByXAttribute(); XAttribute xattr = xdoc.Attribute("CategoryID"); xattr.Remove(); xdoc.Save(path); }
Running this example will throw a null reference exception because the Categories element does not have a property called CategoryID.
The XDocument class provides methods for processing xml documents, including declarations, comments and processing instructions. An XDocument object can contain the following content:

#The following example creates a simple xml document that contains several elements and an attribute, as well as a processing instruction and some comments :
public static void CreateXDocument() { XDocument xdoc = new XDocument( new XProcessingInstruction("xml-stylesheet", "title='EmpInfo'"), new XComment("some comments"), new XElement("Root", new XElement("Employees", new XElement("Employee", new XAttribute("id", "1"), new XElement("Name", "Scott Klein"), new XElement("Title", "Geek"), new XElement("HireDate", "02/05/2007"), new XElement("Gender", "M") ) ) ), new XComment("more comments") ); xdoc.Save(path); }
Running this example will get an xml file whose content is:
Scott Klein Geek 02/05/2007 M
The XDocument class contains multiple methods that are the same as the XElement class. For specific content, please refer to MSDN. It should be noted that most functions for processing nodes and elements can be obtained through XElement. It is necessary to use the XDocument class only when document-level processing capabilities are absolutely required, and when access to annotations, processing instructions, and declarations is required.
After creating the xml document, you can use the NodesAfterSelf method to return all sibling elements after the specified XElement element. It should be noted that this method only returns sibling elements in the collection, not descendants. This method uses delayed execution. The following code demonstrates this process:
public static void NodesAfterSelf() { XElement root = new XElement("Categories", new XElement("Category", new XElement("CategoryID", Guid.NewGuid()), new XElement("CategoryName", "食品"), new XElement("Description", "可以吃的东西") ) ); foreach (var item in root.Element("Category").Element("CategoryID").NodesAfterSelf()) { Console.WriteLine((item as XElement).Value); } }
This section will introduce the related concepts of LINQ to XML programming, such as how to load xml, create Brand new xml, manipulate xml information and traverse xml documents.
使用LINQ to XML加载xml可以从多种数据源获得,例如字符串、XmlReader、TextReader或文件。
下面的示例演示了如何从文件中加载xml:
public static void LoadFromFile() { XElement root = XElement.Load(path); Console.WriteLi
也可以使用Parse方法从一个字符串加载xml:
public static void LoadFromString() { XElement root = XElement.Parse(@" 1 Beverages Soft drinks, coffees, teas, beers, and ales "); Console.WriteLine(root.ToString()); }
在前面的示例中曾多次调用XElement对象的Save方法来保存xml文档,在这里就不冗述了。
在前面的示例中曾多次调用XElement对象的构造函数来创建xml文档,在这里就不冗述了。需要说明的是,在使用LINQ to XML创建xml文档时,会有代码缩进,这使代码的可读性大大加强。
使用LINQ to XML在xml树中遍历xml是相当简单的。只需要使用XElement和XAttribute类中所提供的方法。Elements和Element方法提供了定位到某个或某些元素的方式。下面的示例演示了如何遍历xml树,并获取指定元素的方式:
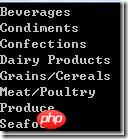
public static void Enum() { XElement root = new XElement("Categories"); using (NorthwindDataContext db = new NorthwindDataContext()) { root.Add( db.Categories .Select ( c => new XElement ( "Category" , new XElement("CategoryName", c.CategoryName) ) ) ); } foreach (var item in root.Elements("Category")) { Console.WriteLine(item.Element("CategoryName").Value); } }
上述代码运行的结果为:

是不是很简单呢?Nodes()、Elements()、Element(name)和Elements(name)方法为xml树的导航提供了基本功能。
LINQ to XML一个重要的特性是能够方便地修改xml树,如添加、删除、更新和复制xml文档的内容。
I.插入
使用XNode类的插入方法可以方便地向xml树添加内容:

在下面的示例中,使用AddAfterSelf方法向现有xml中添加一个新节点:
public static void AddAfterSelf() { XElement root = XElement.Parse(@" 1 Beverages Soft drinks, coffees, teas, beers, and ales "); XElement xele = root.Element("Category").Element("CategoryName"); xele.AddAfterSelf(new XElement("AddDate", DateTime.Now)); root.Save(path); }
运行该示例将会得到一个xml文件,其内容为:
1 Beverages 2010-01-31T03:08:51.813736+08:00 Soft drinks, coffees, teas, beers, and ales
当需要添加一个元素到指定节点之前时,可以使用AddBeforeSelf方法。
II.更新
在LINQ to XML中更新xml内容可以使用以下几种方法:

在下面的示例中使用了ReplaceWith与SetElementValue方法对xml进行了更新操作:
public static void Update() { XElement root = XElement.Parse(@" 1 Beverages Soft drinks, coffees, teas, beers, and ales "); root.Element("Category").Element("CategoryID").ReplaceWith(new XElement("ID", "2")); root.Element("Category").SetElementValue("CategoryName", "test data"); root.Save(path); }
运行该示例将会得到一个xml文件,其内容为:
2 test data Soft drinks, coffees, teas, beers, and ales
III.删除
可以使用Remove(XElement)与RemoveAll方法来删除xml。
在下面的示例中,使用了RemoveAll方法:
} public static void Remove() { string path = @"d:\"; XElement root = XElement.Parse(@" 1 Beverages Soft drinks, coffees, teas, beers, and ales "); root.RemoveAll(); root.Save(path); }
运行该示例将会得到一个xml文件,其内容为:
在下面的示例中,使用了Remove方法删除了xml的Description元素:
public static void Remove() { XElement root = XElement.Parse(@" 1 Beverages Soft drinks, coffees, teas, beers, and ales "); root.Element("Category").Element("Description").Remove(); root.Save(path); }
运行该示例将会得到一个xml文件,其内容为:
1 Beverages
I.添加
LINQ to XML添加属性与添加元素师类似的,可以使用构造函数或者Add方法来添加属性:
public static void AddAttribute() { XElement root = new XElement("Categories", new XElement("Category", new XAttribute("CategoryID", "1"), new XElement("CategoryName", "Beverages"), new XElement("Description", "Soft drinks, coffees, teas, beers, and ales") ) ); root.Element("Category").Add(new XAttribute("AddDate", DateTime.Now.ToShortDateString())); root.Save(path); }
运行该示例将会得到一个xml文件,其内容为:
Beverages Soft drinks, coffees, teas, beers, and ales
II.检索
检索属性可以使用Attribute(name)方法:
public static void SelectAttribute() { XElement root = new XElement("Categories", new XElement("Category", new XAttribute("CategoryID", "1"), new XElement("CategoryName", "Beverages"), new XElement("Description", "Soft drinks, coffees, teas, beers, and ales") ) ); XAttribute xattr = root.Element("Category").Attribute("CategoryID"); Console.WriteLine(xattr.Name); Console.WriteLine(xattr.Value); }
上述代码的运行结果为:
CategoryID 1
本文介绍了LINQ to XML的编程基础,即System.Xml.Linq命名空间中的多个LINQ to XML类,这些类都是LINQ to XML的支持类,它们使得处理xml比使用其他的xml工具容易得多。在本文中,着重介绍的是XElement、XAttribute和XDocument。
以上就是LINQ to XML 编程基础的图文代码详细介绍的内容,更多相关内容请关注PHP中文网(m.sbmmt.com)!


