With the help of Brother Chao, we completed the construction of a mysql database cluster based on the InnoDb data engine and implemented the master-slave replication function. This blog post introduces how to install mysql using binary. The specific implementation steps are as follows:
Software usage instructions:
Liunx system: centOS 7
Database version: mysql-5.6.12-linux-glibc2.5-x86_64.tar
1, Download the files required for centos7 newly installed system:
yum install libaio
yum install 'perl(Data::Dumper)'
yum -y install perl perl-devel
2, Enter the user’s home directory to create the tools folder
# cd ~
#mkdir tools
#cd tools
3、 Download MySQL5.6 binary package
Download wget tool:
rpm ivh wget-1.12-1.4.el6.x86_64.rpm
wget http://cdn.mysql.com//archives/mysql-5.6/mysql-5.6.12-linux-glibc2.5-x86_64.tar.gz
(也可以从云盘下载:http://pan.baidu.com/s/1i44FJWL)
3. Add mysql user and user group
# groupadd mysql
# useradd -g mysql mysql
4. Unzip the binary installation package
# tar zxvf mysql-5.6.12-linux-glibc2.5-x86_64.tar.gz
5. Create the /application/data and /application/mysql folders
# mkdir /application/data -p
6. Unzip the mysql-5.6.12-linux-glibc2.5-x86_64 Rename it to mysql
# mv mysql-5.6.12-linux-glibc2.5-x86_64 /application
# mv /application/mysql-5.6.12-linux-glibc2.5-x86_64/ /application/mysql
7. Modify the user and user group of the mysql folder to mysql
# cd /application/mysql
#chown -R mysql:mysql ./
8. Mysql has been installed. Next, you need to initialize the mysql table, information table, etc.
#scripts/mysql_install_db --user=mysql --basedir=/application/mysql --datadir=/application/data
9. Set up the configuration file to start mysqld and mysql
# cp /application/mysql/support-files/mysql.server /etc/init.d/mysqld
# cp /application/mysql/my.cnf /etc/my.cnf
10. Modify the configuration file
# vi /etc/my.cnf
basedir =/application/mysql
datadir = /application/data
port = 3306
server_id = 1
11. Create a soft link to start mysql
# ln -s /application/mysql/bin/mysql /usr/bin
12. Set mysql to start automatically at boot
# chkconfig mysqld on
13. Turn off the firewall
#
systemctl start firewalld.service
# systemctl stop firewalld.service
# systemctl disable firewalld.service  禁止开机启动
14. Start the service:
# service mysqld start
15. Create a user:
#mysql –uroot –p
 mysql>create user mysql identified by 'mysql';
分配用户权限: mysql>grant all privileges on *.* to 'mysql'@'%' identified by 'mysql';
Building a database is the first step to implement a mysql cluster. The editor uses virtual machine cloning to quickly implement multiple replications when setting up one server, saving a lot of trouble. However, there will be network problems after replication. If the connection fails, use the following method to solve the problem:
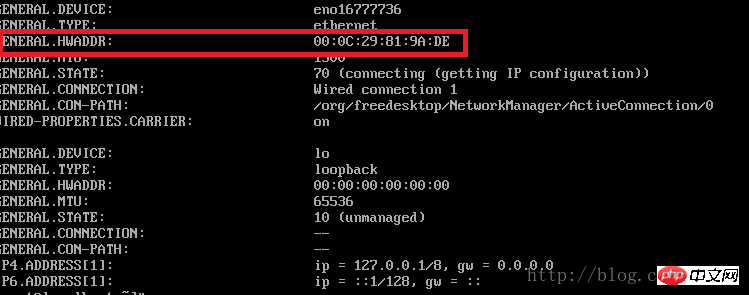
1. Check the host mac address:
# nmcli device show

2. According to the queried mac address, modify the mac address and ip of the network configuration file:
# vi /etc/sysconfig/network-scripts/ifcfg-eno16777736
In this way, the servers required for the cluster have been set up. Please look forward to the following blog post to implement master-slave replication of the database cluster!
The above is the content of actual mysql cluster construction (1)--binary installation of mysql-5.6 under centos7. For more related content, please Follow the PHP Chinese website (m.sbmmt.com)!


